Logical imaging
The Logical imaging module saves you time and storage space by copying only selected files and folders from an individual physical drive, image file, or RAID array in a forensically sound manner, without altering the original content of a source device and its metadata.
As a result of logical imaging, you get an image file in L01 or ZIP format, which contains only the data you selected manually or using include/exclude filters. L01 image will also include MD5/SHA1 hashes of the files.
After the logical imaging process is completed, TaskForce generates a comprehensive report with the details about the source, target, number of imaged files and bytes and more.
Key features of logical imaging in TaskForce
- 25+ parallel logical imaging sessions.
- Pause/Resume for each session.
- L01 or ZIP target images created in a network folder or on a storage drive.
- Compression of a target file is available.
- Supported file systems: NTFS, ext4/3/2, exFAT, XFS, ZFS, Btrfs, APFS (with encrypted volumes), HFS/HFS+, FAT32/16.
- Smart include/exclude filters.
Start logical imaging
There are two ways to start the Logical imaging module in TaskForce.
- From the Homescreen: On the Taskbar, click the Logical icon.
- From the RAID module: On the RAID Configuration page, click the Go to logical button. For details, see Logical imaging of a RAID array.
The Logical icon in the Taskbar.
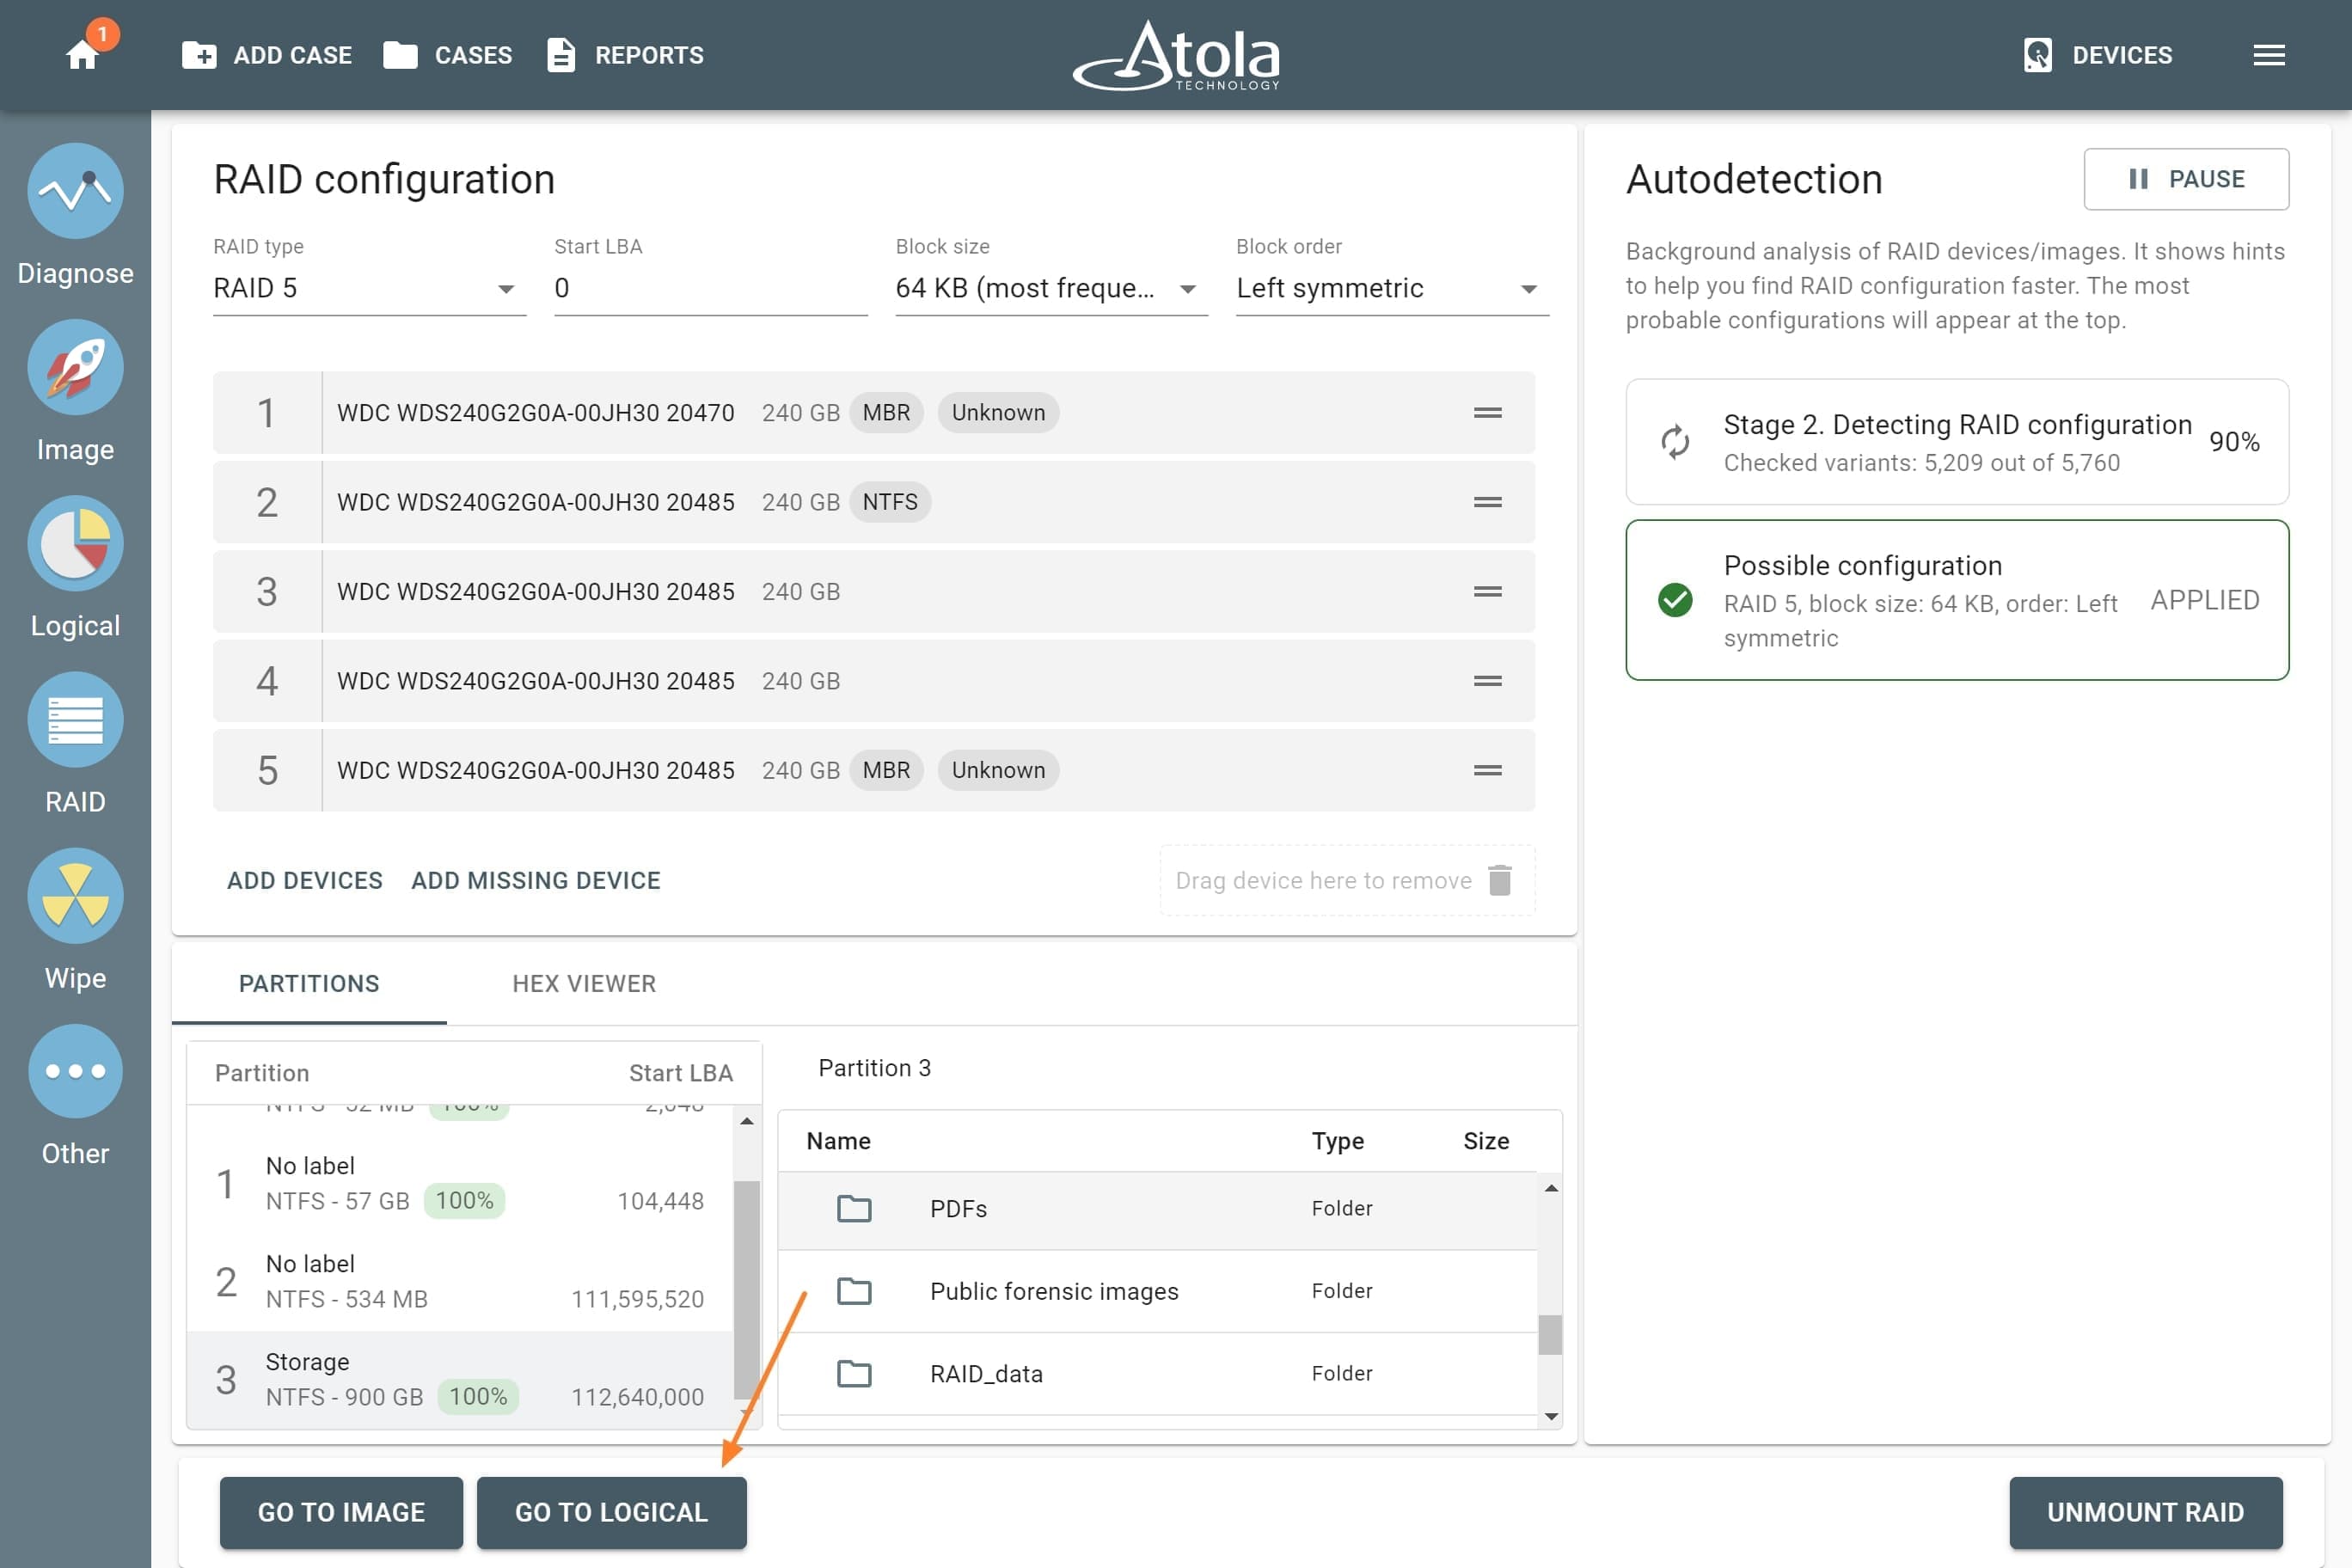
The Go to Logical button on the RAID configuration page.
Logical imaging workflow in TaskForce
Once you started the Logical imaging module, follow these steps to create a logical image of your source device:
- Select your source device.
- Select partitions, folders, or files to image.
- Apply smart filters, if needed.
- Select target file.
- Optional: Pause and resume the imaging process.
- View the logical imaging report.
Let’s see in detail how to perform each step.
Select source device
After clicking the Logical icon on the Taskbar, select your source device.
TaskForce supports the following source types:
-
Individual physical drive:
- SATA,
- SAS,
- NVMe,
- USB,
- IDE,
- drives with M.2 interface within Apple laptops using the Apple PCIe SSD extension module,
- Apple MacBooks with FireWire, Thunderbolt 2, and Thunderbolt 3 interfaces using the Thunderbolt extension module.
-
Image files:
- IMG, RAW, DD
- E01
- AFF4
- Reassembled RAID arrays.
File systems, supported by the Logical imaging module, are NTFS, ext4/3/2, exFAT, XFS, ZFS, Btrfs, APFS (with encrypted volumes), HFS/HFS+, FAT32/16.
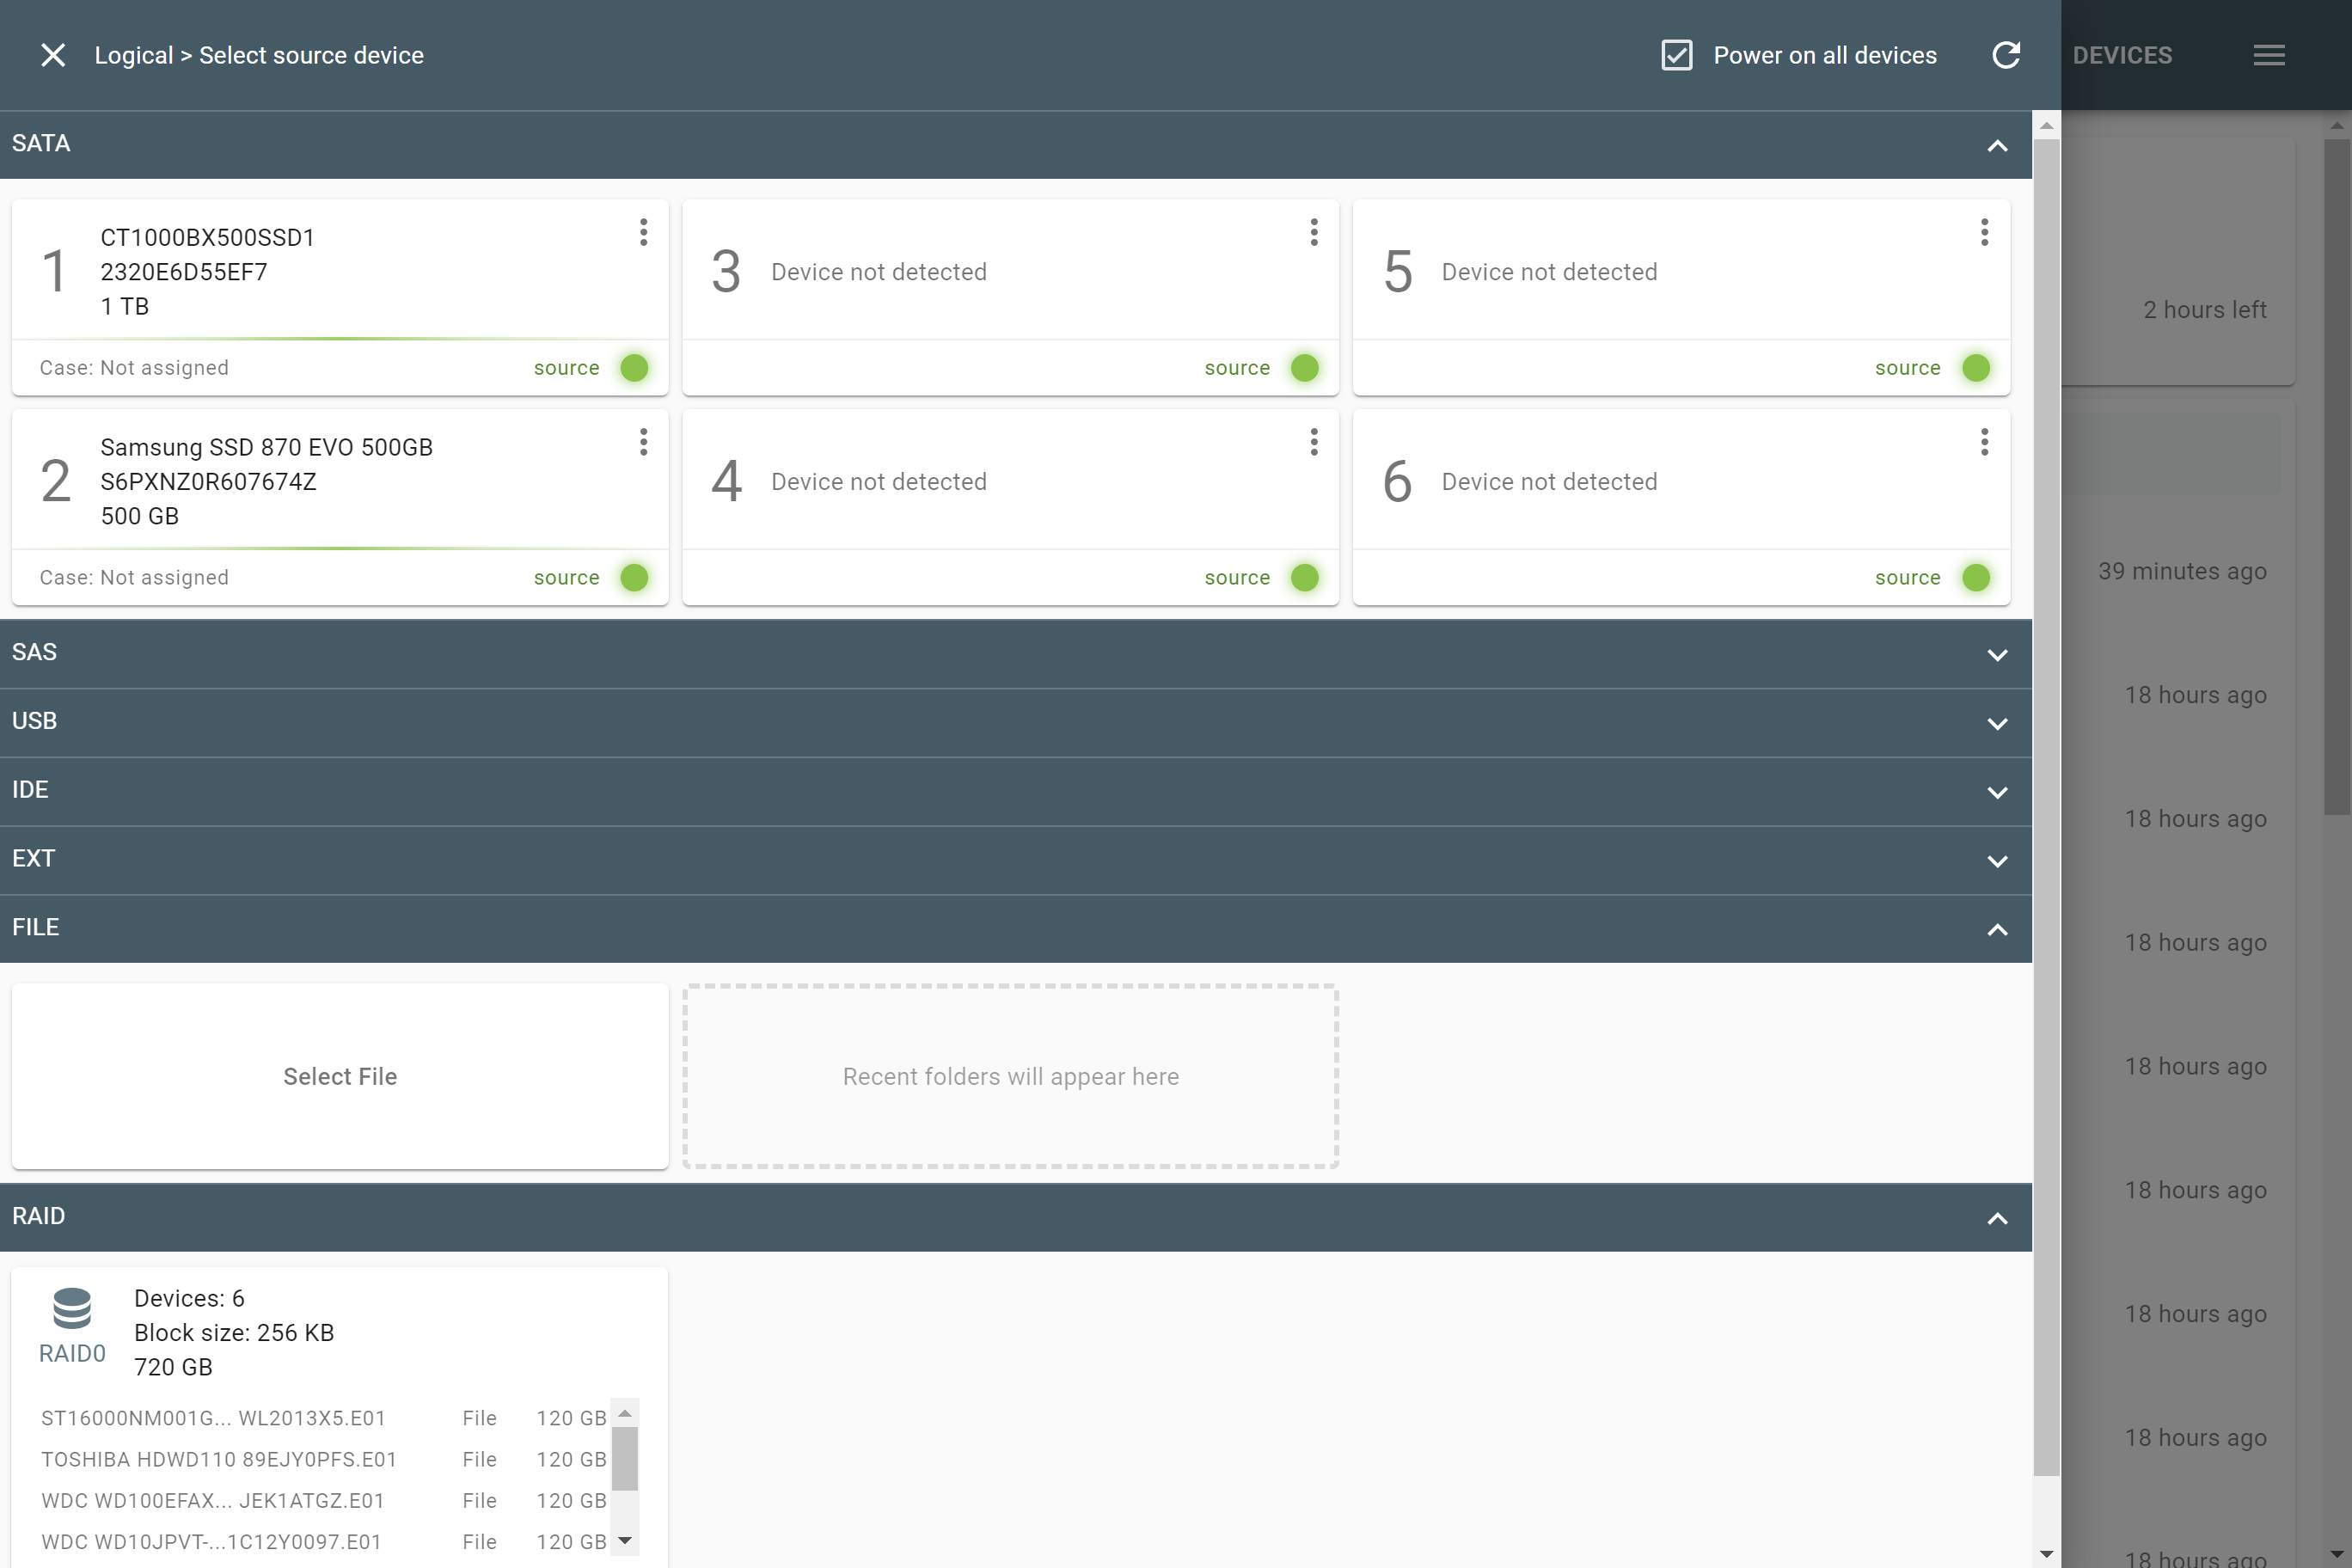
Selecting a source device for logical imaging.
Select partitions, folders, or files to image
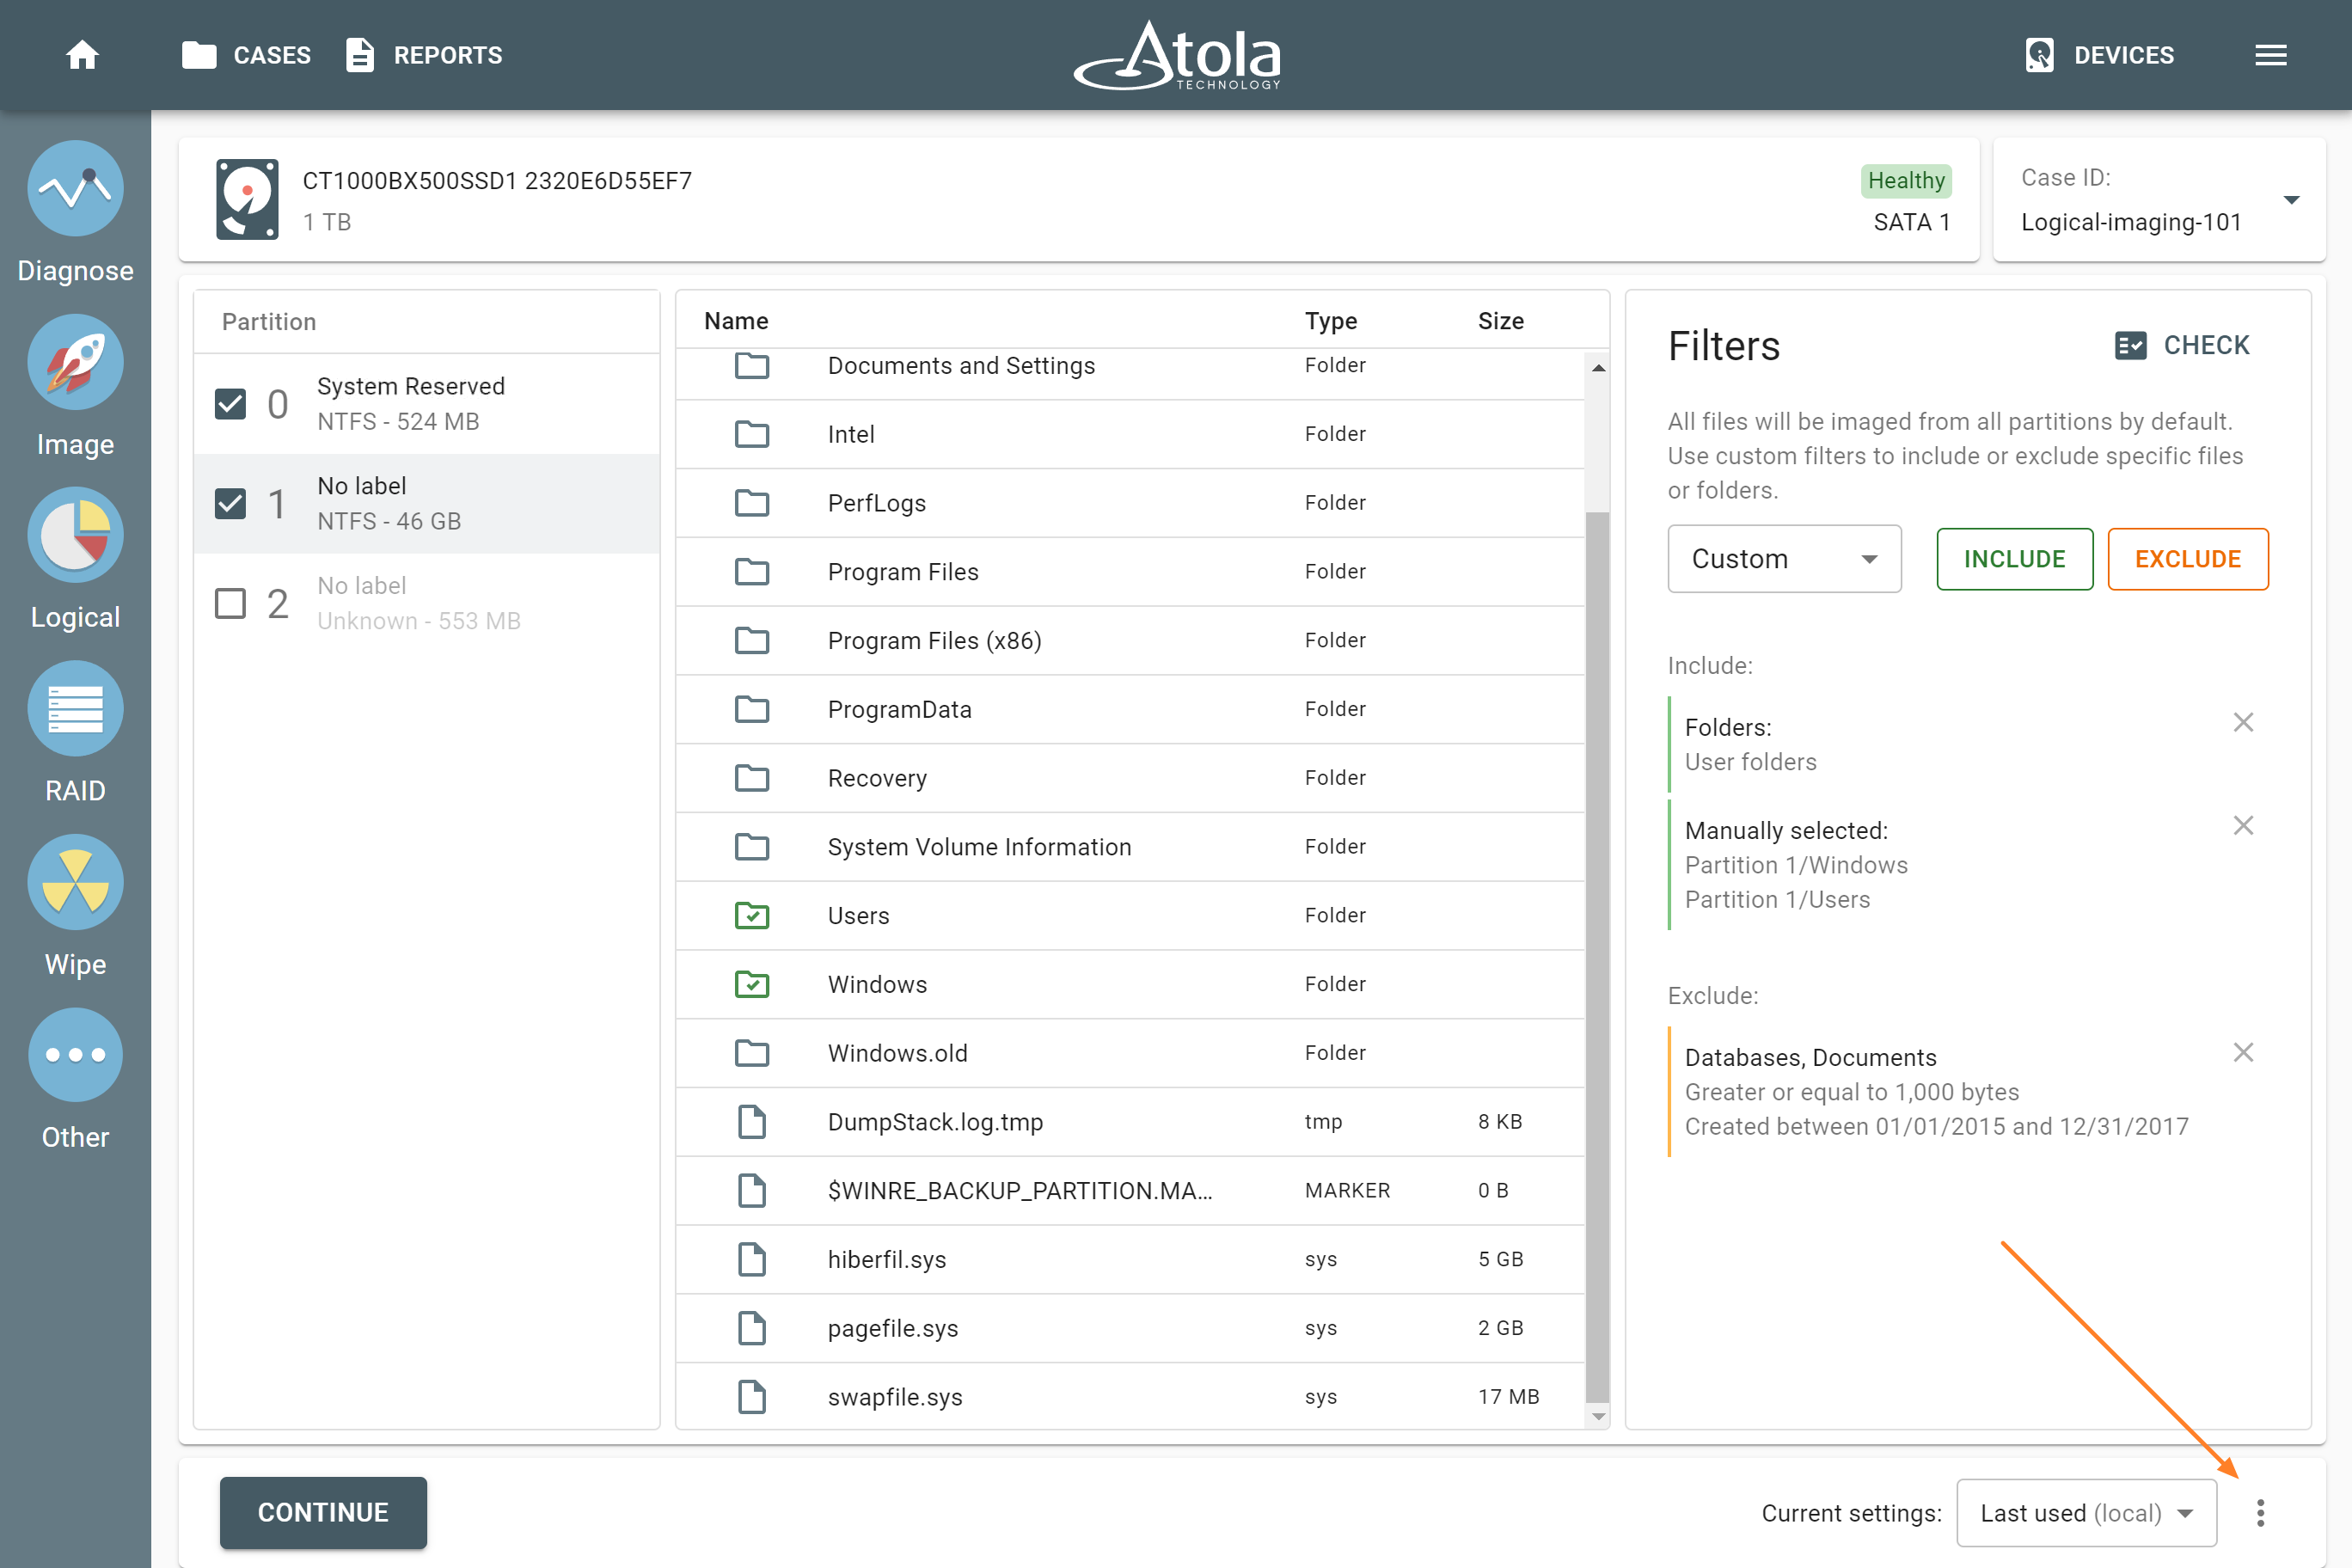
After you select your source device for logical imaging, TaskForce takes you to the Logical imaging page. Here you can preview the content of available partitions and folders, apply smart filters or use presets with predefined filtering settings.
Your source device and its case ID are shown at the top of the page.

Selecting partitions, folders, and files for logical imaging.
Preview, select, or deselect partition
The Partition section on the left lists all the partitions available on your source device.
- To preview the partition contents, click on its name.
- By default, all partitions are selected for imaging.
- To exclude a partition, clear the checkbox next to it.
- To include a partition again, select the checkbox.
Preview folder, manually include or exclude folders and files
Folders and files of the selected partition are shown in the middle section. By default, TaskForce images all files from all partitions.
- To preview a folder's contents, click on the folder name.
- To manually include a folder or file for imaging, click on its icon once. The icon turns green. The folder or file appears in the Filters section on the right as manually included.
- To manually exclude a folder or file, click on its icon twice. The icon turns orange. The folder or file appears in the Filters section on the right as manually excluded.
Use smart filters and presets for selecting folders or files
Automatically include or exclude folders and files for imaging by using the built-in smart filters or custom filtering presets.
The Filters section on the right provides flexible options for fine-tuning your selection of folders and files for imaging.
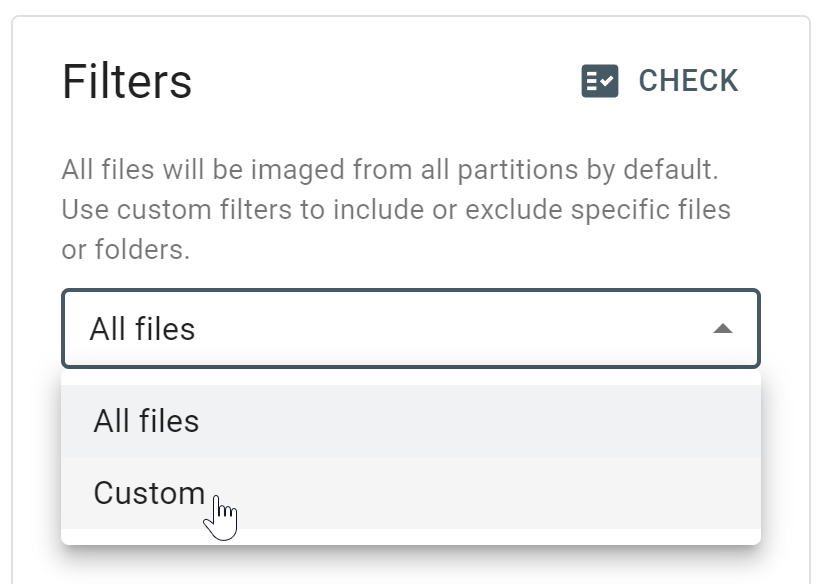
By default, TaskForce images all files from all partitions.
Apply filters
Use smart filters to automatically include or exclude specific files or folders:
- In the Filters section, select the Custom option from the list.
- Click the Include or Exclude button. The respective dialog appears.
-
Automatically include or exclude folders:
- In the respective dialog, select the Folders option from the list at the top.
- Click in the Folders field.
- Select one of the predefined options: User folders or OS folders.
- Or enter the folder paths, separated by commas.
- Click Apply.
-
Automatically include or exclude files:
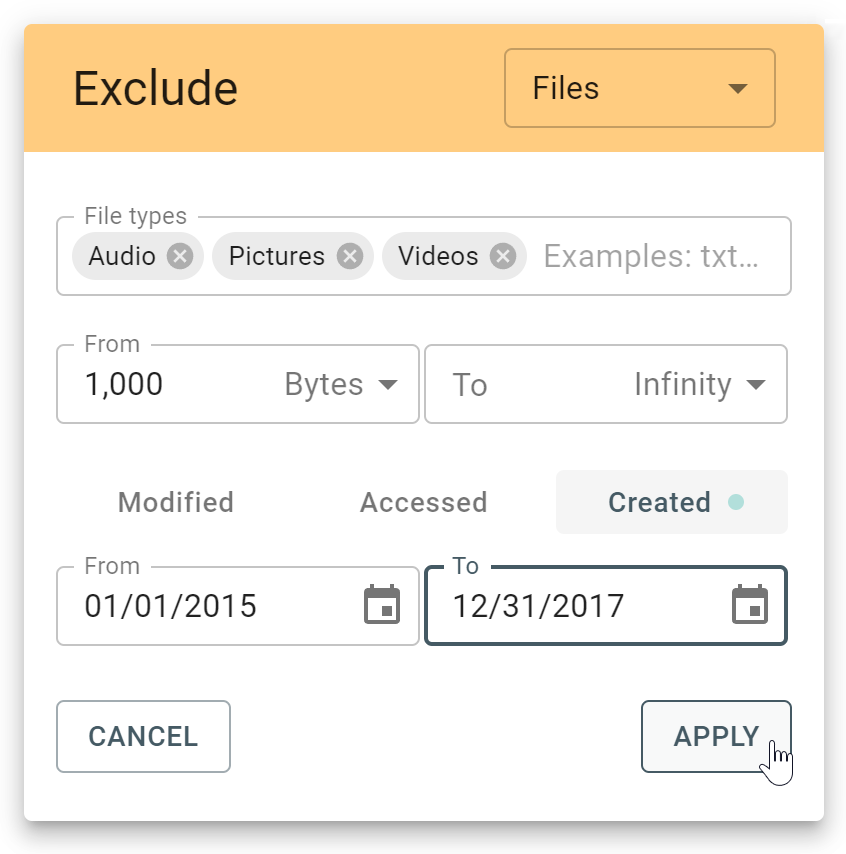
- In the respective dialog, select the Files option from the list at the top.
- Specify File types by selecting predefined options from the list: archives, audio, databases, documents, emails, financial, pictures, security keys, video, and virtual machines. You can enter file extensions yourself as well.
- Enter file size range: from 1 byte to infinity.
- Narrow down time spans: when files were modified, accessed, or created.
- Click Apply.


All applied Include or Exclude filters appear in the Filters section.
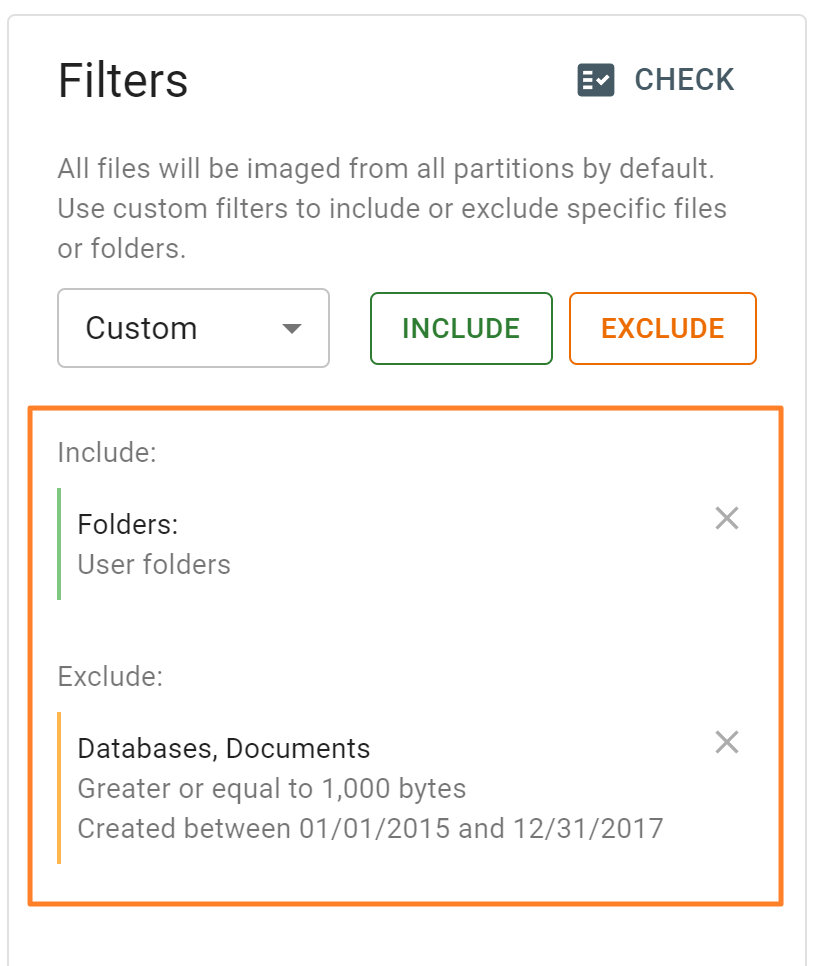
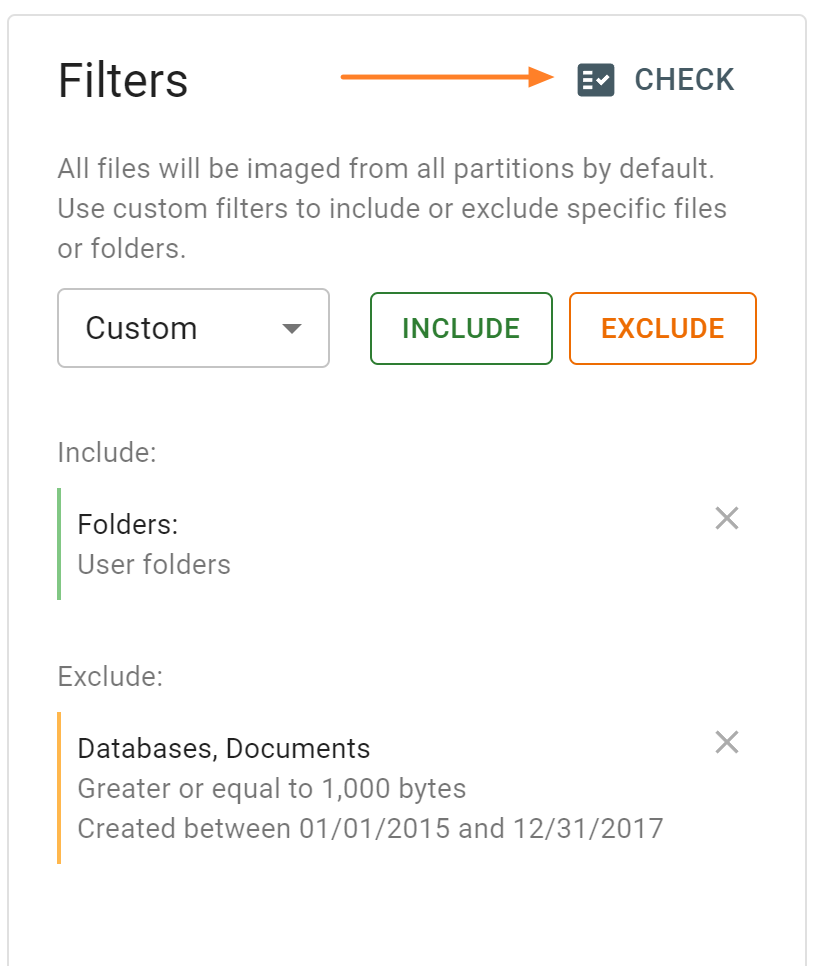
Check filters before imaging
To test your filtering settings before imaging and get a list of files that match the selected filters, click Check at the top of the Filters section:
TaskForce scans the selected partition(s) and lists all files matching the filtering criteria. You can download this file list in CSV format by clicking the Download button at the bottom.
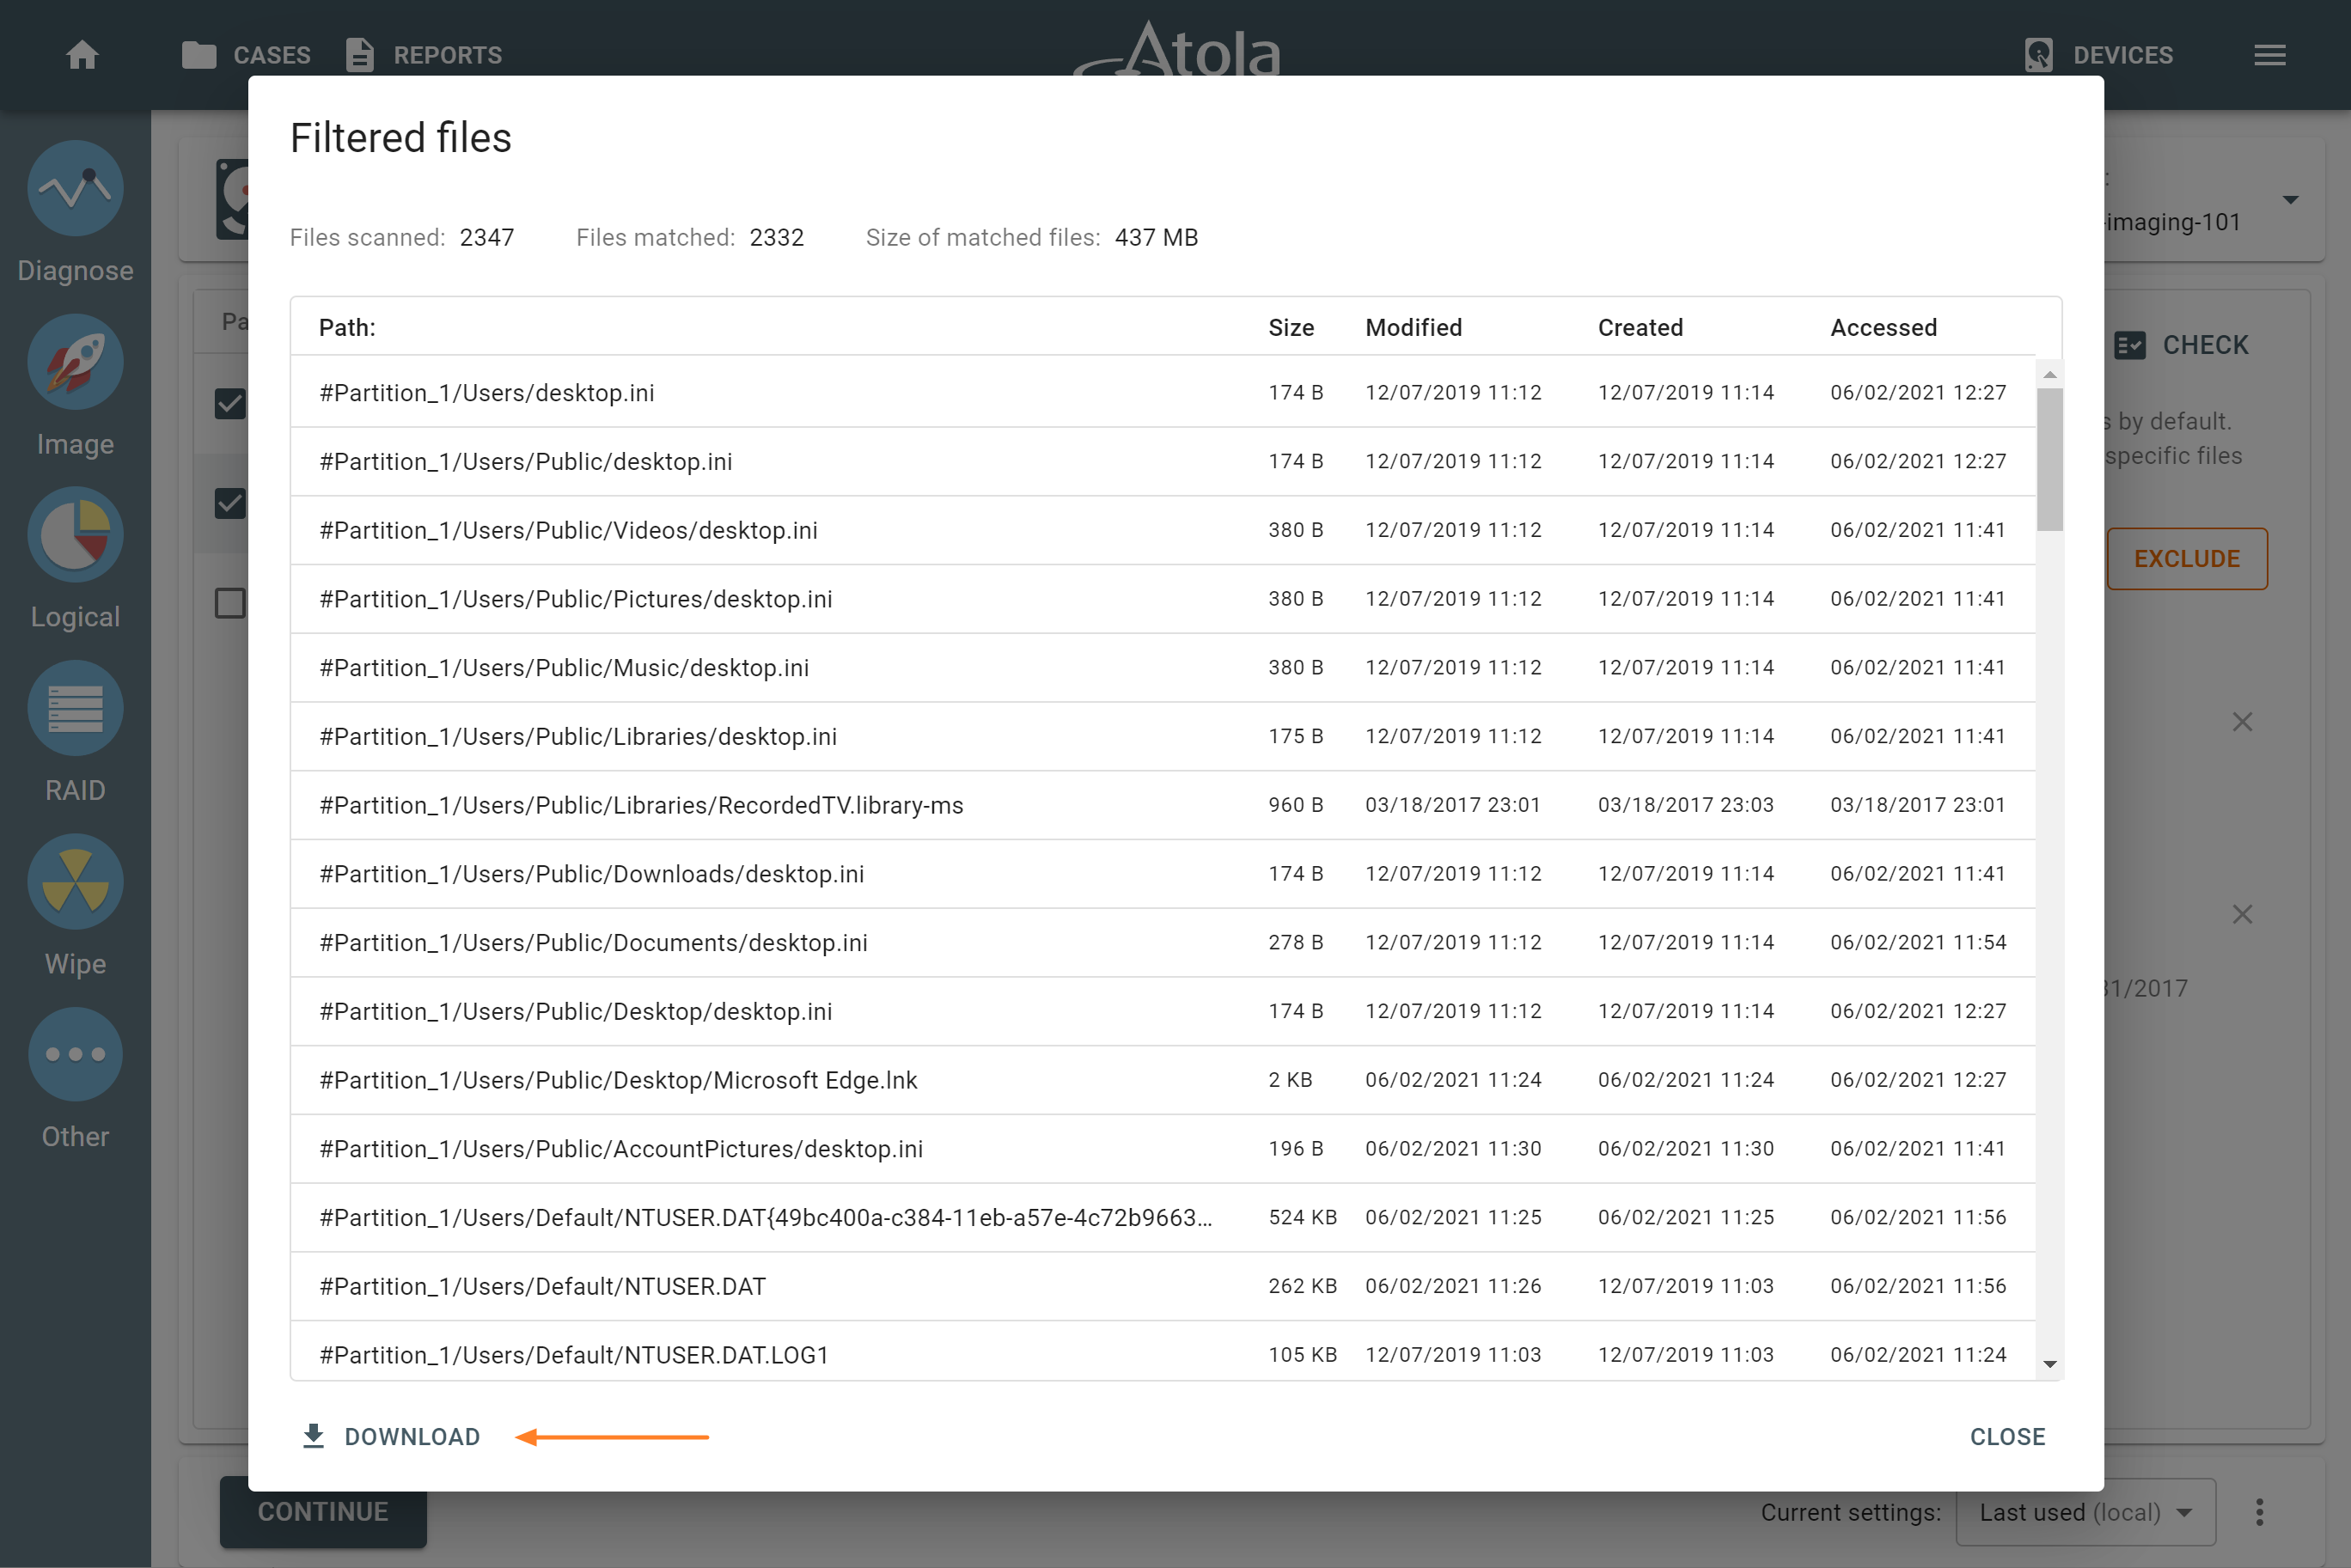
Downloading the list of files matching the filtering criteria.
Save filtering settings as a preset
To reuse your filtering settings later or share them with your colleague, save them as a logical imaging preset:
- In the bottom right corner of the Logical imaging page, click the More icon with three dots.
- Select Save to.
- Enter the name for your preset and click Save.
Saving a logical imaging preset.
From the same three-dots menu, you can also:
- Export a preset to use it on another computer.
- Import a preset created on another computer.
- Delete a preset.

To switch between presets, use the Current settings list on the bottom right of the logical imaging page.
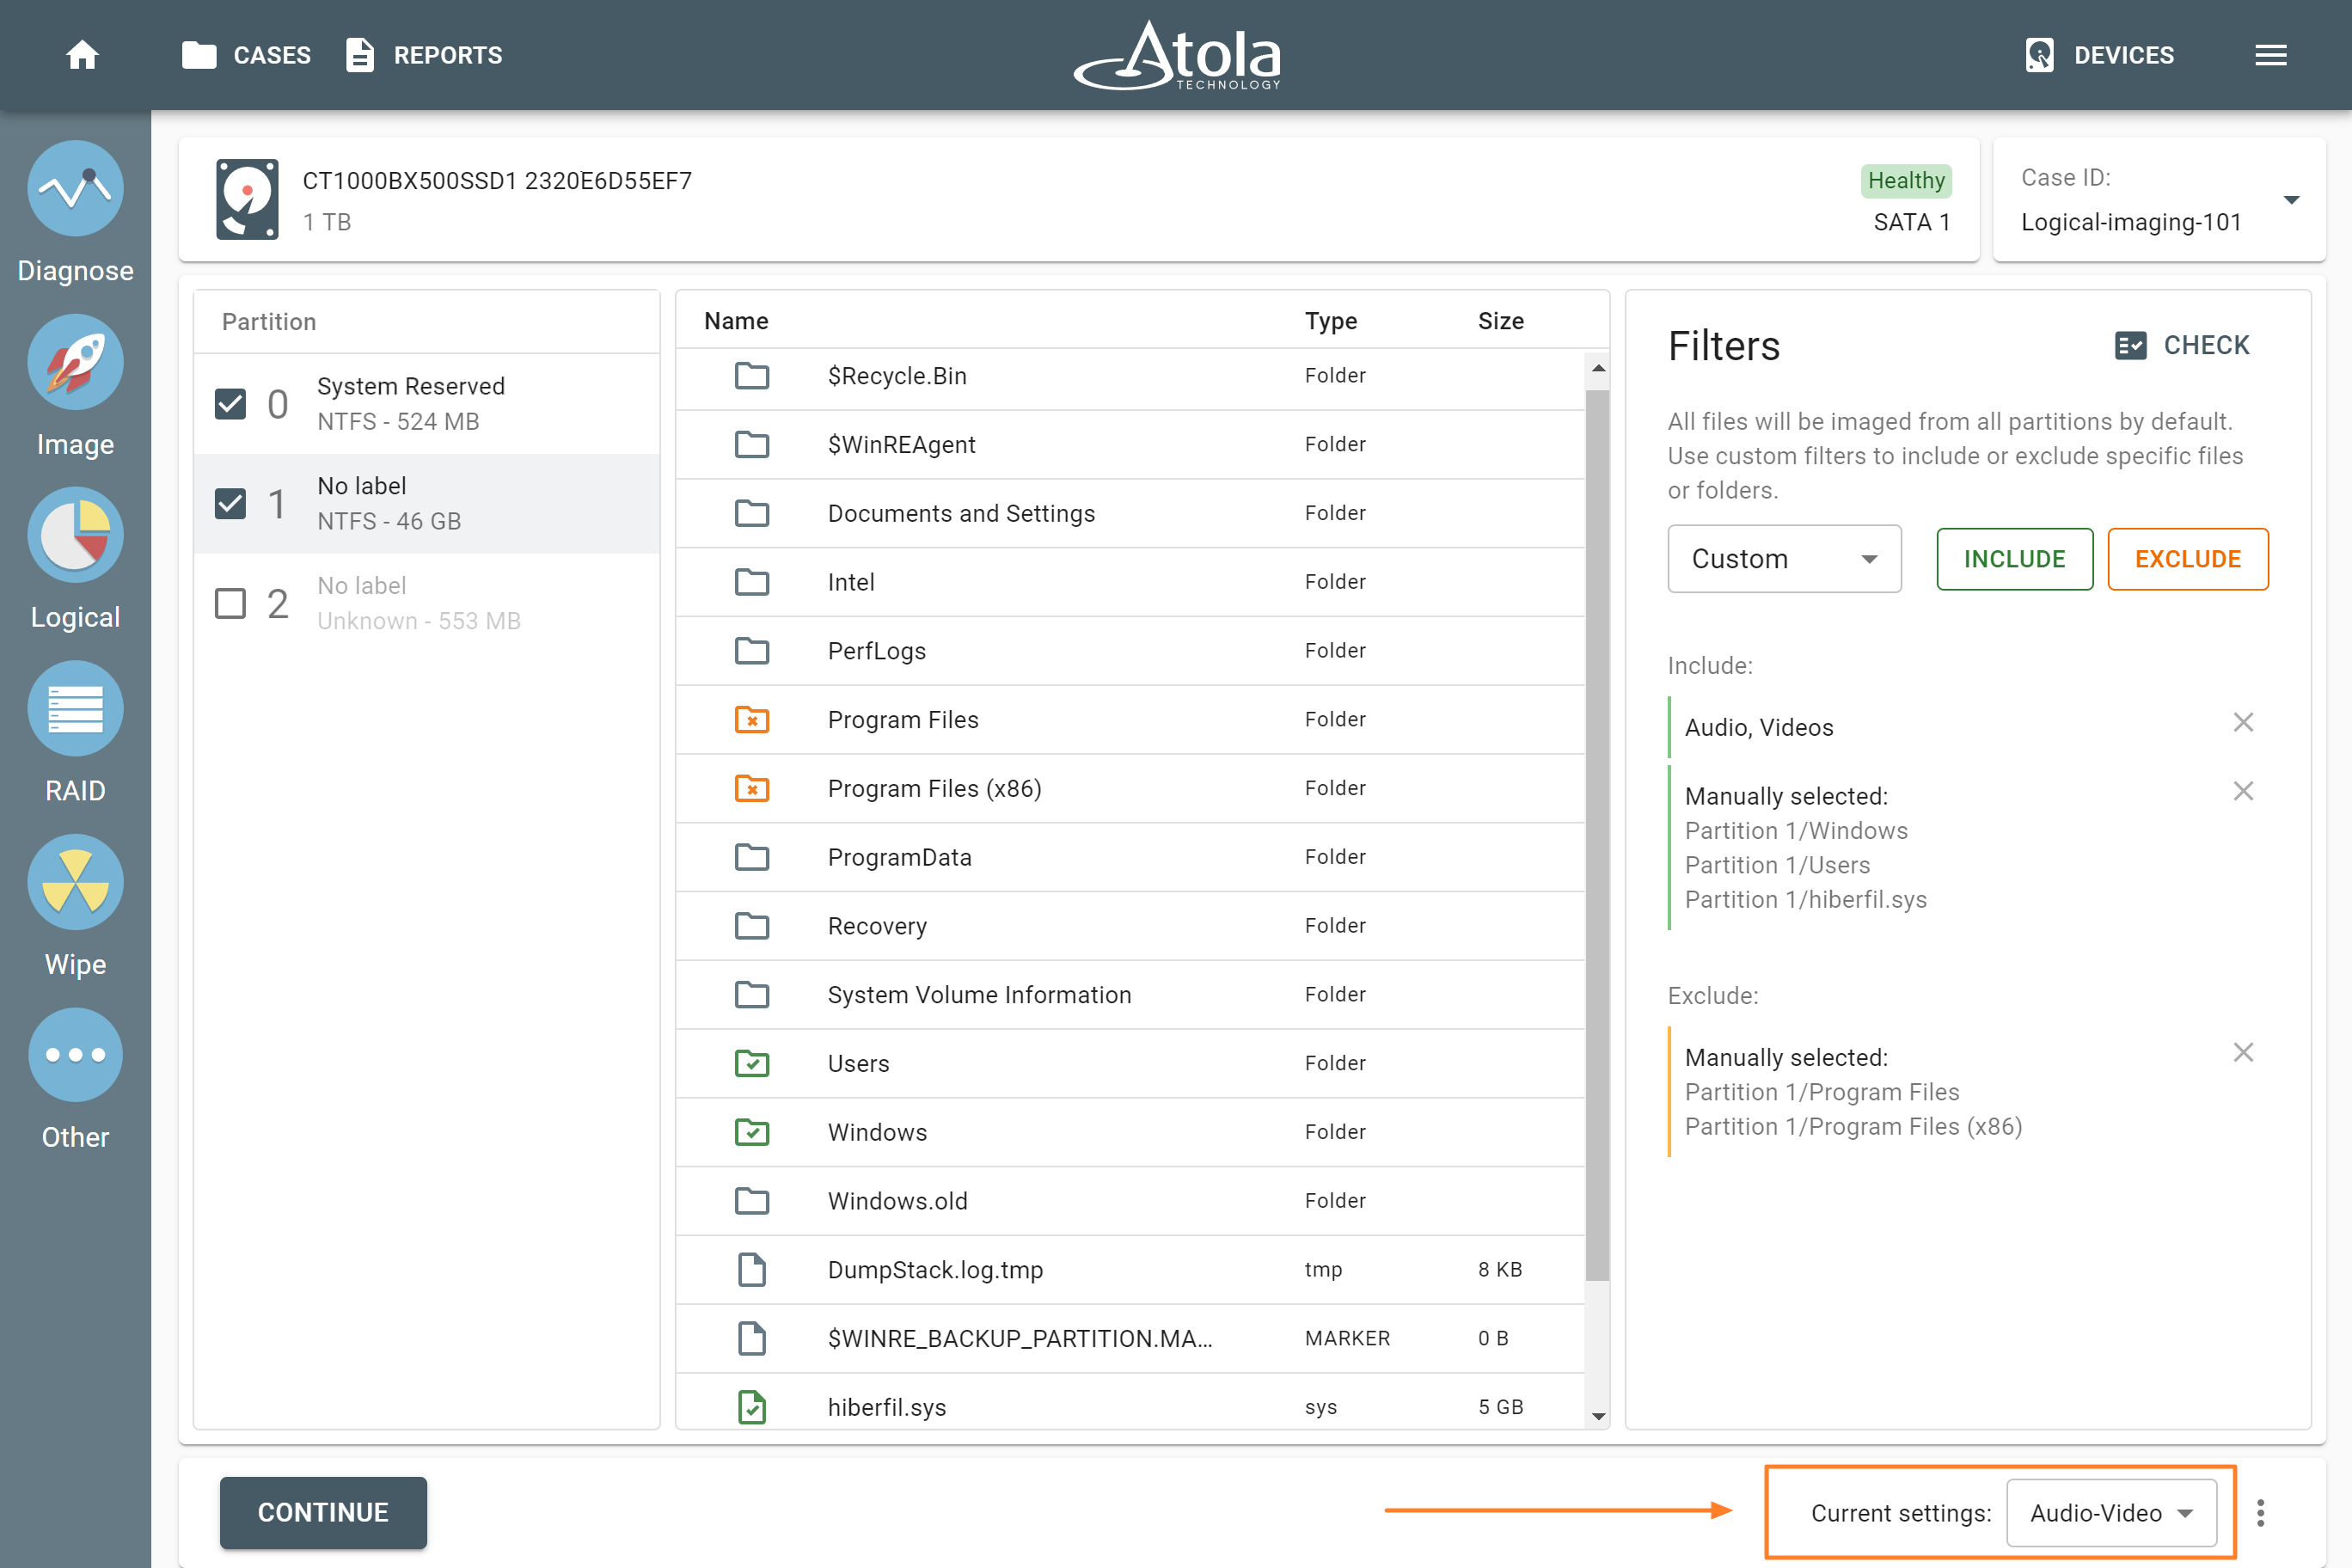
Selecting a preset from the Current settings list.
Select target file
Once you have adjusted the logical imaging parameters, click Continue.
TaskForce takes you to the Select target folder window.
The target file in L01 or ZIP format (with or without compression) can be created either on a network drive or on a storage device connected directly to the TaskForce hardware unit:
- Select the folder for your target file and click Create file.
-
Adjust the settings of the target file:
- Name.
- File type: L01 or ZIP.
- Hashing method (Digest type): MD5, SHA1, or MD5+SHA1.
- Compression.
- Case ID and details.
- Click Create to start the imaging process.

The Select target folder window.

Creating logical imaging file.
How to set a drive to Storage mode
To create a target file on a drive connected directly to the TaskForce, you must first add this drive as a storage device:
- In the Select image file window, click Add storage.
- On the Select device panel, choose the drive you want to use in Storage mode. TaskForce uses a lighter shade of blue to indicate that a storage drive is being configured.
- If TaskForce cannot find the appropriate exFAT partition on the selected drive, it offers you to format the device accordingly. In that case, select the Format device to exFAT option and click Next.
- To launch target device formatting to exFat with a large cluster size (32 MB), click Format and enter YES for confirmation. This cluster size enables faster imaging to this drive.
- Once the target device is formatted, TaskForce perceives it as a Storage target.
Logical imaging process. Pause and resume
The logical imaging process starts immediately when you click Create in the Create logical image file dialog.
Once imaging is launched, TaskForce creates a Logical imaging started report. It contains all details about the imaging source and target(s), as well as information about the include or exclude filters. You can find this report on the Home screen, on the Case page, or the Reports page.

A Logical imaging started report.
During the imaging process, you can track the progress of individual files.
To check the filtering parameters of this running session, click View filters at the bottom of the page.
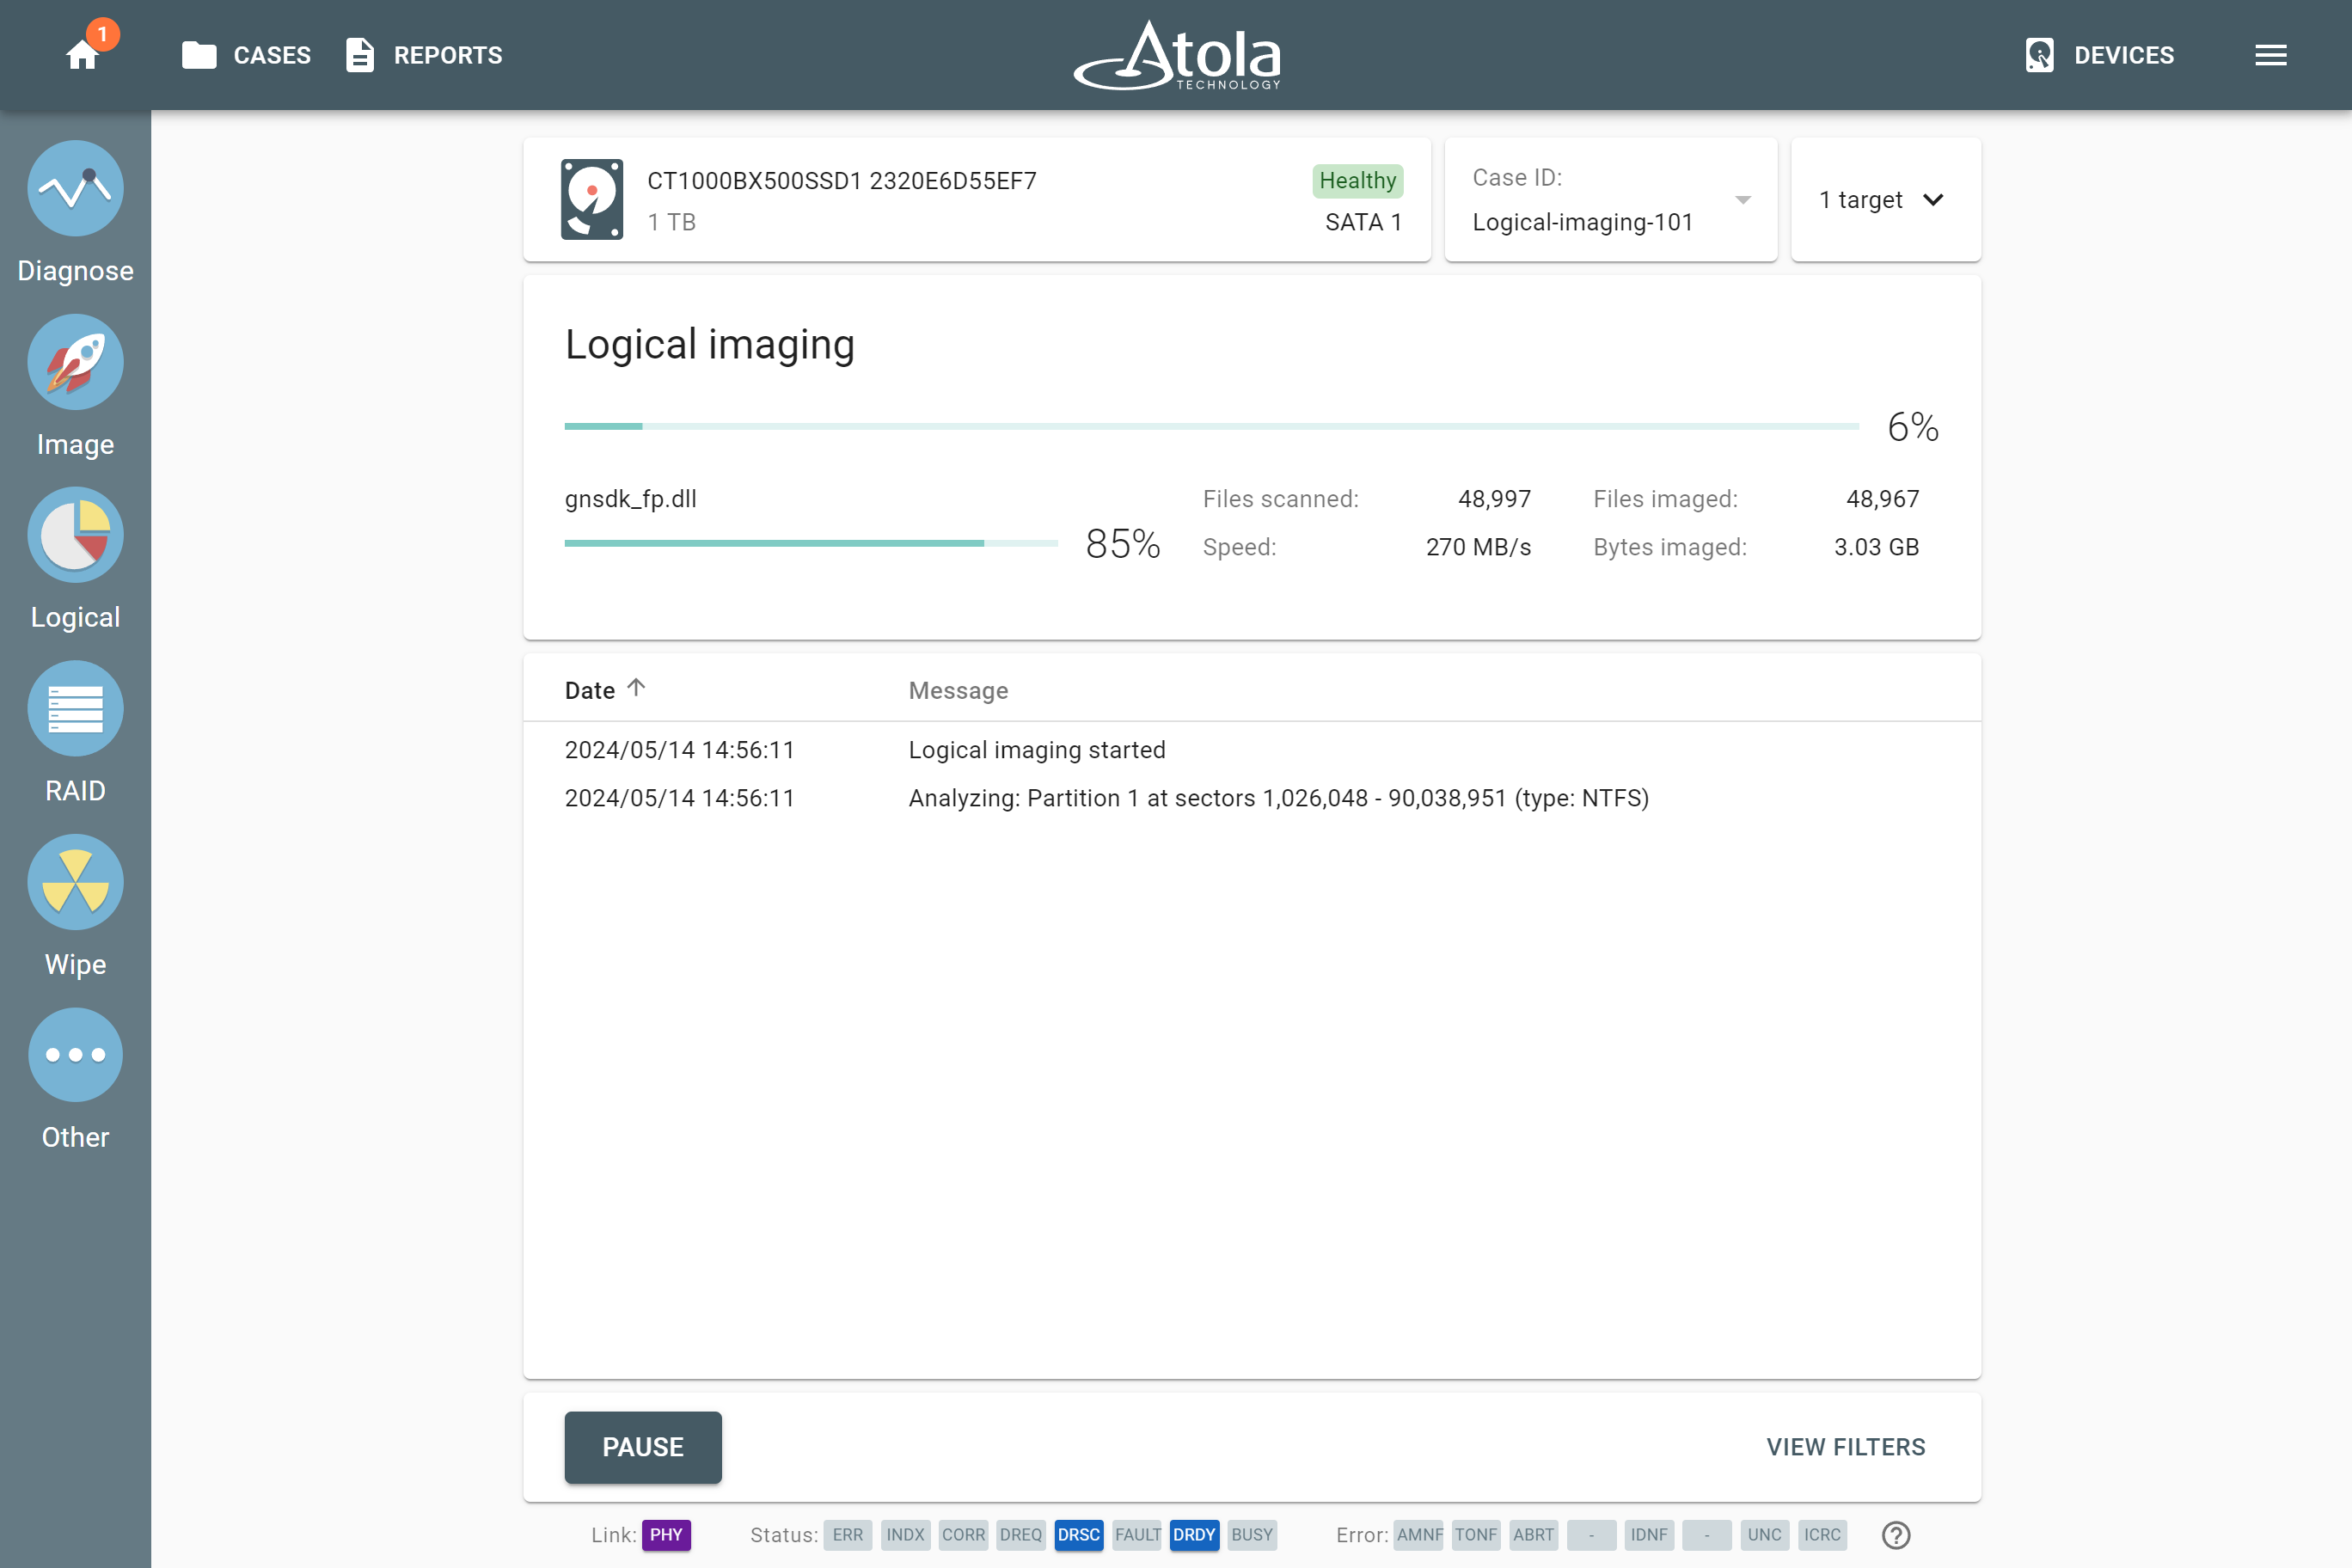
The logical imaging process.
Pause and Resume
TaskForce lets you pause any logical imaging session and resume it later:
- While the logical imaging process is running, click the Pause button at the bottom of the page.
- To resume a session, click Logical on the Taskbar and then select your source device.
- On the Recent logical imaging sessions page, click Resume next to your session.
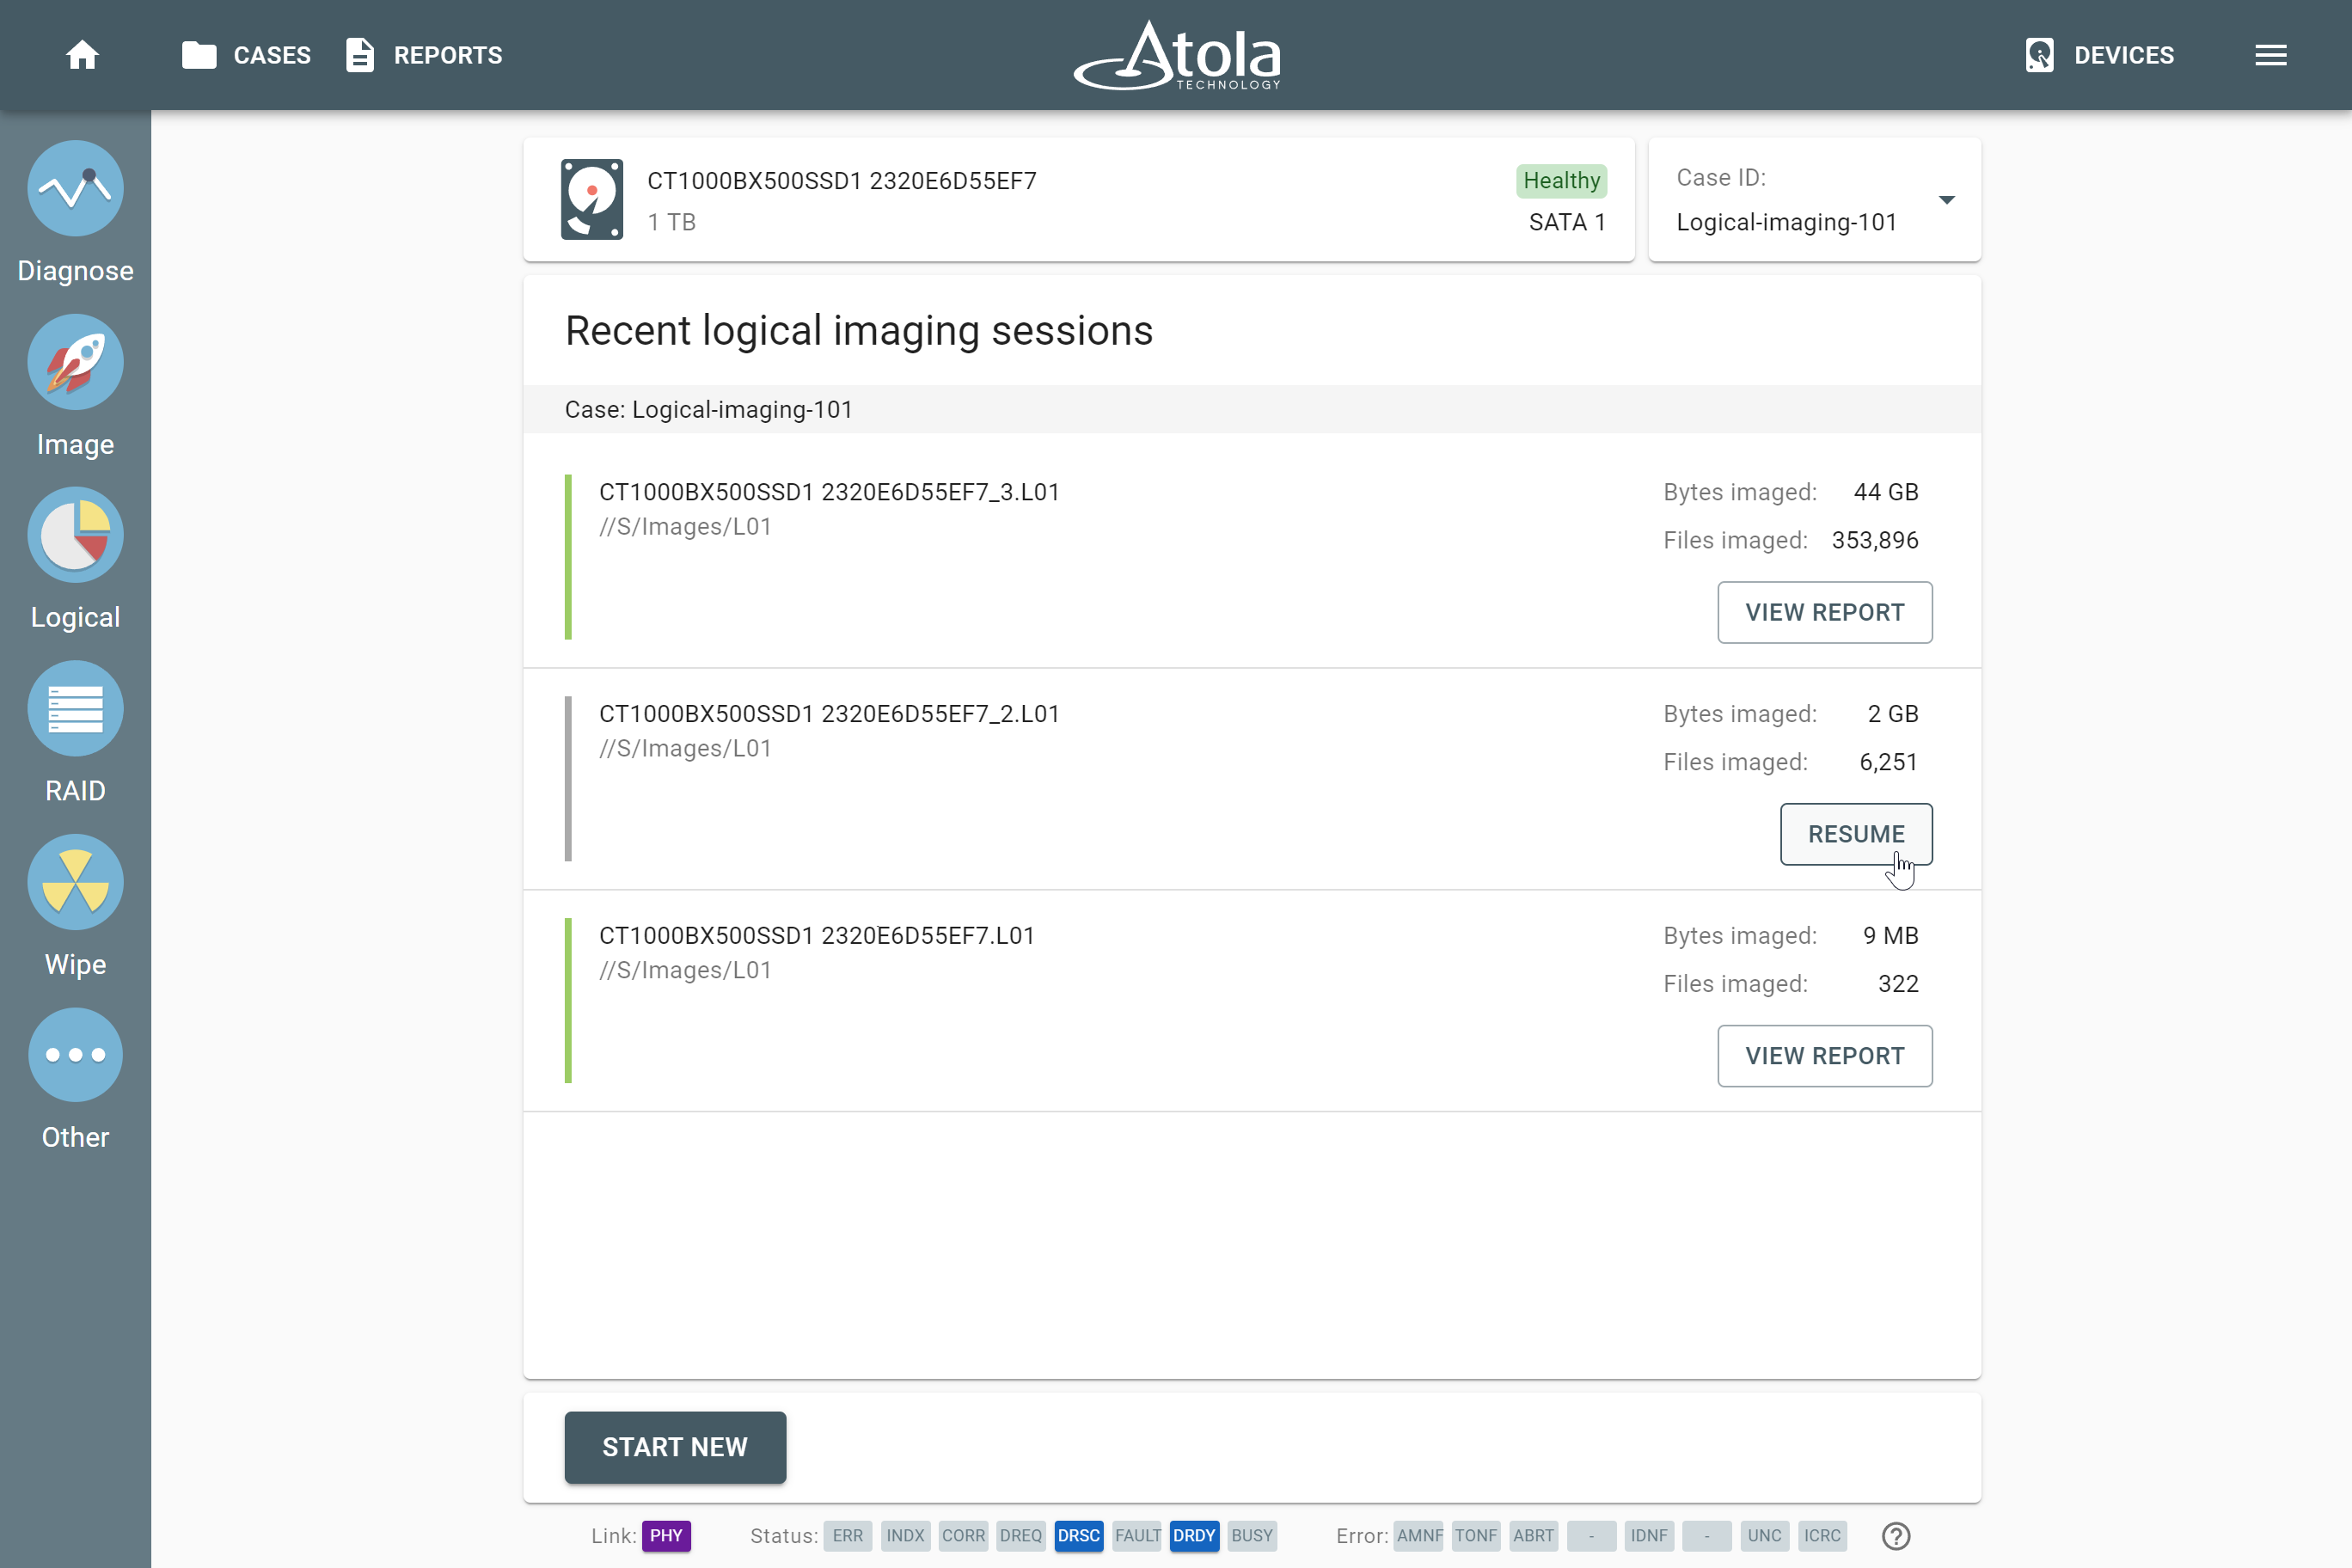
Resuming the logical imaging session.
Use cases of Pause/Resume
When you have to temporarily power off your TaskForce:
- Pause logical data acquisition.
- Turn off the TaskForce.
- Power it on later.
- Resume the logical imaging session exactly from the very "pause" moment.
When you want your colleague to continue imaging on another TaskForce:
- Pause logical data acquisition.
- Export the case.
- Transfer the source drive and the exported case to a different location that has another TaskForce.
- Import the case.
- Resume the logical imaging session.
Logical imaging completed report
After the logical imaging process is completed, TaskForce generates a comprehensive report with all the details of the imaged data:
- The number of scanned and imaged files
- The volume of imaged data
- Time stamps
- and more
You can find this report on the Home screen, on the Case page, or on the Reports page.
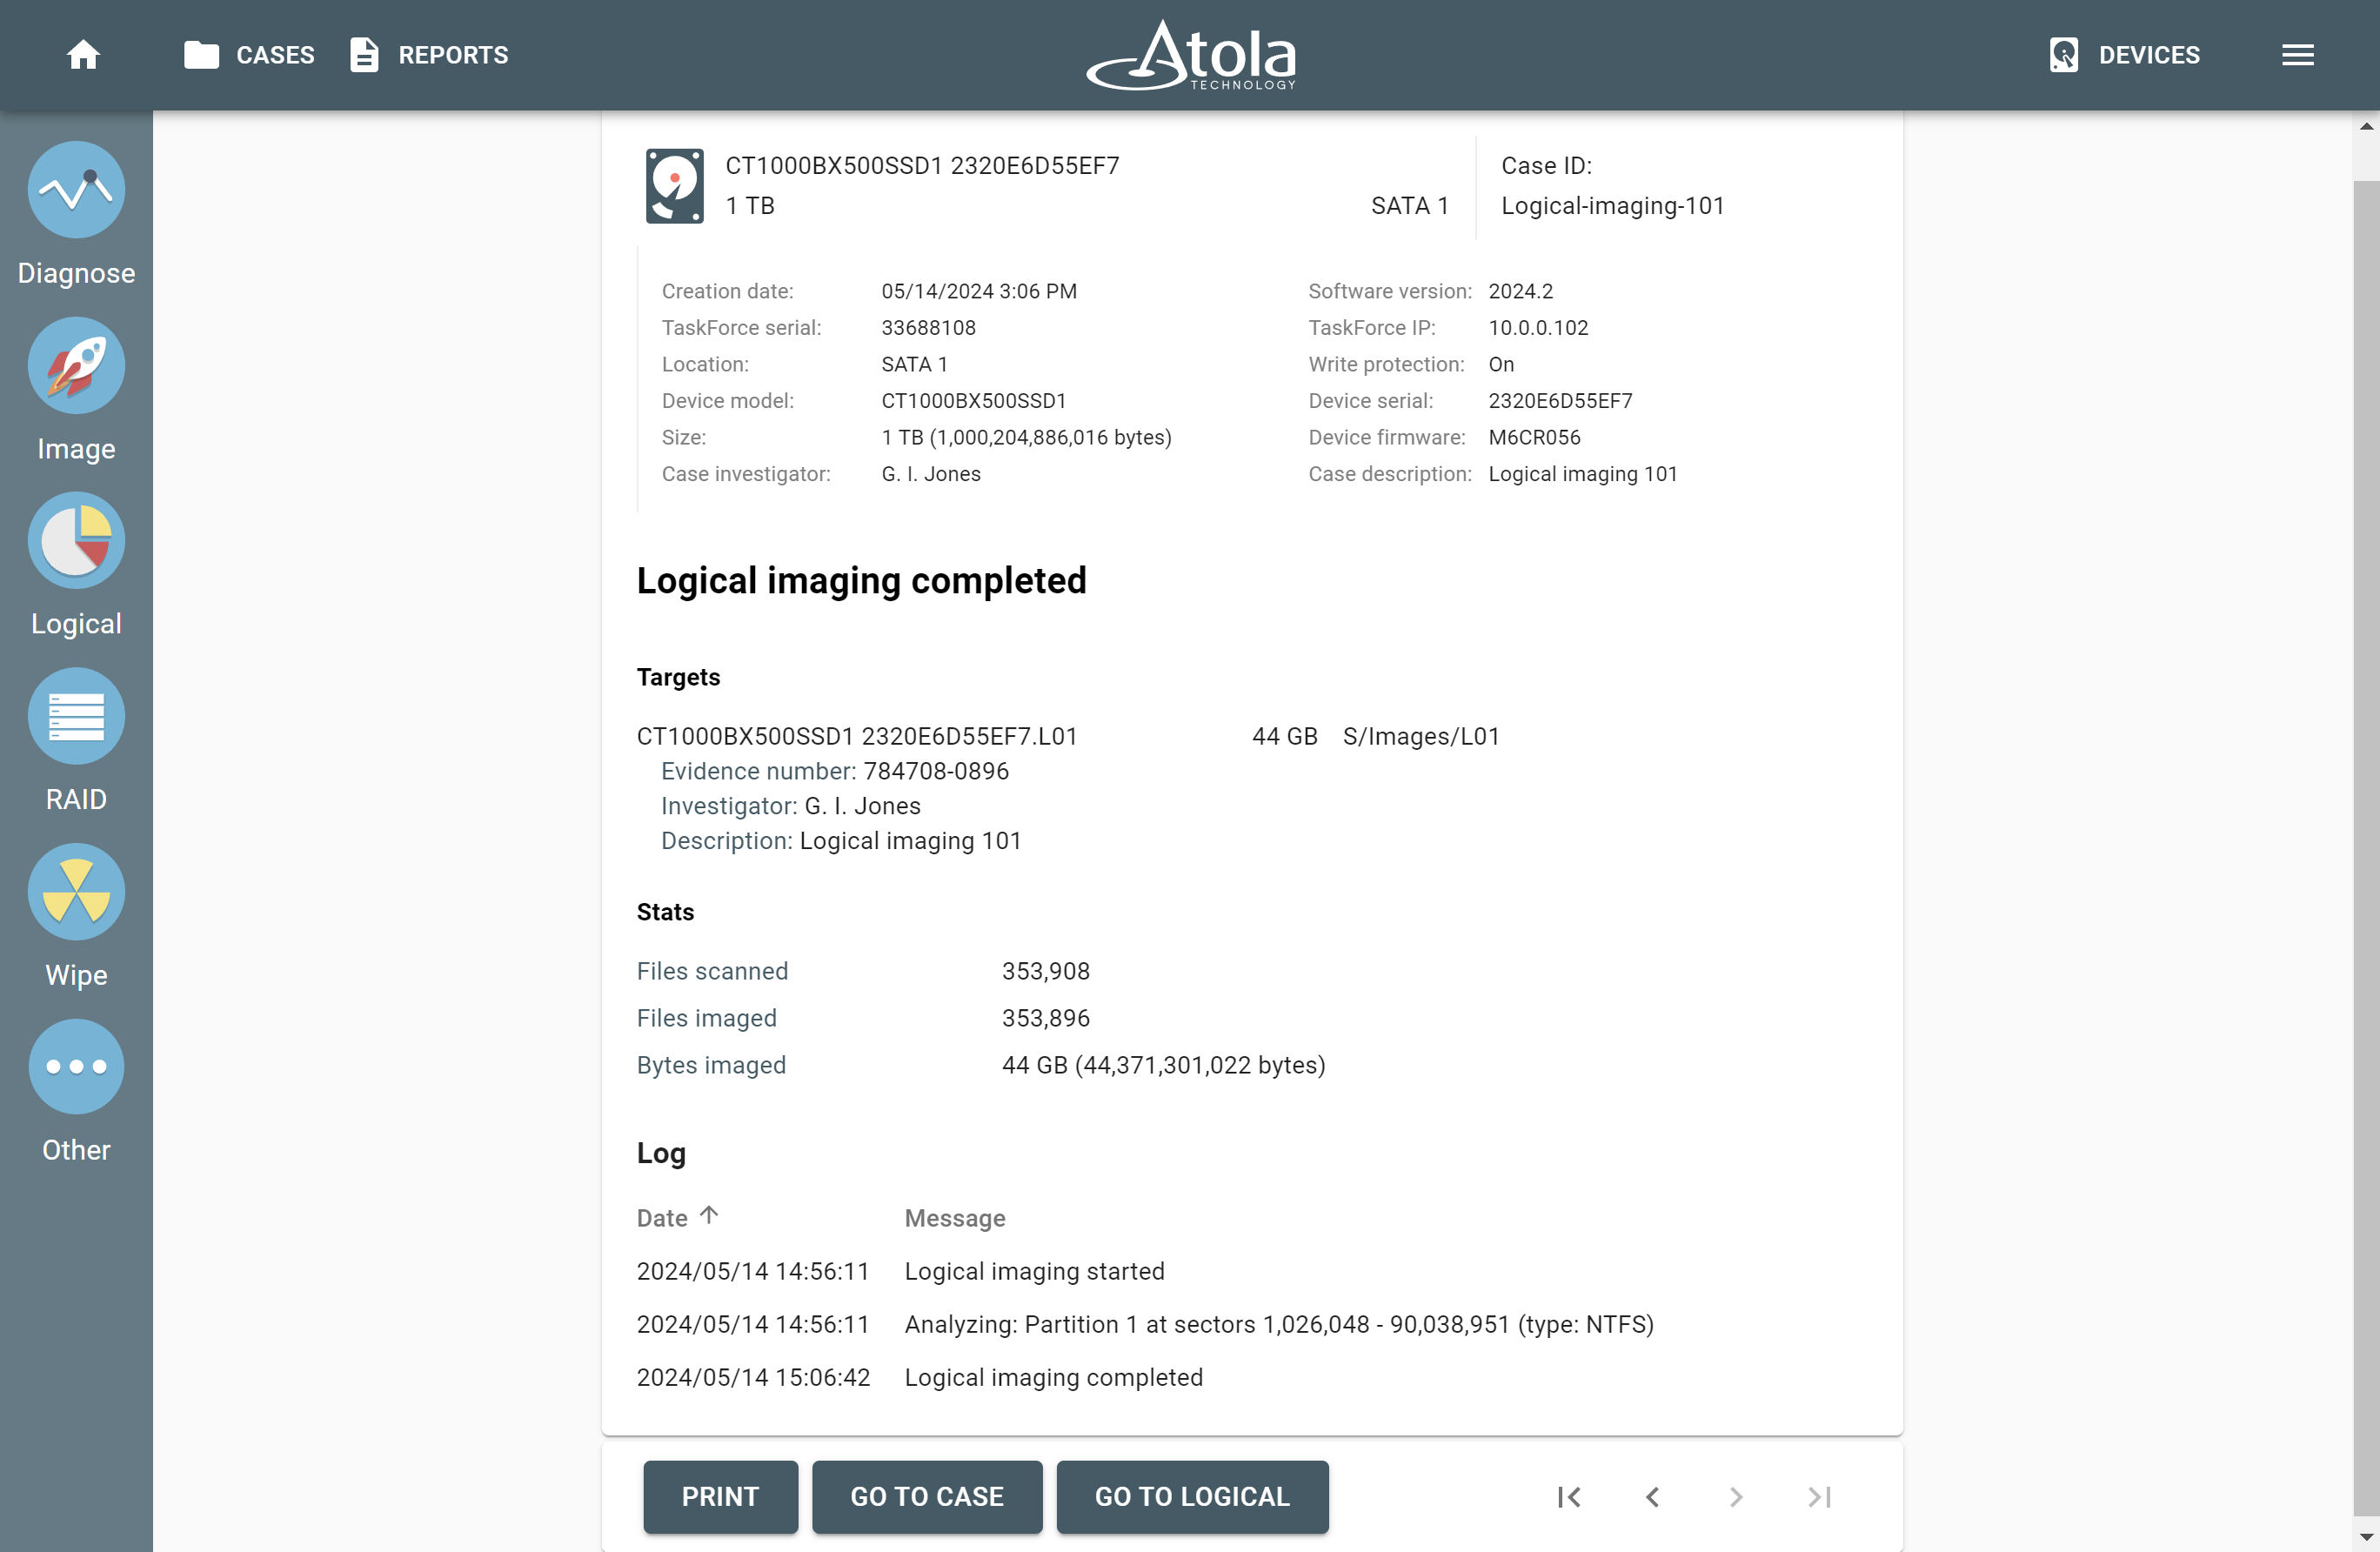
The 'Logical imaging completed' report.