Forensic RAID autodetection and reassembly
Reassemble most of the RAID types with an unknown configuration in a matter of minutes, even if one drive is missing or damaged.
TaskForce’s extreme performance and optimized RAID autodetection algorithms identify the unknown key RAID parameters, reassemble the RAID, and give a preview of the partitions.
TaskForce supports the following RAID types and file systems:
- RAID 0, 1, 5, 6, 10, JBOD
- Hardware RAID controllers: Adaptec, Areca, HP, Dell, LSI, Intel RST, IBM ServeRAID, other generic controllers
- Software RAID: mdadm
- Synology NAS RAID
- File systems: NTFS, exFAT, ext4/3/2, XFS, ZFS, Btrfs, APFS, HFS/HFS+, FAT32/16
Rebuild and image a RAID array in 5 steps
- Select the members of the RAID array (drives and/or their images).
- Wait for a couple of minutes while the autodetection module searches for the right RAID configuration.
- Apply the suggested configuration with one click on a button.
- Preview partitions, folders, and files of the RAID to identify the data you need to acquire.
- Image the whole RAID or only selected partitions, folders, and files.
Of course, if you already know the RAID type, device order, block size and order, you can enter these parameters manually.
How autodetection of an unknown RAID works
To correctly rebuild forensic RAID for imaging, you have to know its key characteristics:
- Order of drives/images
- RAID type
- Start LBA
- Block size
- Block order
But if any of these are unknown, you need to comb through all possible variants, and there could be millions of combinations. That translates to hours, days, or even weeks of tedious manual work.
In TaskForce, after you selected the RAID devices or images, the autodetection module starts automatically, checks up to 200,000,000 possible RAID configurations and detects the right one in a matter of minutes.
Within that limit, the use of heuristic algorithms enables TaskForce to go through all possible RAID configurations, for instance:
- RAID 0 array consisting of 10 devices (43,545,600 variants)
- RAID 5 array consisting of 9 devices (17,418,240 variants)
Here’s how it works:
- Stage 1. Analyzing devices. The autodetection module reads data on the drives and identifies the RAID type. It narrows down the number of combinations for the next stage.
- Stage 2. Detecting RAID configuration. The algorithm checks millions of possible RAID configurations and detects suitable ones.
- Stage 3. Detecting RAID configuration (extended). This additional stage starts if no suitable configuration has been identified. It uses an alternative heuristic approach during the configuration search and indicates the percentage of valid files resulting from each possible configuration it has detected.
- Stage 4. Detecting RAID configuration with an added missing device. If one of the array members is missing, TaskForce now automatically detects that and reconstructs the whole array anyway.
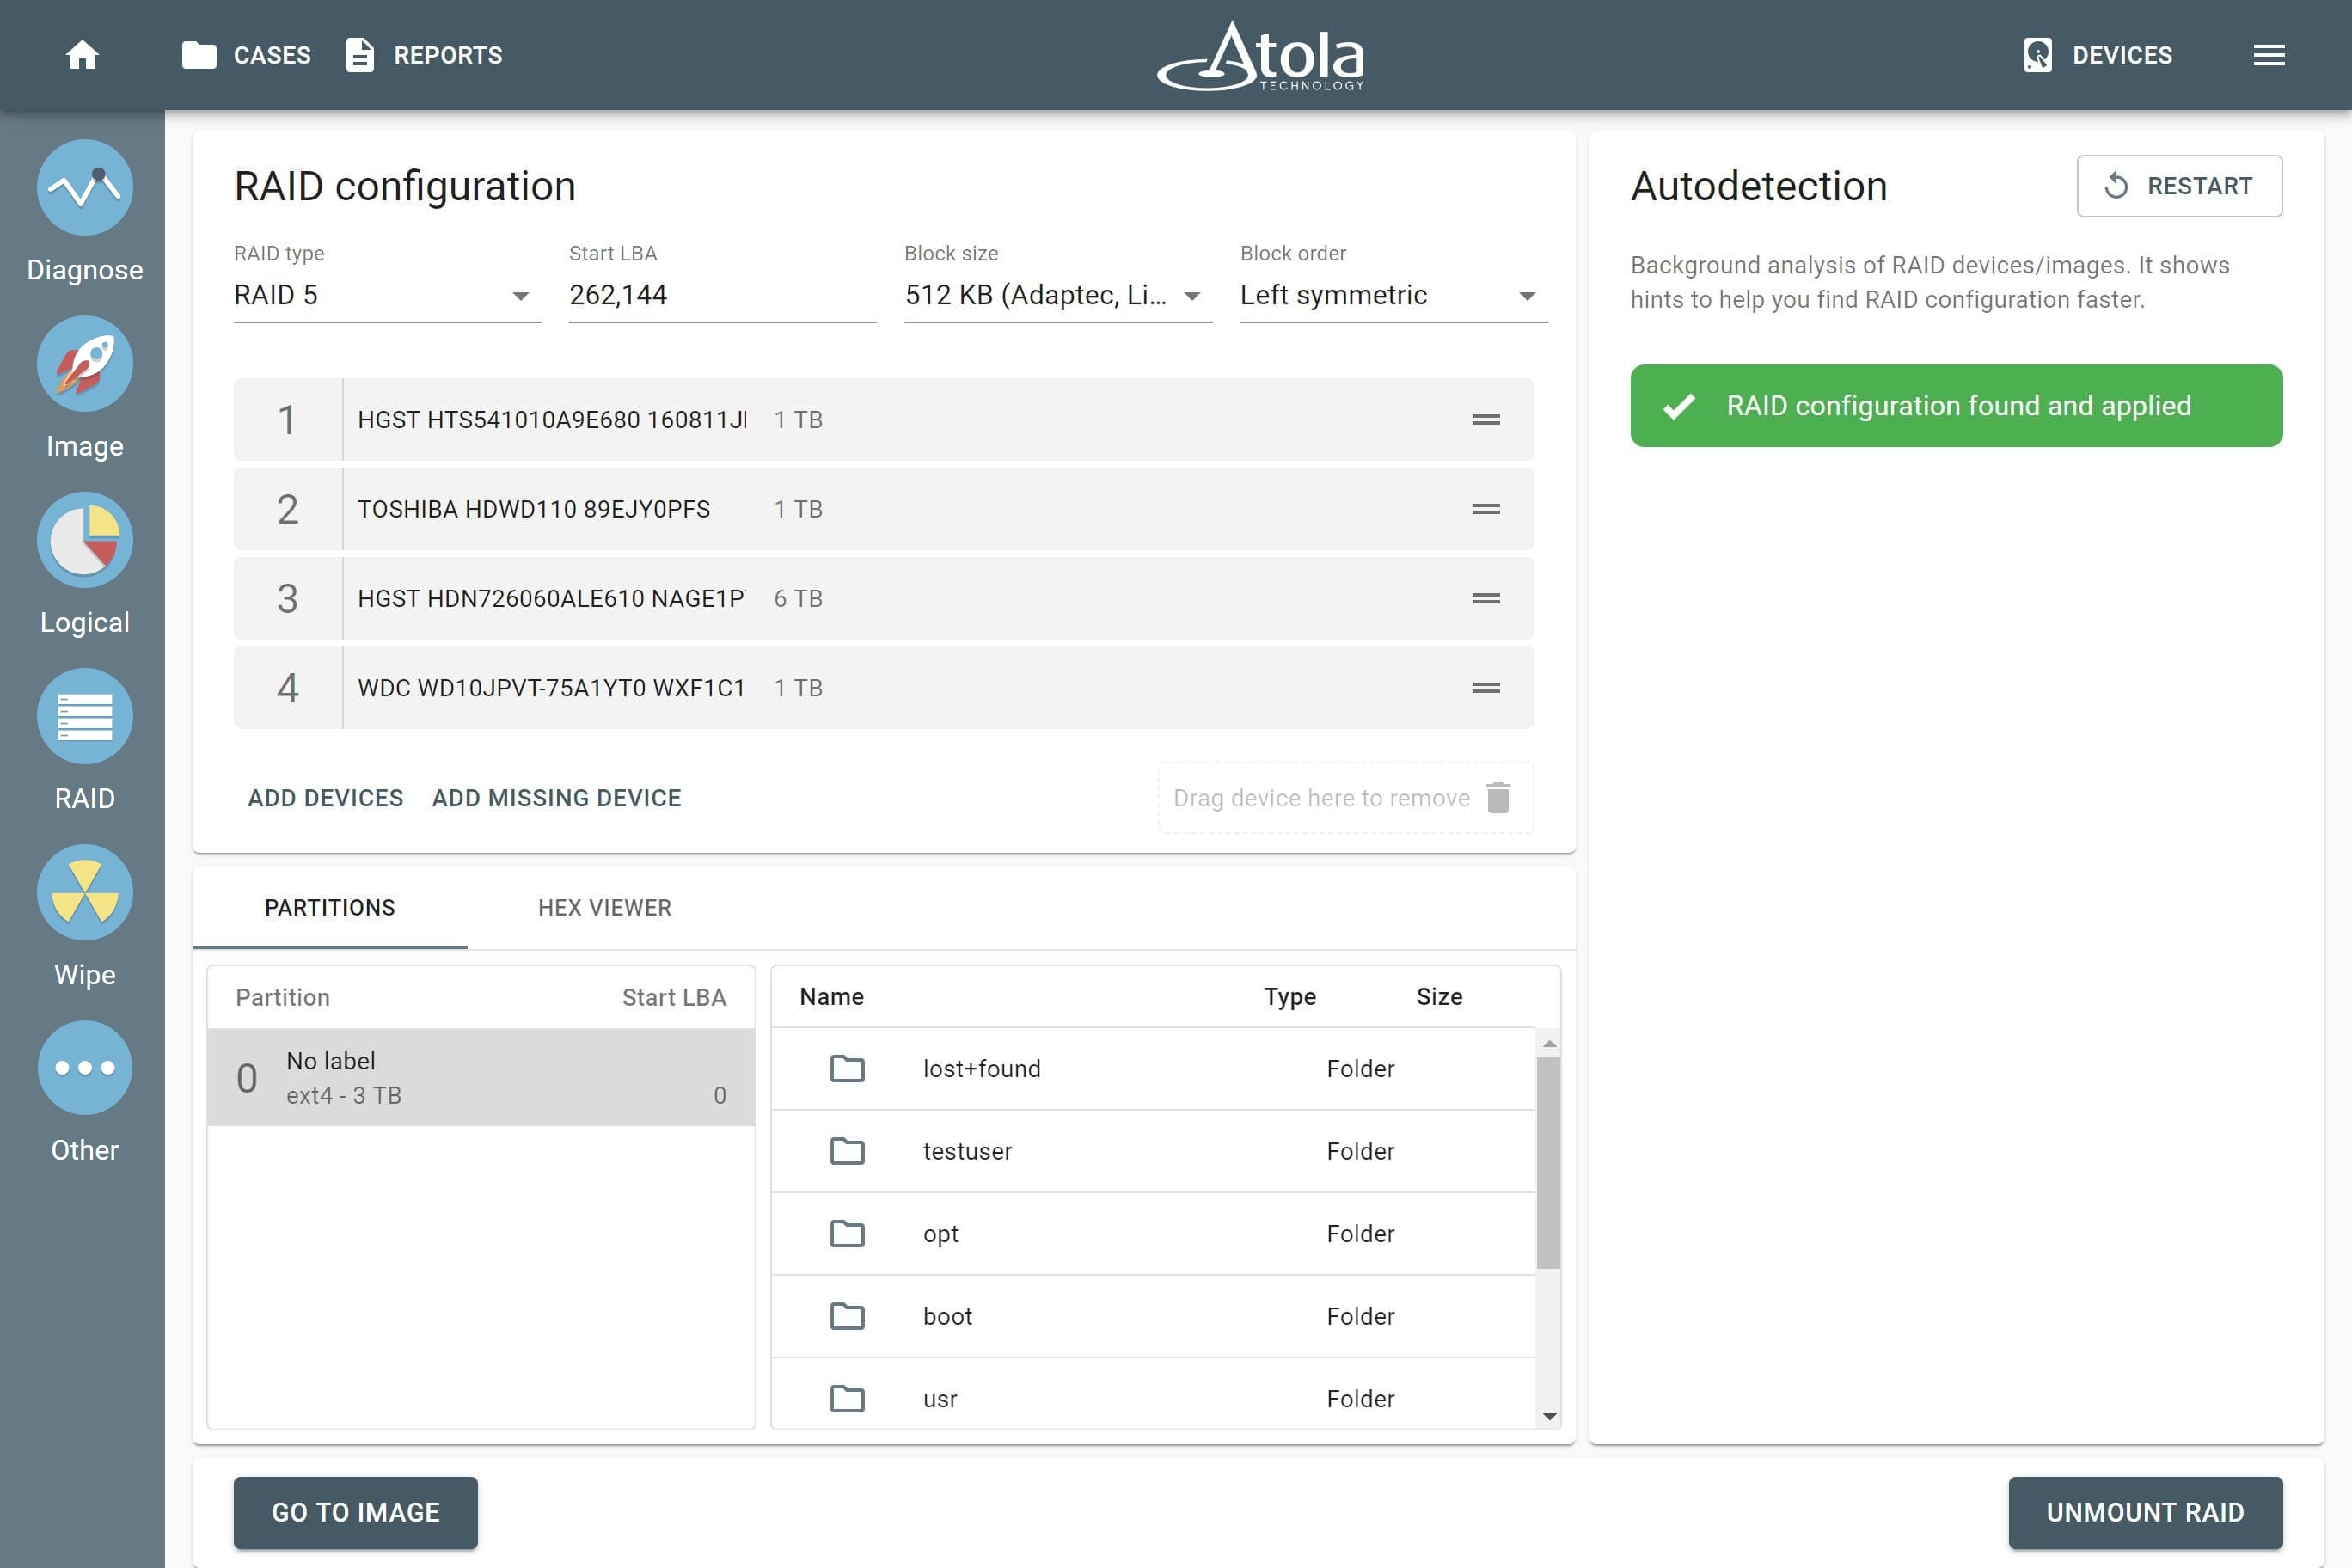
To preview the suggested configuration, simply click Apply. TaskForce automatically changes the order of the drives/images; the detected RAID type, block size and order are applied automatically, too. After a suitable RAID configuration is applied, you can check the mounted partitions, folders, and files in the bottom part of the screen.
Additionally, TaskForce instantly identifies and reassembles RAID types that contain metadata about their configuration, such as mdadm and Synology NAS arrays.
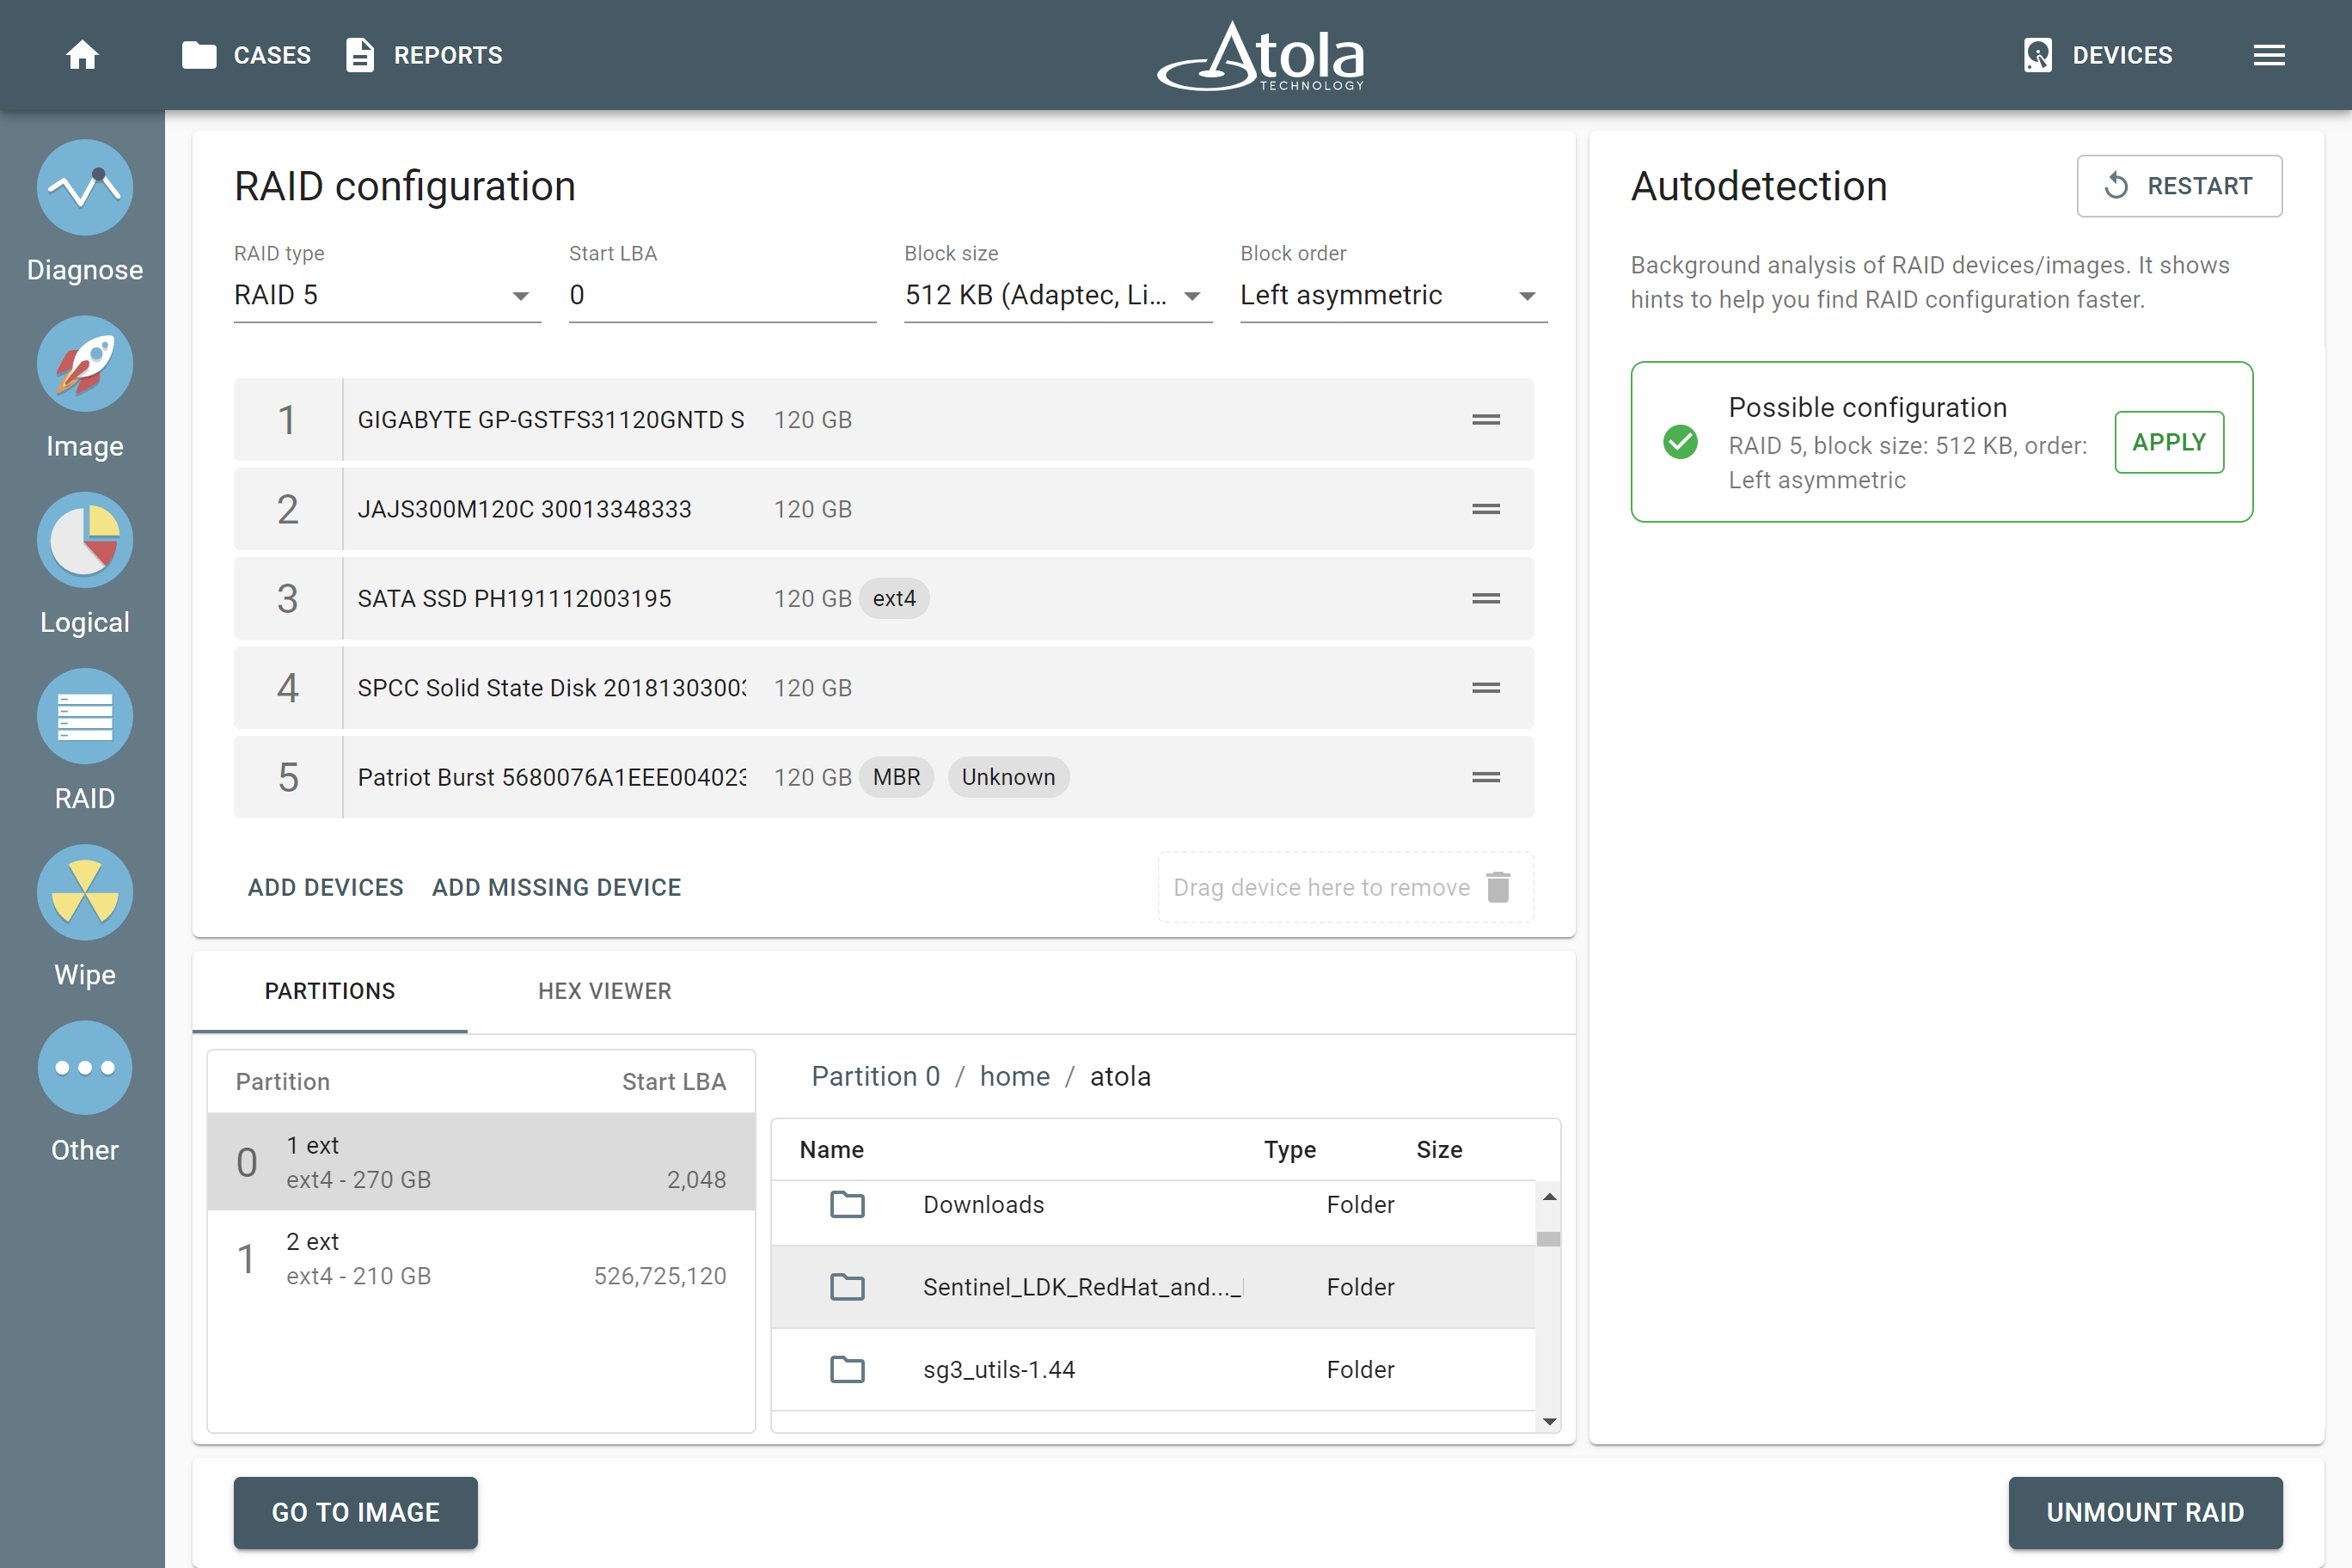
Autodetection of RAID type and other configuration parameters.
Reconstruct RAID 5, even with errors or one missing drive
RAID 5 has parity information distributed across the drives. Using that redundancy, TaskForce can automatically reassemble RAID 5 even in the following tough cases:
- You don’t know the right order of the RAID disks.
- One of the RAID members is lost or damaged.
- One or more drives have errors.
- You don’t even know that one drive is missing.
TaskForce successfully identifies the configuration and creates a full image of the RAID, even without one missing part of the array.
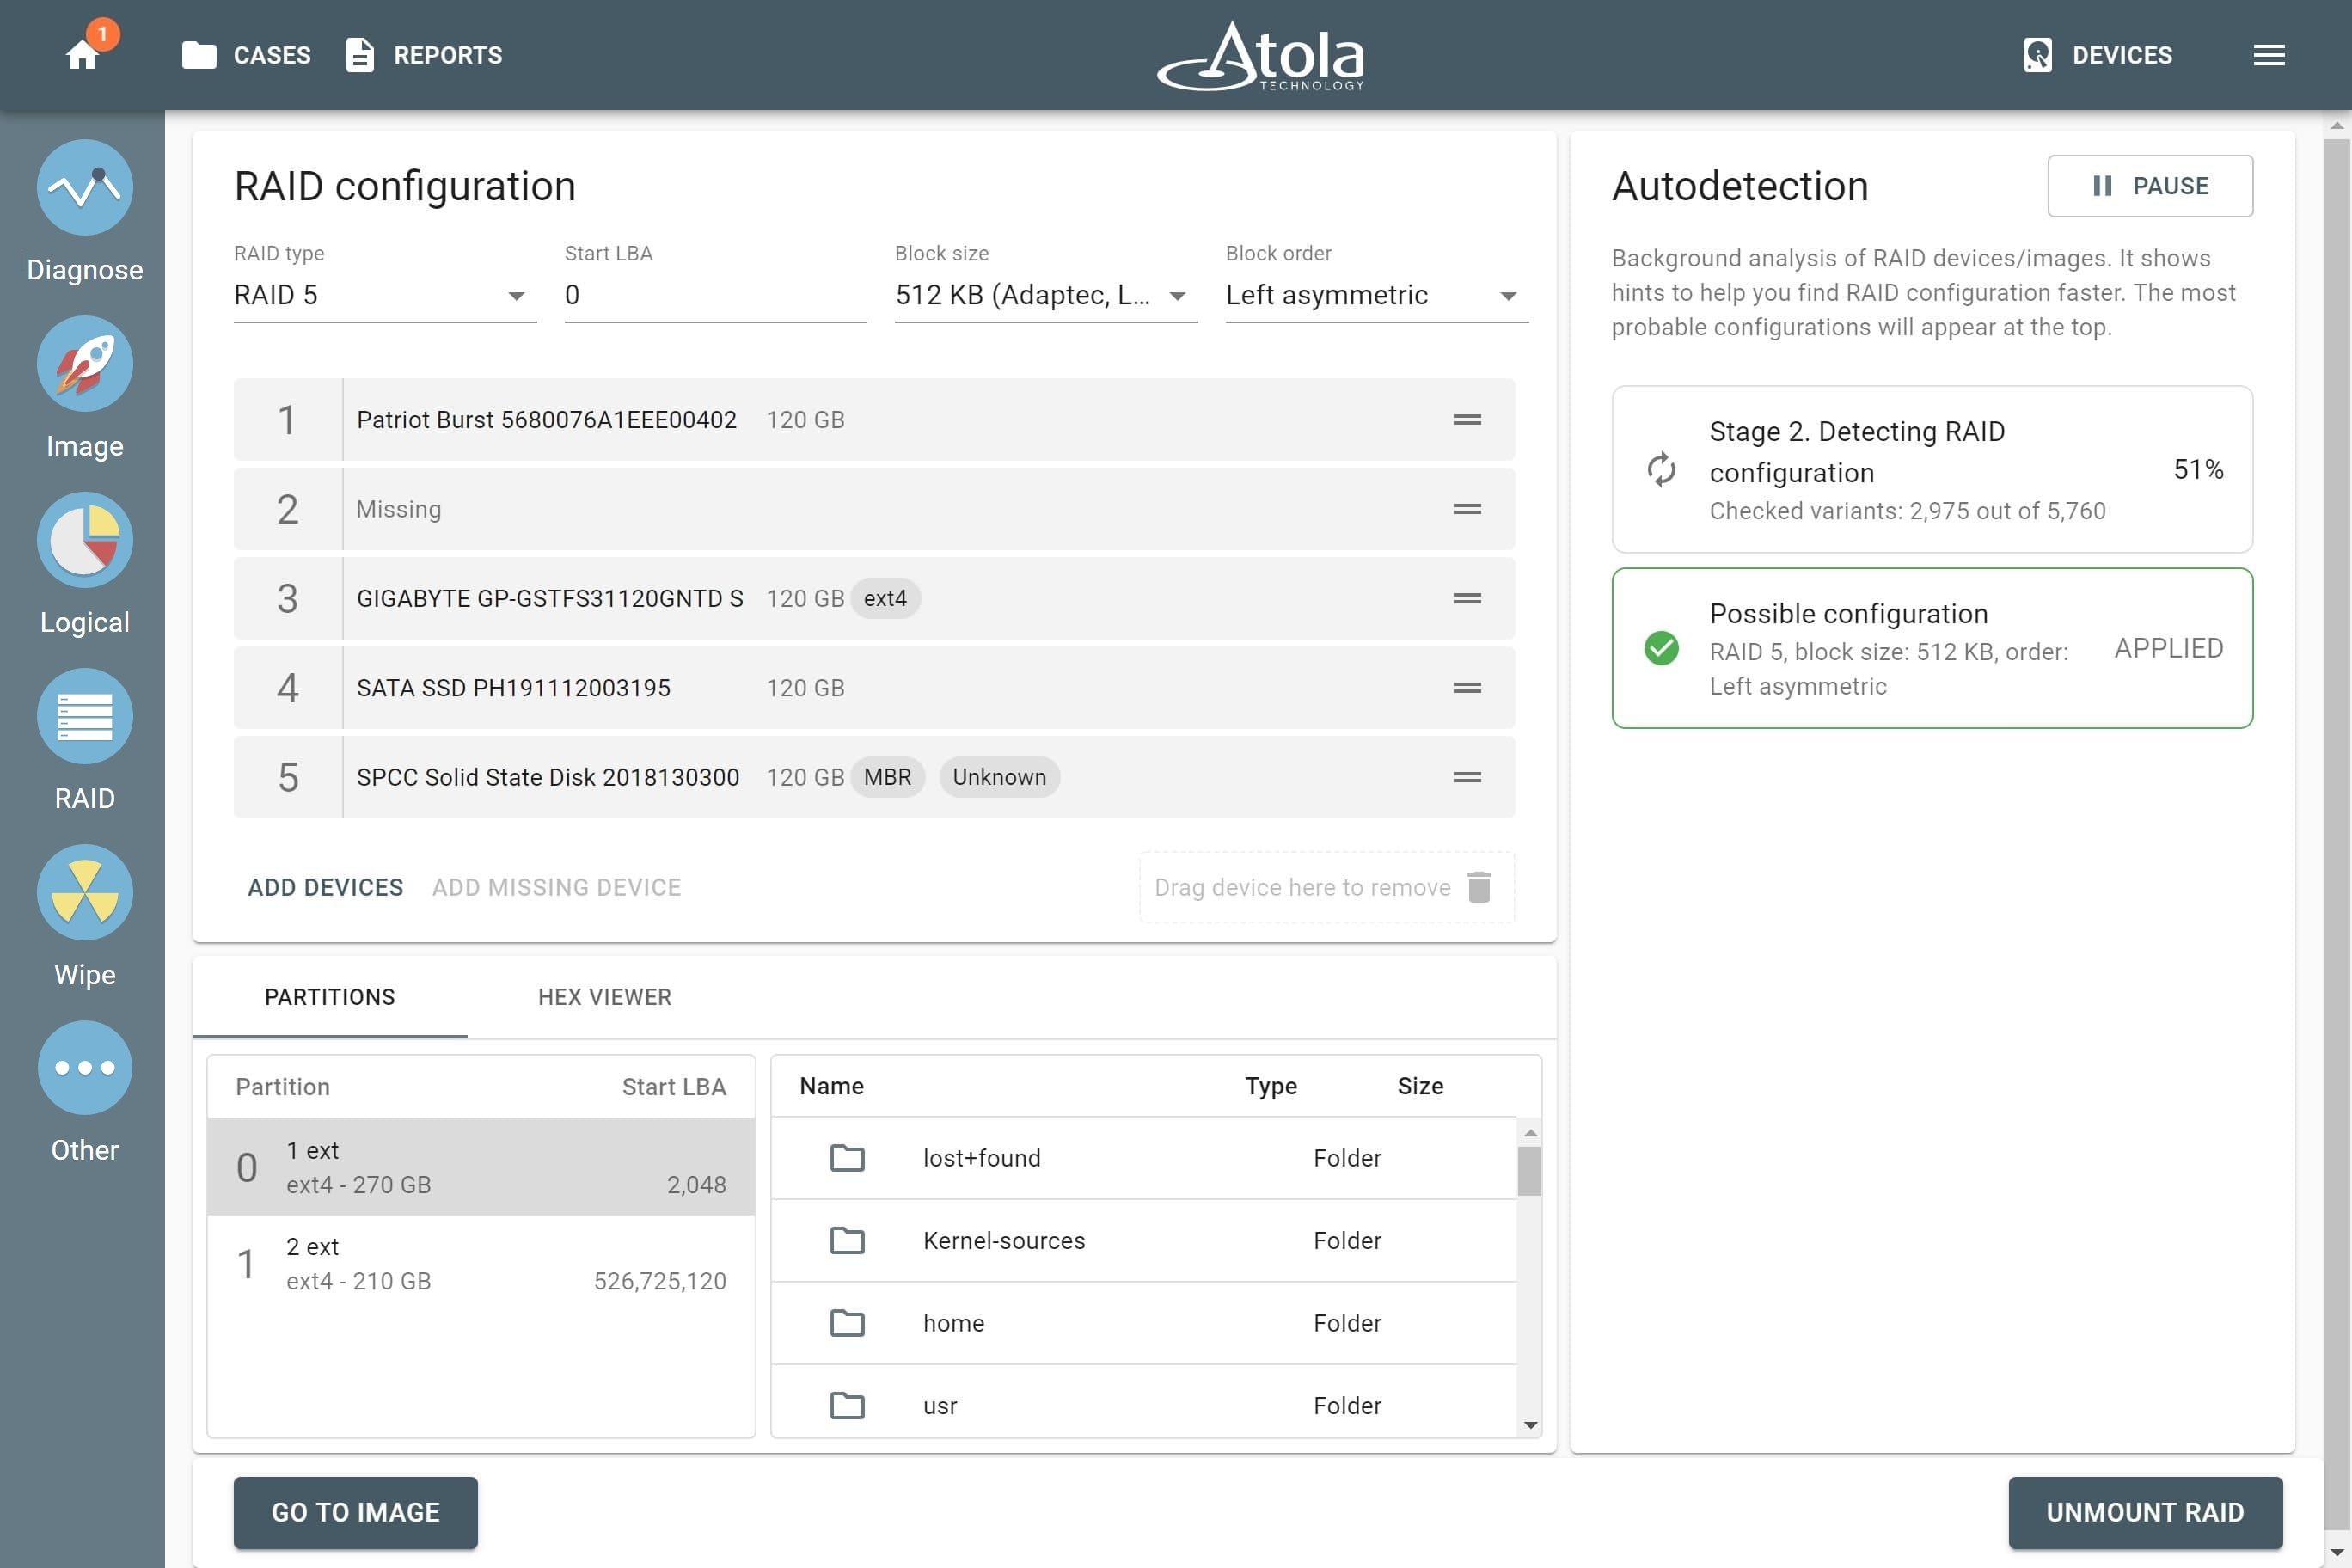
Reassembling RAID 5 with a missing device.
When TaskForce encounters errors on some drives, it displays error tags next to the respective RAID member. Despite the errors on drives, TaskForce can mount the partitions of the RAID for preview using the data redundancy of this RAID.
If the read error occurs during imaging, TaskForce fixes it by itself. It looks at the data in the parity blocks on the other parts of the RAID and uses that to fill in the missing parts. This is done automatically and doesn't need any actions from you. This way, the whole image can still be recovered.

Reassembling RAID 5 with errors on multiple devices.
Imaging RAID 6, even with errors or two missing devices
With TaskForce you can automatically reassemble and image RAID 6, even if an array contains errors or two of its members are missing. This is possible because RAID 6 features not one, but two types of parity blocks (XOR parity and Reed-Solomon parity), distributed across all devices in an array. TaskForce uses this parity information to reconstruct damaged or missing data on the fly.
When you’re dealing with an array with two missing members, click the Add missing device button twice, and TaskForce will take two absent pieces of a puzzle into account when checking variants of possible RAID configuration. Once a suitable configuration is found, click Apply. TaskForce immediately rebuilds an array using its redundancy, parses its file systems and validates the partitions. You can preview volumes, folders, and files before proceeding with physical or logical imaging.
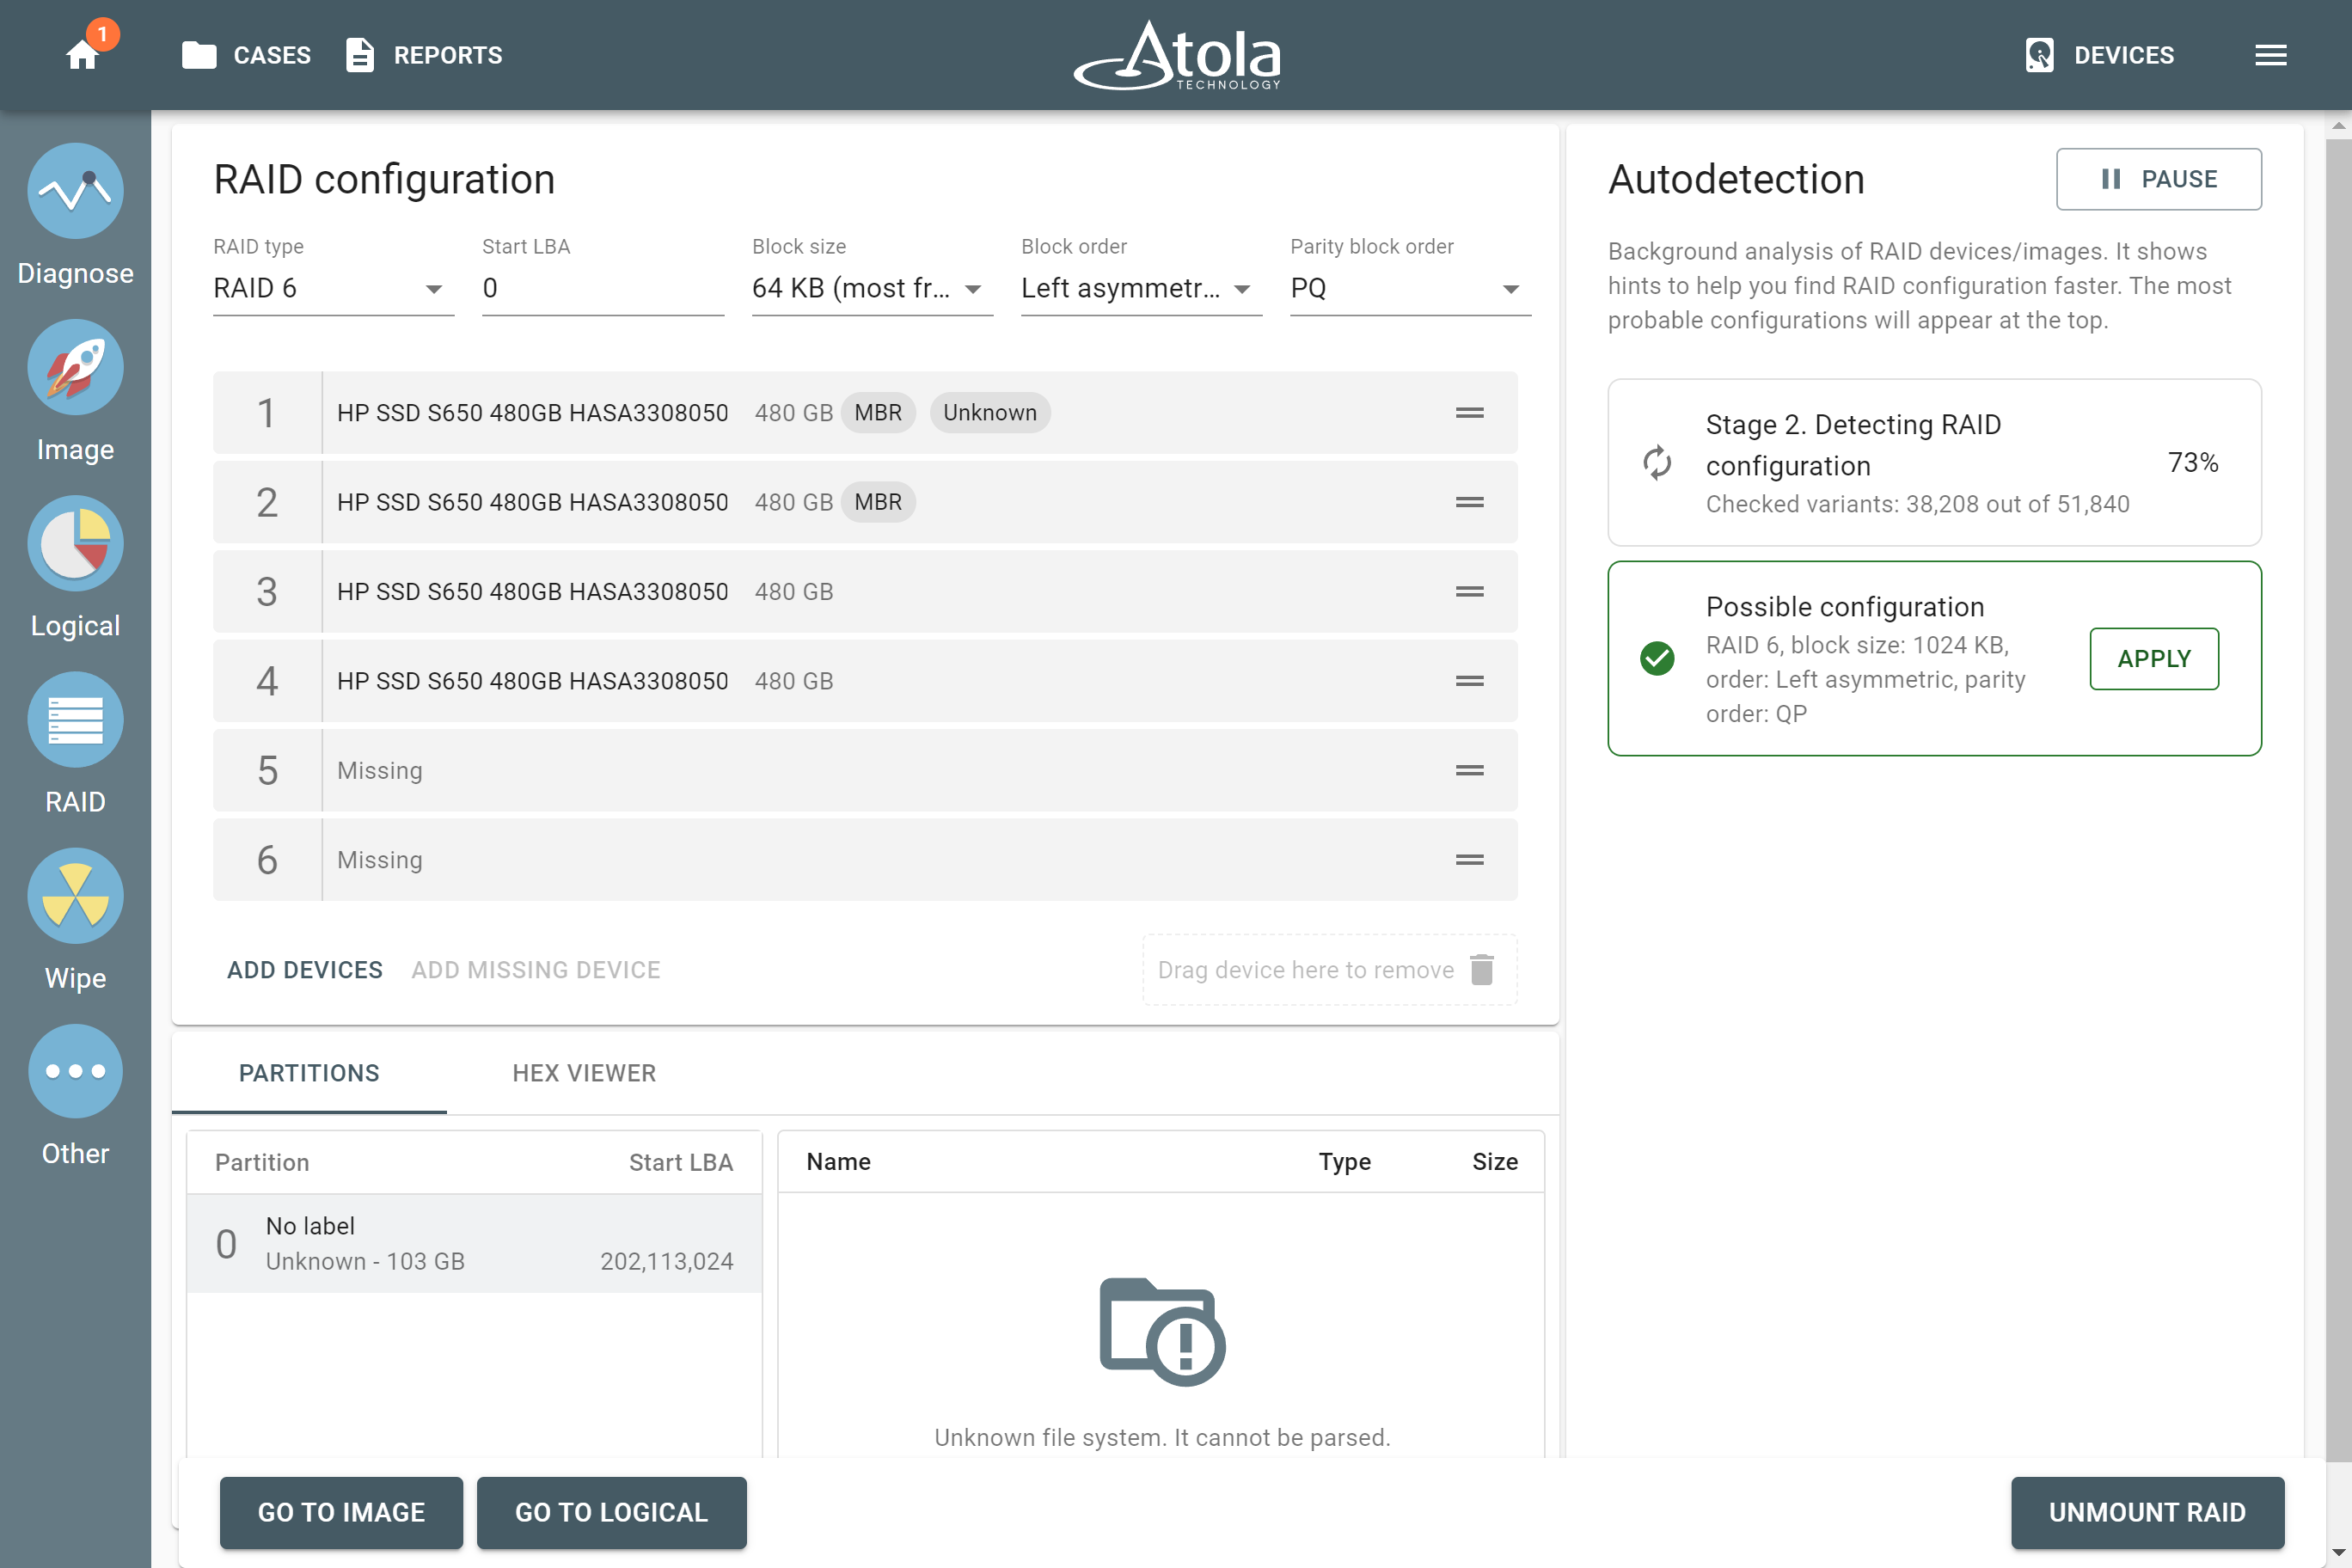
Possible configuration found for RAID 6 with two missing devices.
If all the array members are present but contain errors, TaskForce is still able to detect its parameters, parse its file systems for preview, and image such RAID.
The imaging algorithm uses parity information on the remaining devices in the array to compute the missing data on the fly. Thanks to extra redundancy of RAID 6, TaskForce creates a forensically sound bit-by-bit image of the entire array automatically, without involvement of a DFIR specialist.
Synology NAS RAID: Instant identification and reassembly
Network Attached Storage (NAS) by Synology is a popular hardware solution to store data on a network location.
TaskForce offers system-wide support for Synology NAS, including SHR/SHR2 RAID types, built upon ext4 and Btrfs file systems, and Logical Volume Manager (LVM).
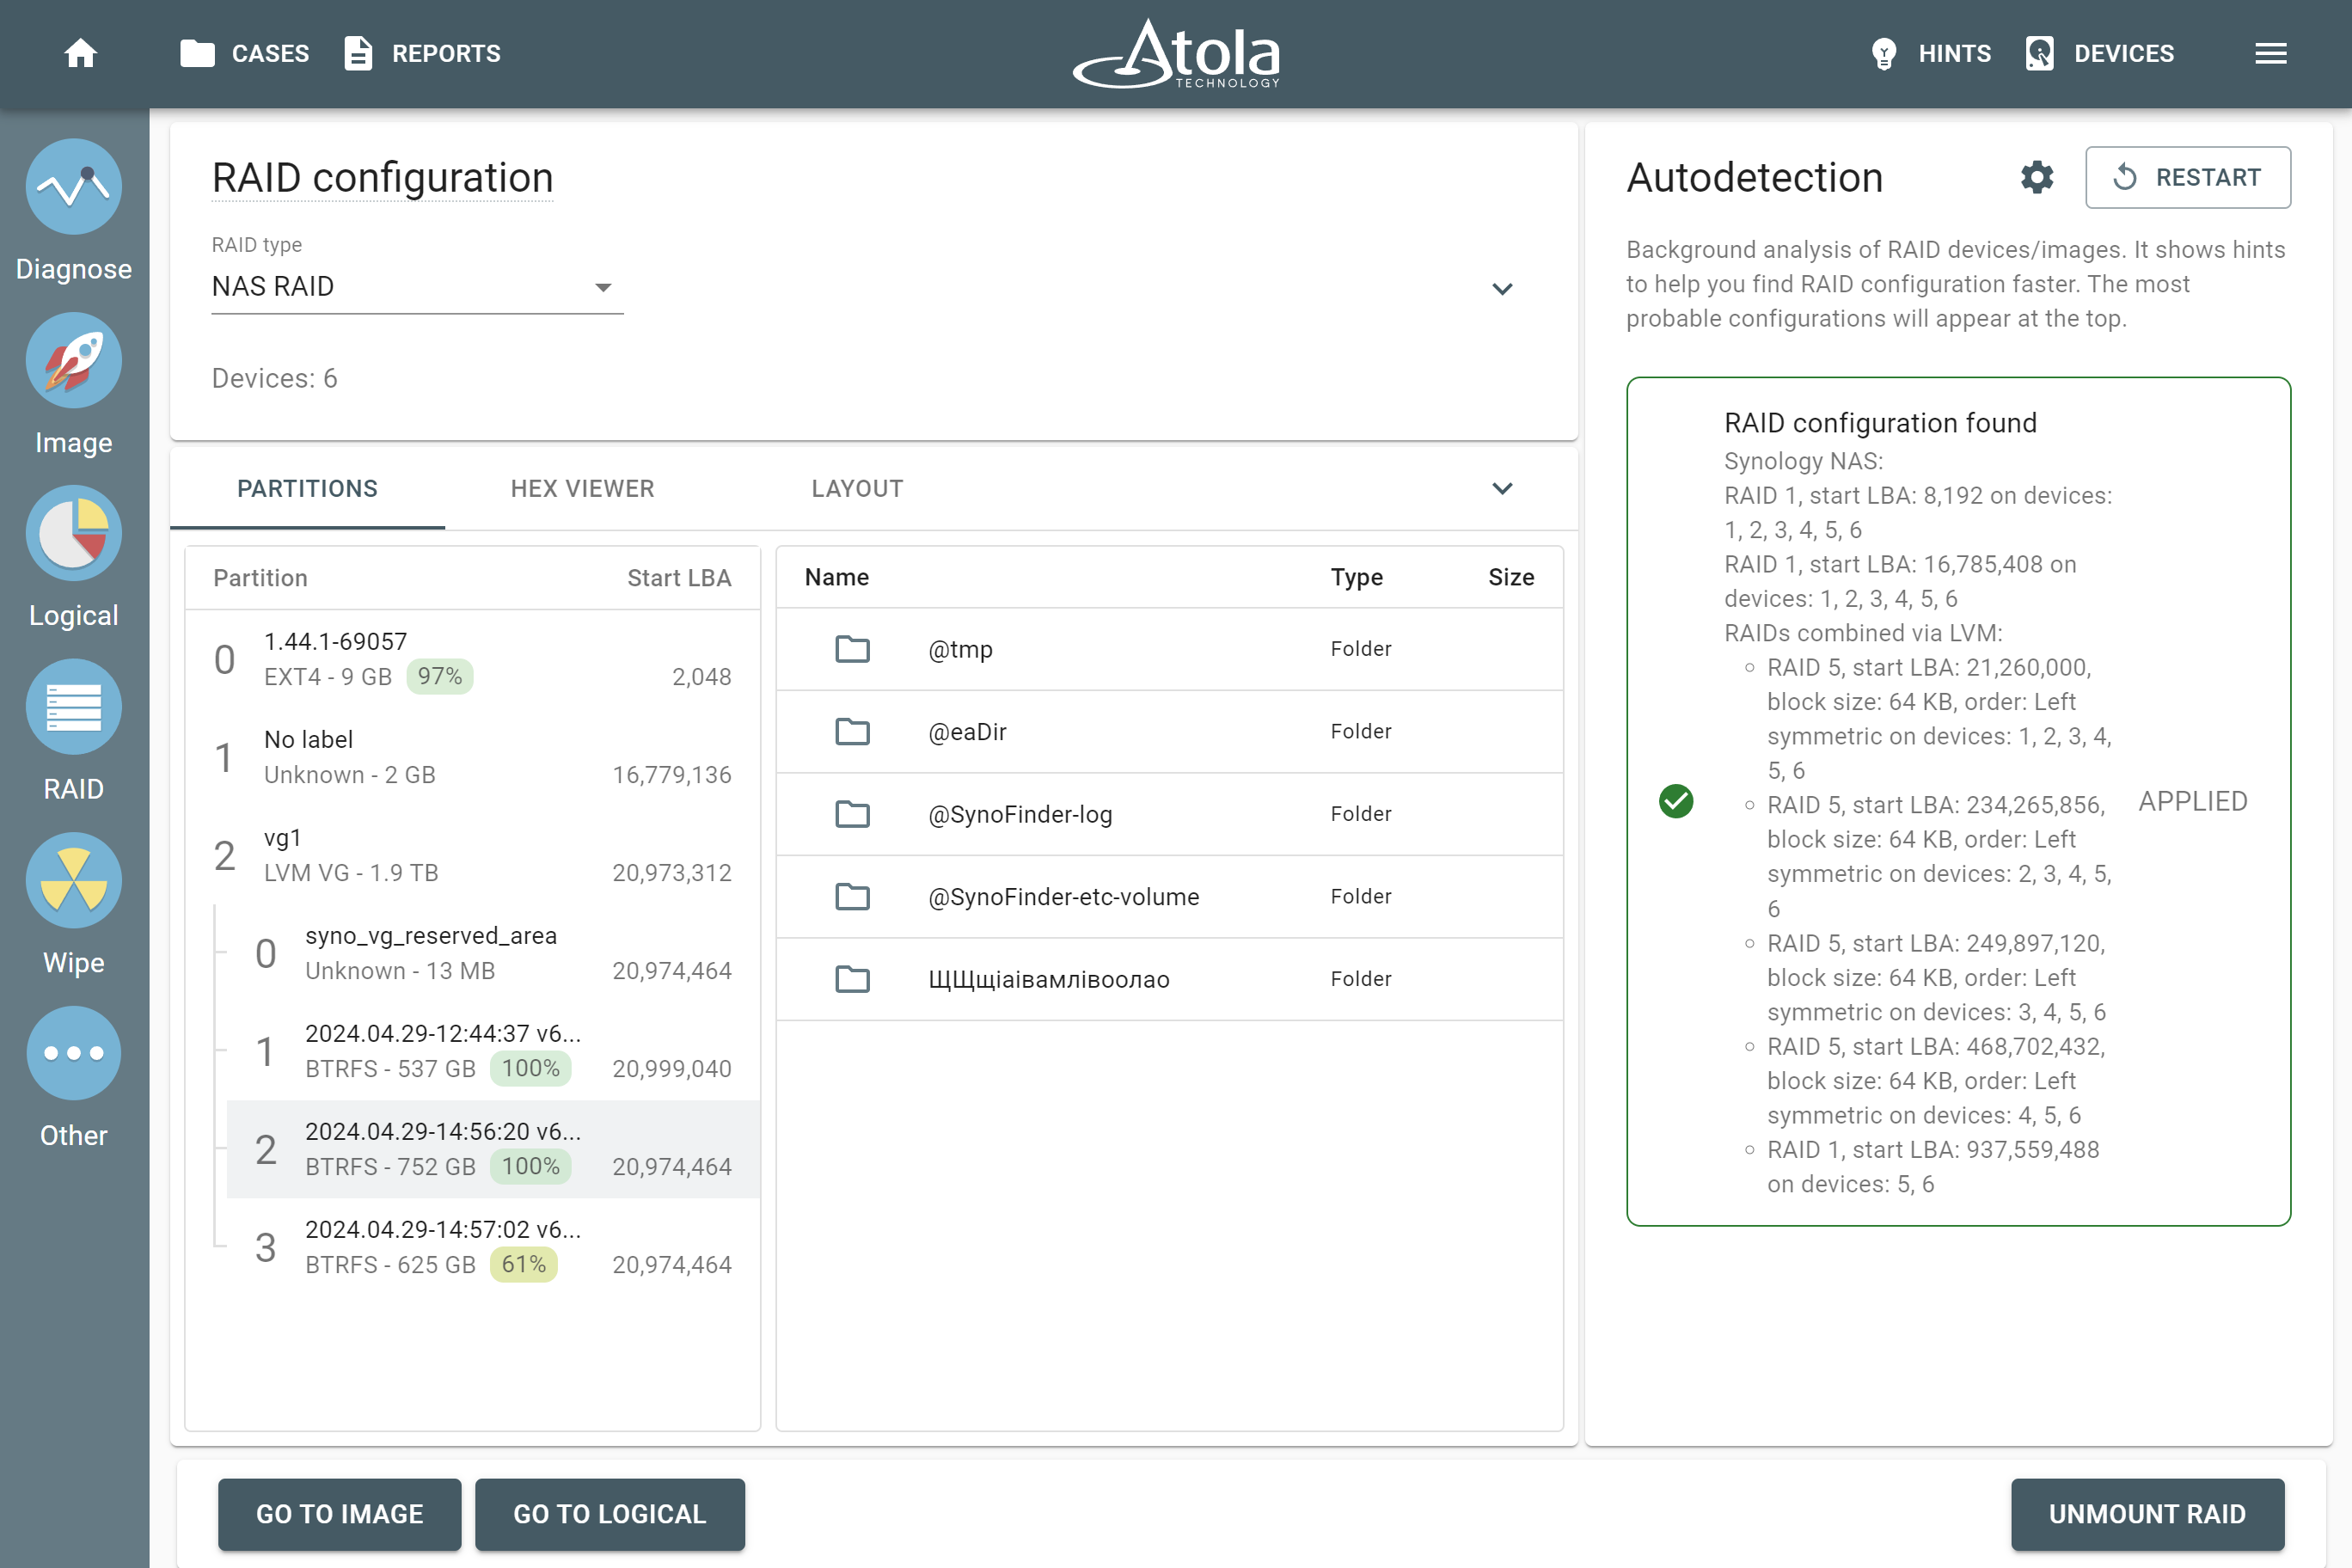
RAID configuration found for Synology NAS.
Instantly identify and assemble Linux mdadm-created RAID
TaskForce immediately recognizes and automatically mounts RAID arrays created with mdadm in Linux. It takes only a few seconds thanks to controller metadata detection.
The autodetection module can determine the Start LBA parameter for different types of mdadm RAID arrays.
Instant autodetection of mdadm RAID
Preview RAID partitions before imaging
Once RAID type and configuration are detected, file systems are found and validated, and the array is mounted, TaskForce shows you a preview of the array’s partitions, folders, and files at the bottom of the screen.
Here you can double-check if the applied configuration is correct and perform a preliminary assessment of the RAID’s contents. If everything looks fine, proceed to physical or logical imaging by clicking the respective button.
Partitions preview after successful application of RAID configuration suggestion.
Create a complete forensic image of a RAID array
For a full image acquisition, simply select your target, and start the session. All imaging settings can be applied to RAID acquisitions. TaskForce will image data at a speed sustained by the selected target.
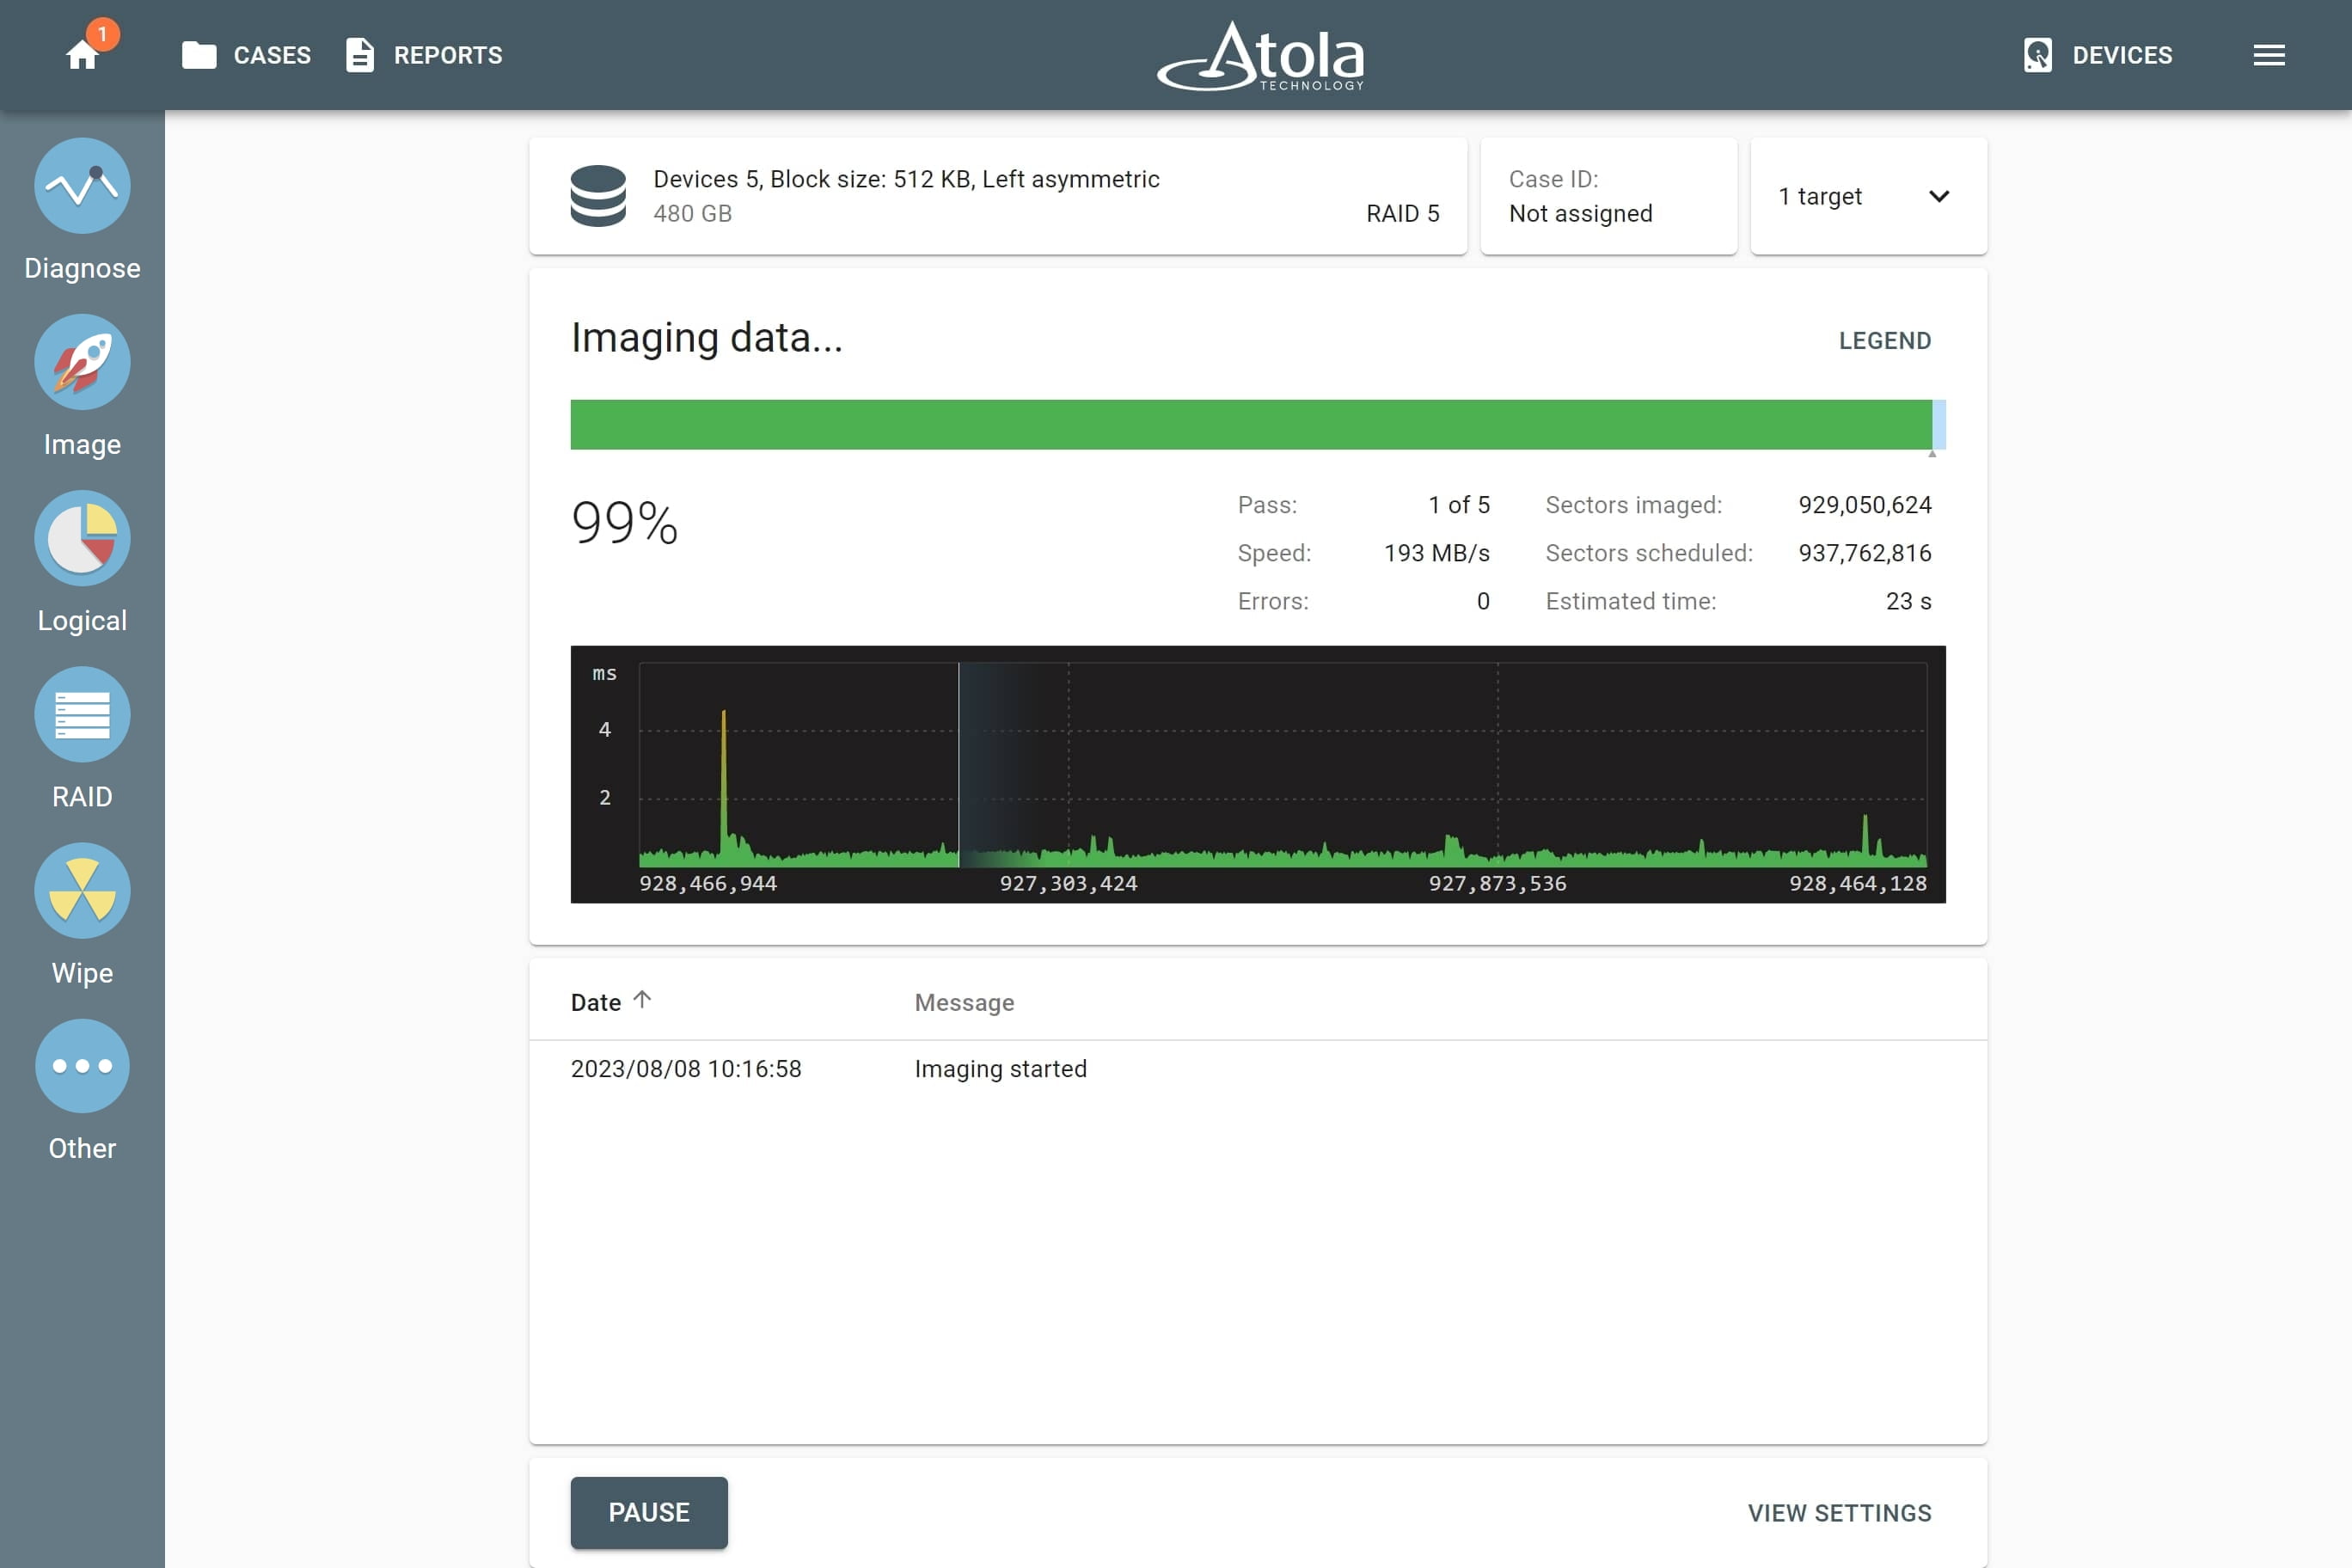
Imaging a RAID array.
Upon the completion of imaging, TaskForce provides you with an imaging report that lists all RAID details including all members, RAID configuration, and selected data range (the whole RAID or its elements, etc.).
Image only selected partitions
In TaskForce, you can choose which partitions of a RAID to image.
After the RAID configuration is applied, the file system is confirmed and you can see the detected partitions. Preview their contents and decide which of the partitions are of interest.
Click the Go to Image button and select the target you want to use. Then go to the imaging Settings and select Only sectors with data. Unselect the partitions you want to exclude from imaging.
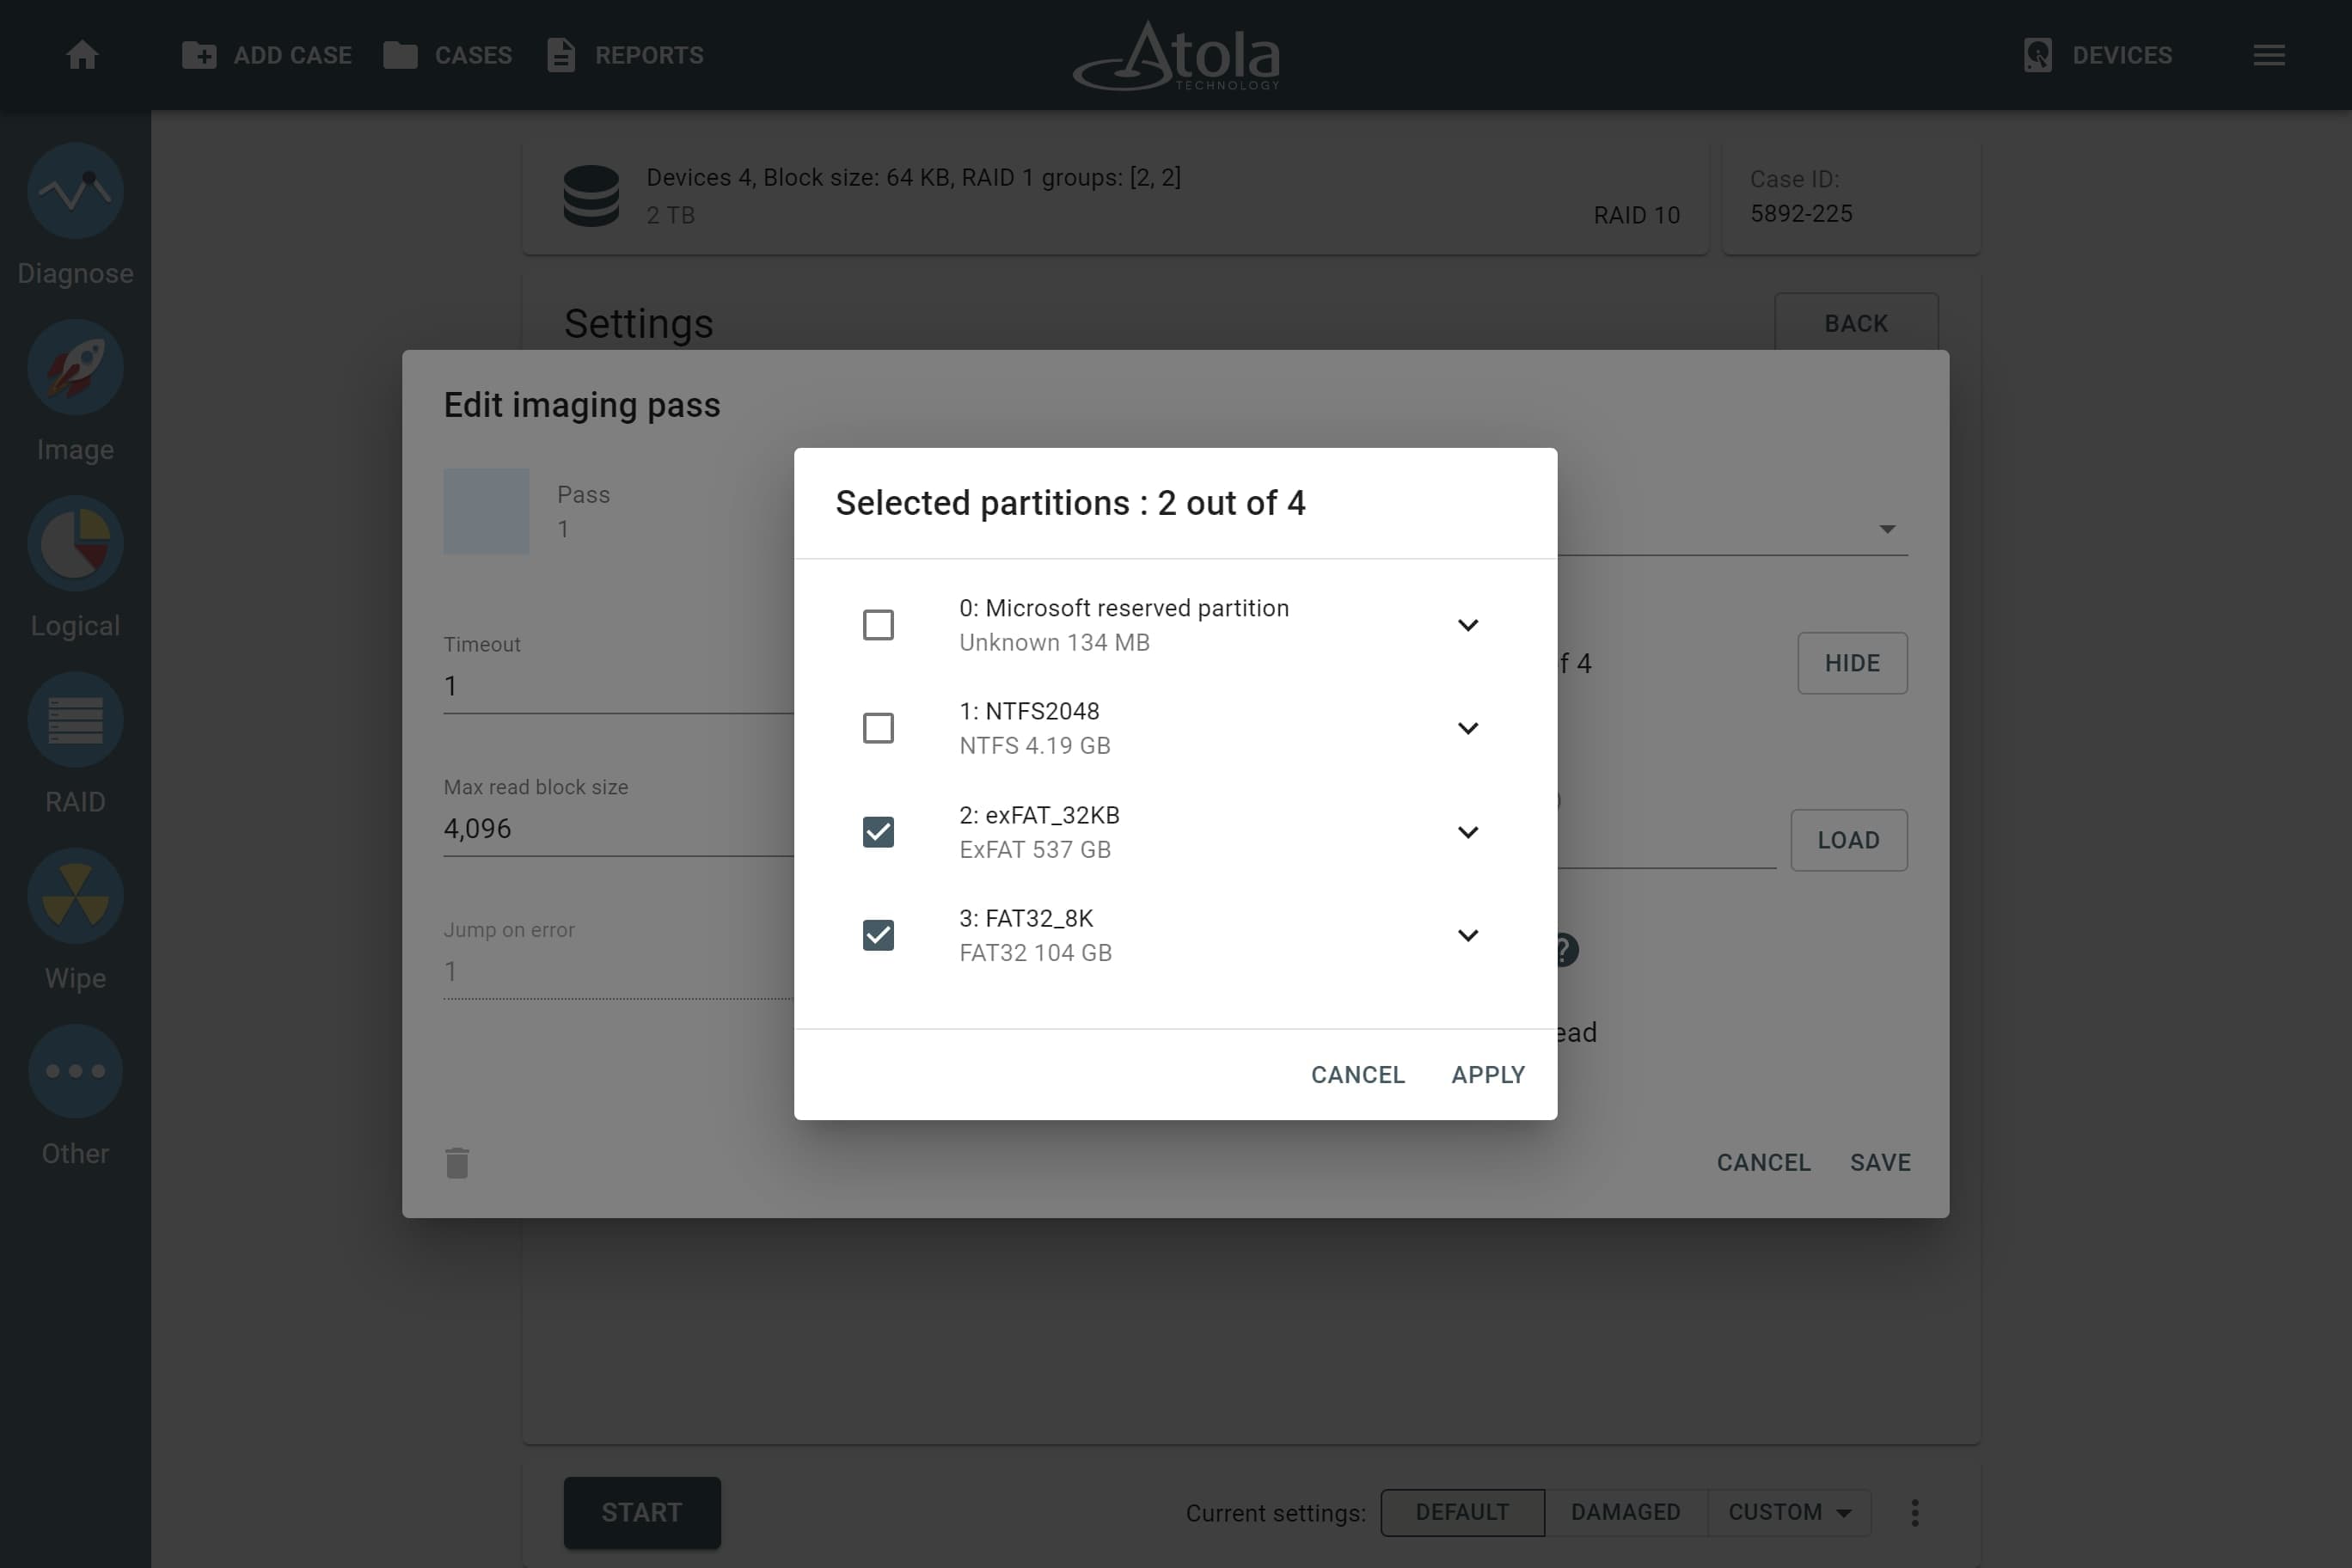
Imaging only selected partitions.
Quickly acquire only selected data from a RAID
To save time and quickly acquire the most critical data from a RAID, use logical imaging.
By default, logical imaging is set to image all files from the drive. To fine-tune your selection, include what you need:
- All or selected partitions
- Manually selected files and/or folders
- Select file types: archives, emails, documents, databases, financial, virtual machine, audio, video, pictures, security keys
- Type in file extensions
- Folder types: only user or only OS folders
- Time spans: when files were accessed, created, modified
- File size: from 1 byte to infinity
Exclude what is irrelevant:
- Exclude filters allow using the same parameters to eliminate irrelevant files and folders for further precision of your search.
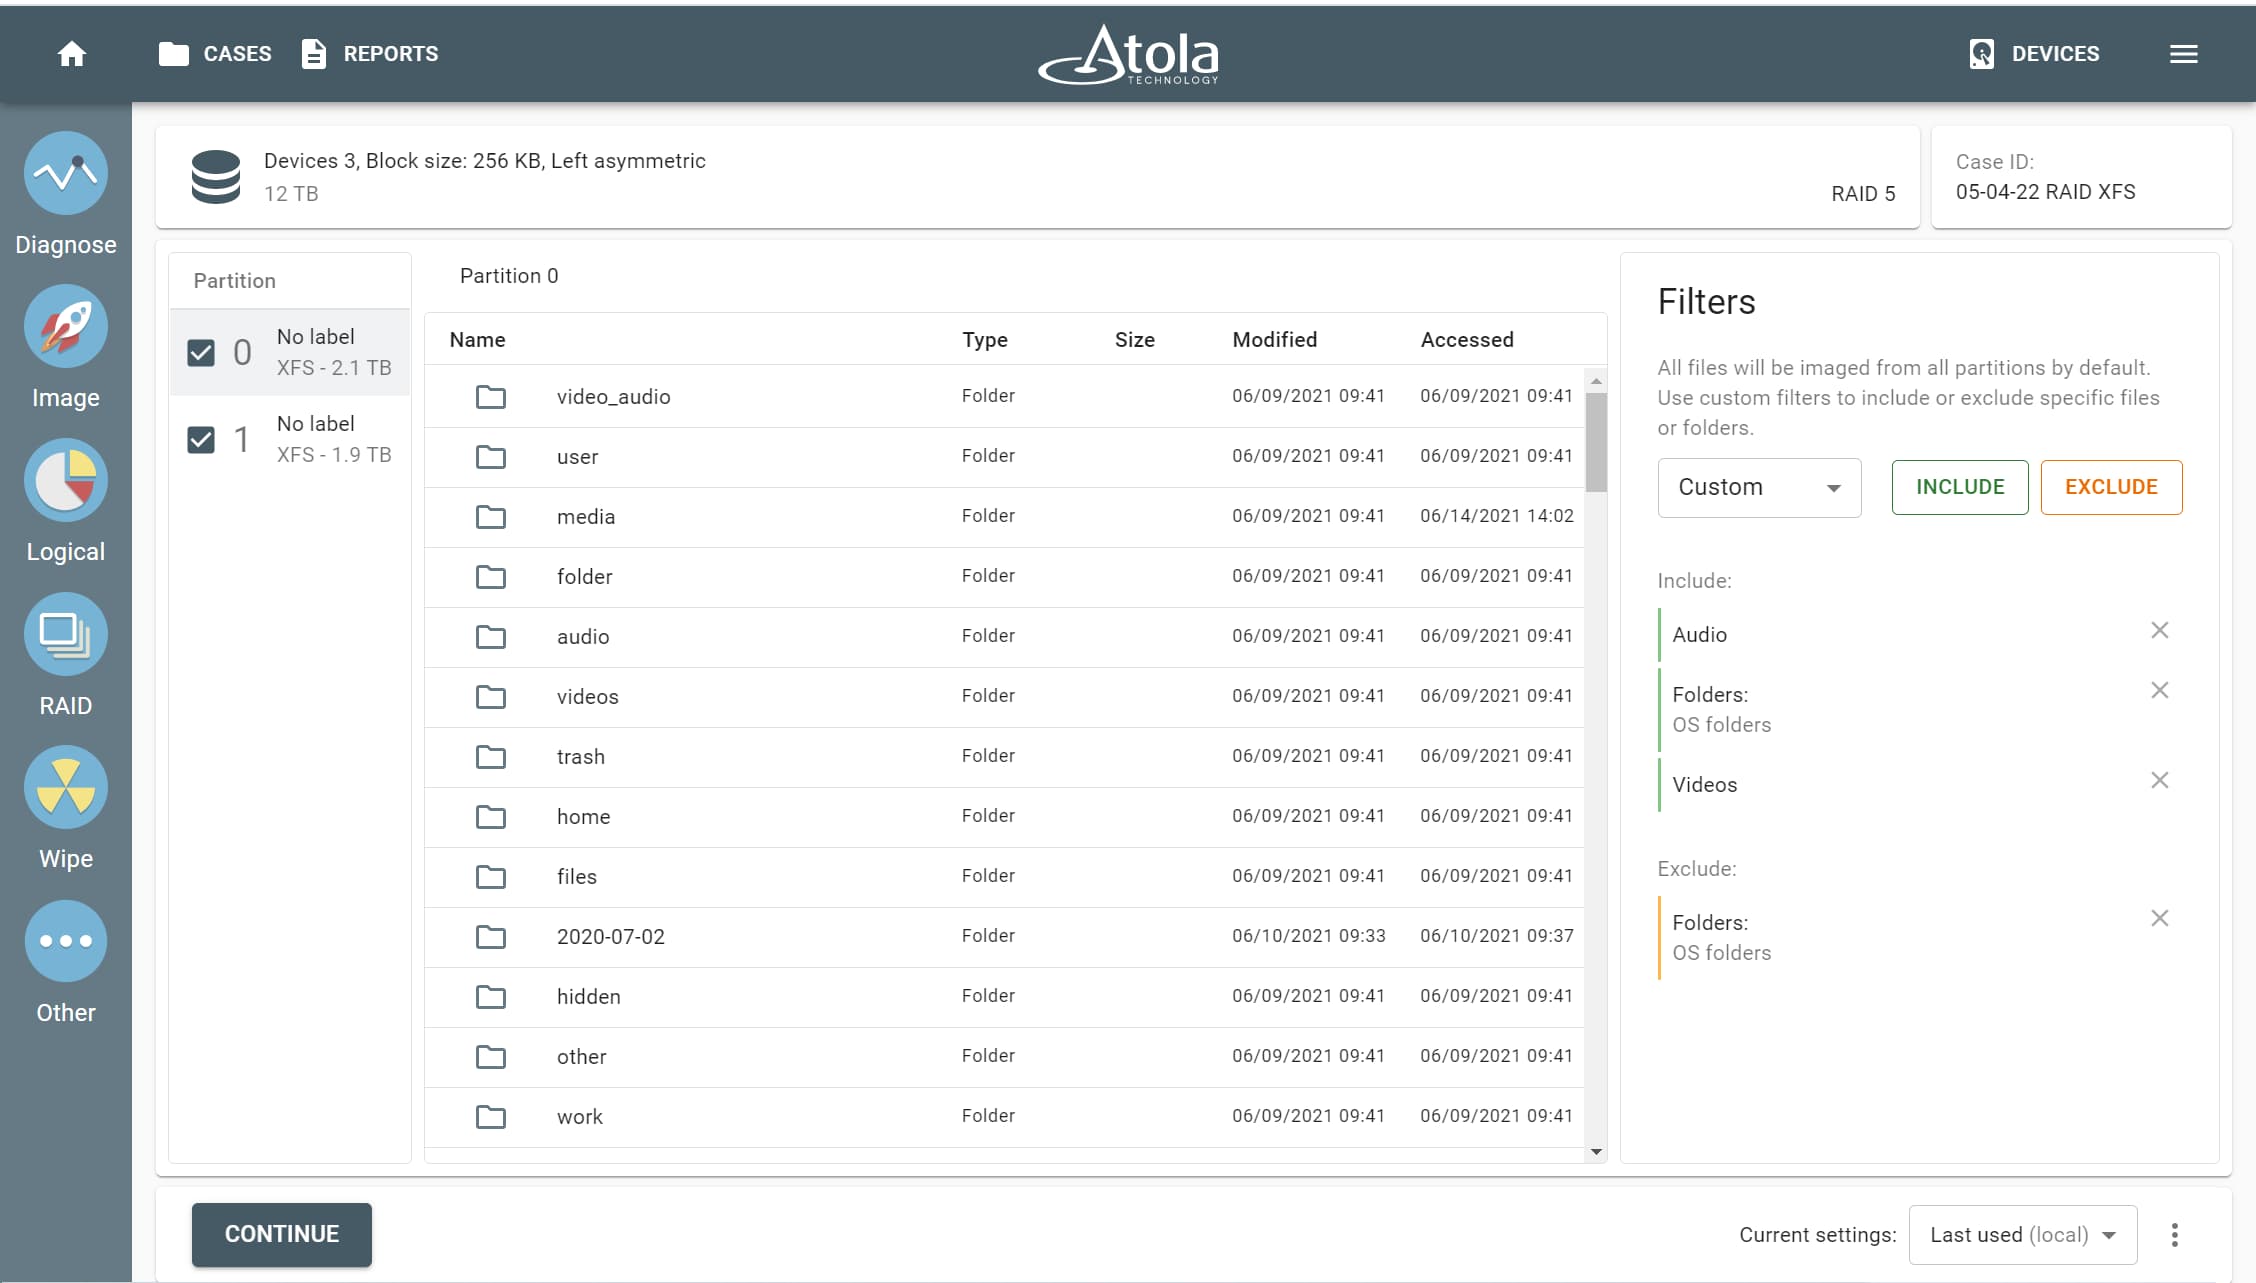
Logical imaging of a RAID array.