Evidence drive diagnostics
The operation of most evidence acquisition tools is based on the assumption that everything is working properly. This approach works until the hard drive stops in the middle of the imaging session, and in a few hours, you have to conclude that the evidence drive is dead.
Atola TaskForce can automatically diagnose a hard drive to identify the exact reason for failure and suggest the best imaging approach.
Sample diagnostics reports

Always diagnose before imaging
We at Atola Technology are strong proponents of running diagnostics on every evidence drive.
First of all, if a drive is damaged, diagnostics help you make an informed decision on how to get evidence from this drive using TaskForce. You need to make sure that by imaging an evidence drive, you are not causing further damage to it.
Secondly, a diagnostics report shows you if there is any data on the drive, thus helping you to prioritize the drive among others involved in the same case.
Last but not least, TaskForce gives you an estimate of how much time it will take to image this drive.
What happens during the diagnostics
TaskForce's automatic diagnostics evaluates the state of the hard drive, identifies specific errors and recommends steps for data recovery and extraction.
The operator simply plugs the damaged hard drive into the TaskForce unit and clicks a single button to start an automatic checkup.
What happens next:
- TaskForce measures and analyzes currents to detect problems with a circuit board (PCB).
- It also analyzes each of the heads to detect head damage.
- Then TaskForce performs initial media surface reading to detect issues and estimate the time of imaging.
- Then there is a set of firmware checks including SMART analysis, HPA and DCO checks.
- And finally, TaskForce scans the drive for file systems and detects any logical problems with them.
Real-time status updates are displayed throughout the diagnostics. A full diagnostic report is generated in under 3 minutes.
Drive diagnostics in progress.
Steps of the diagnostic process
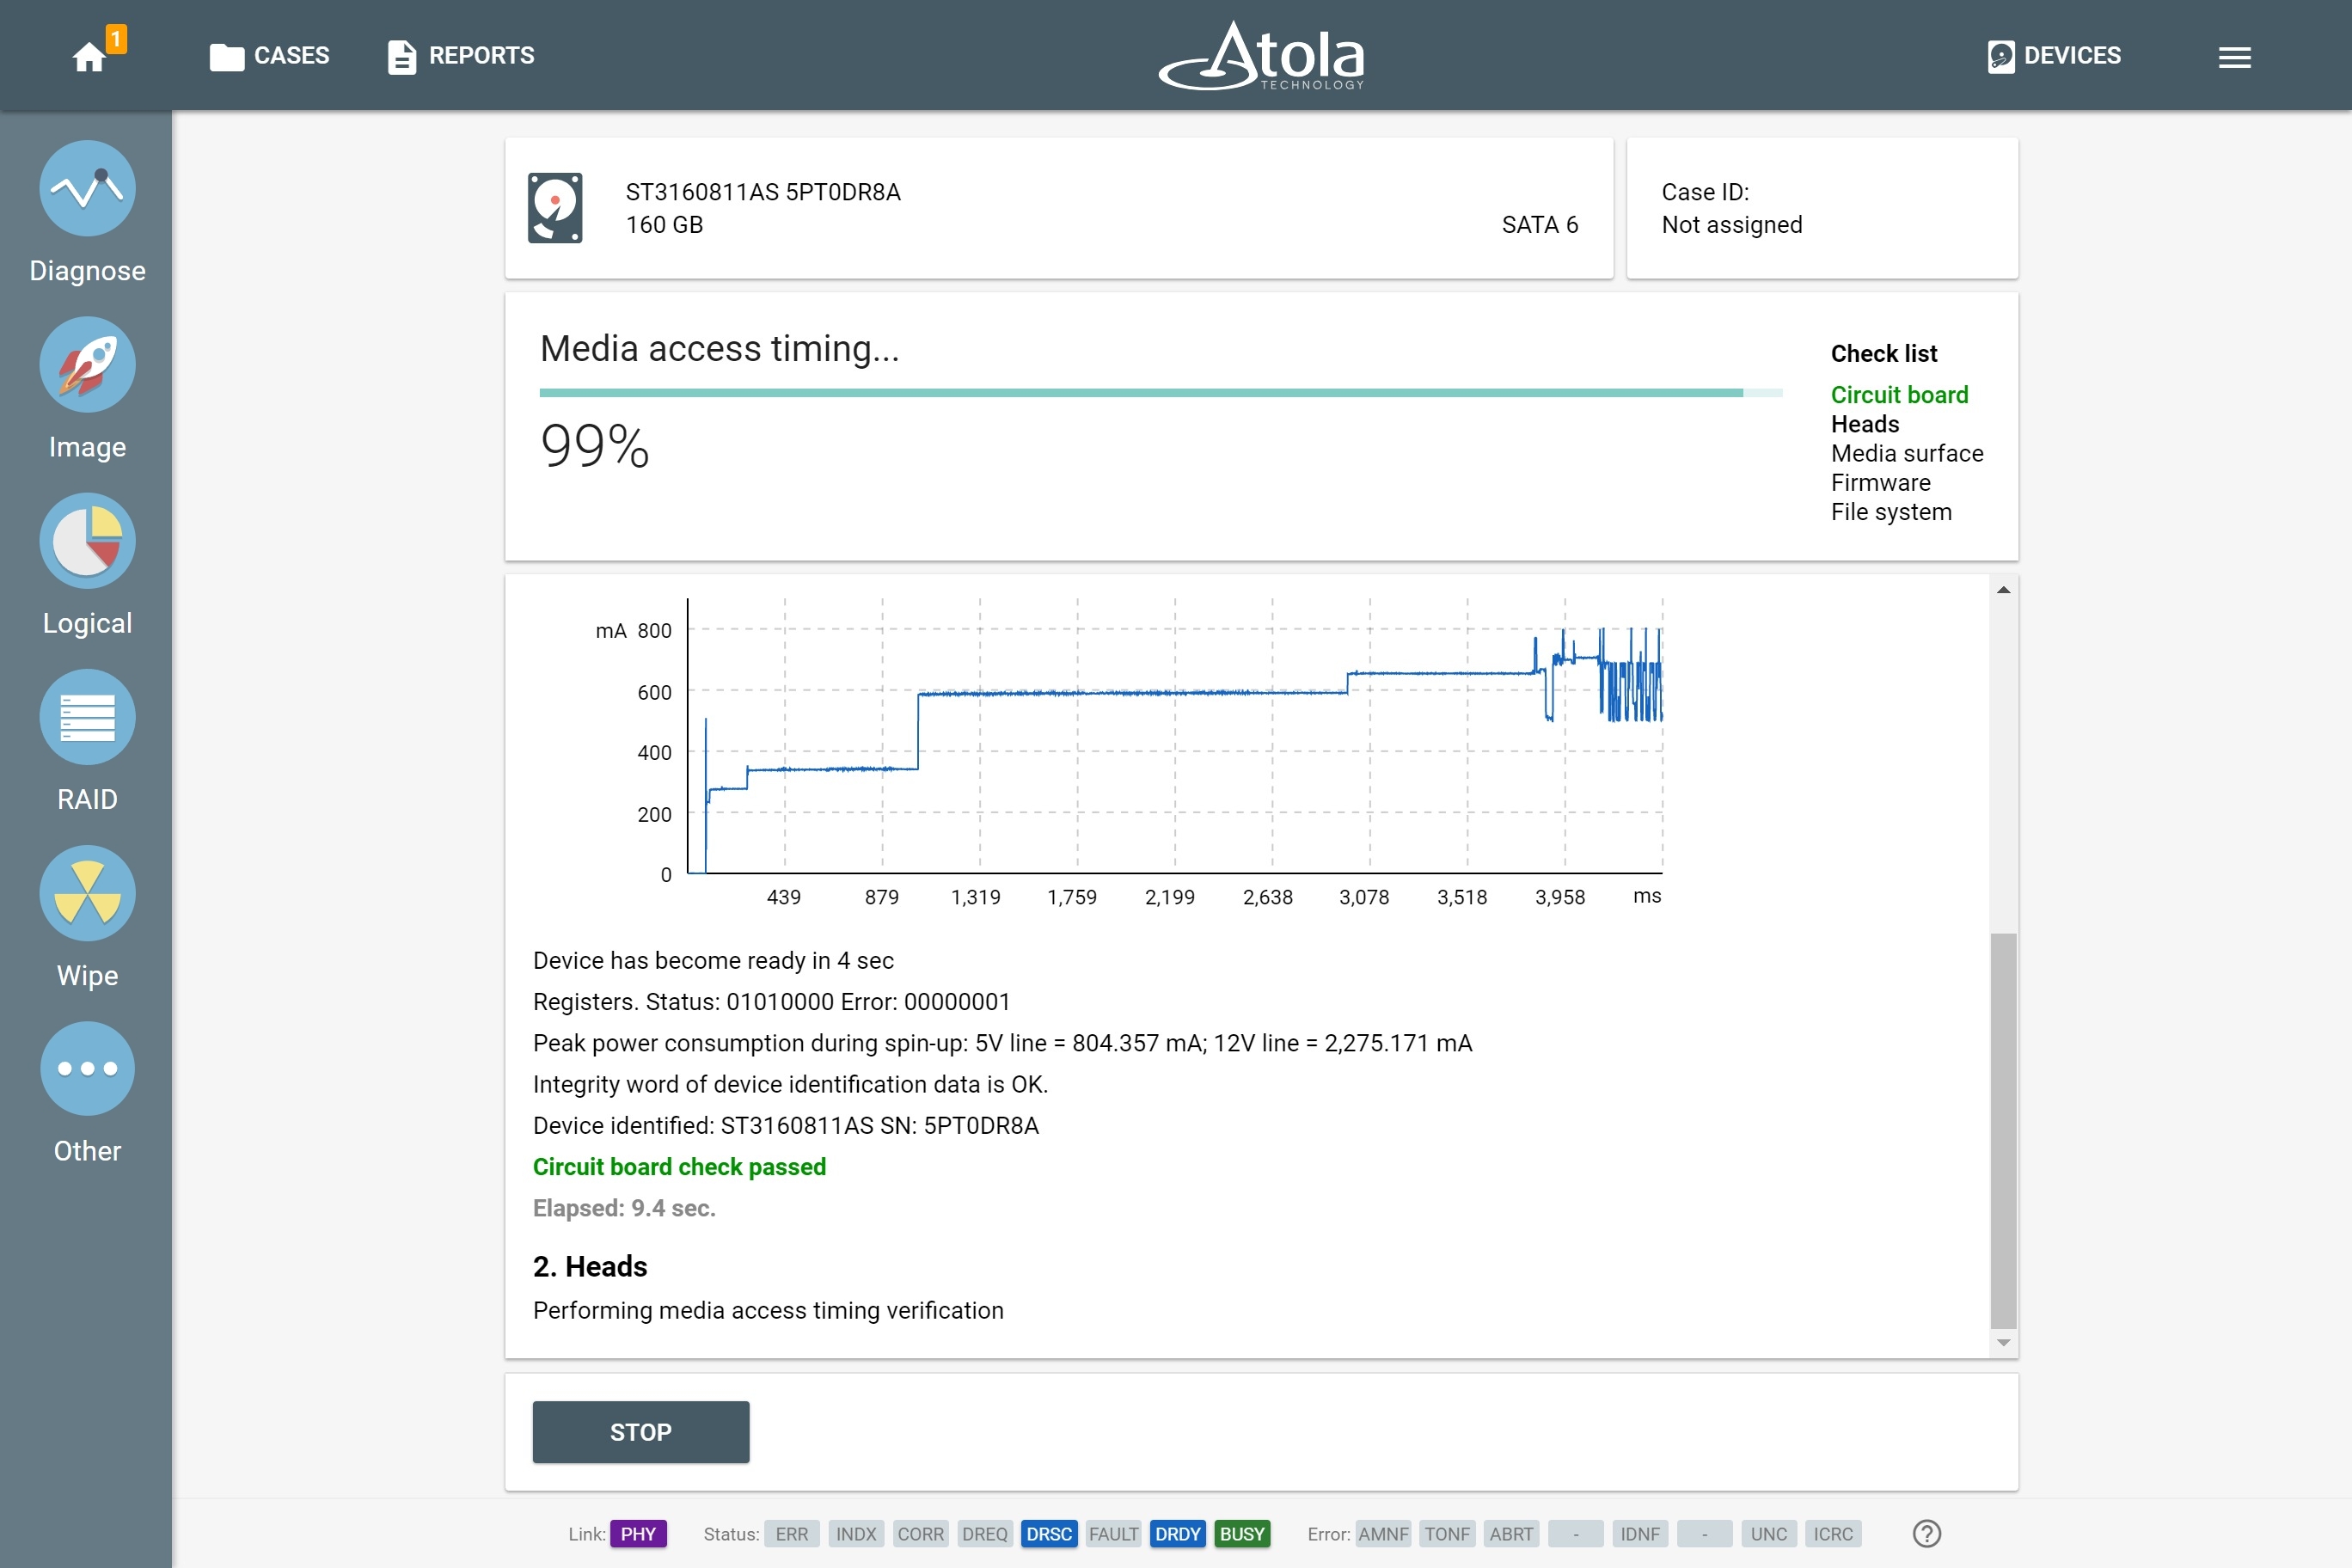
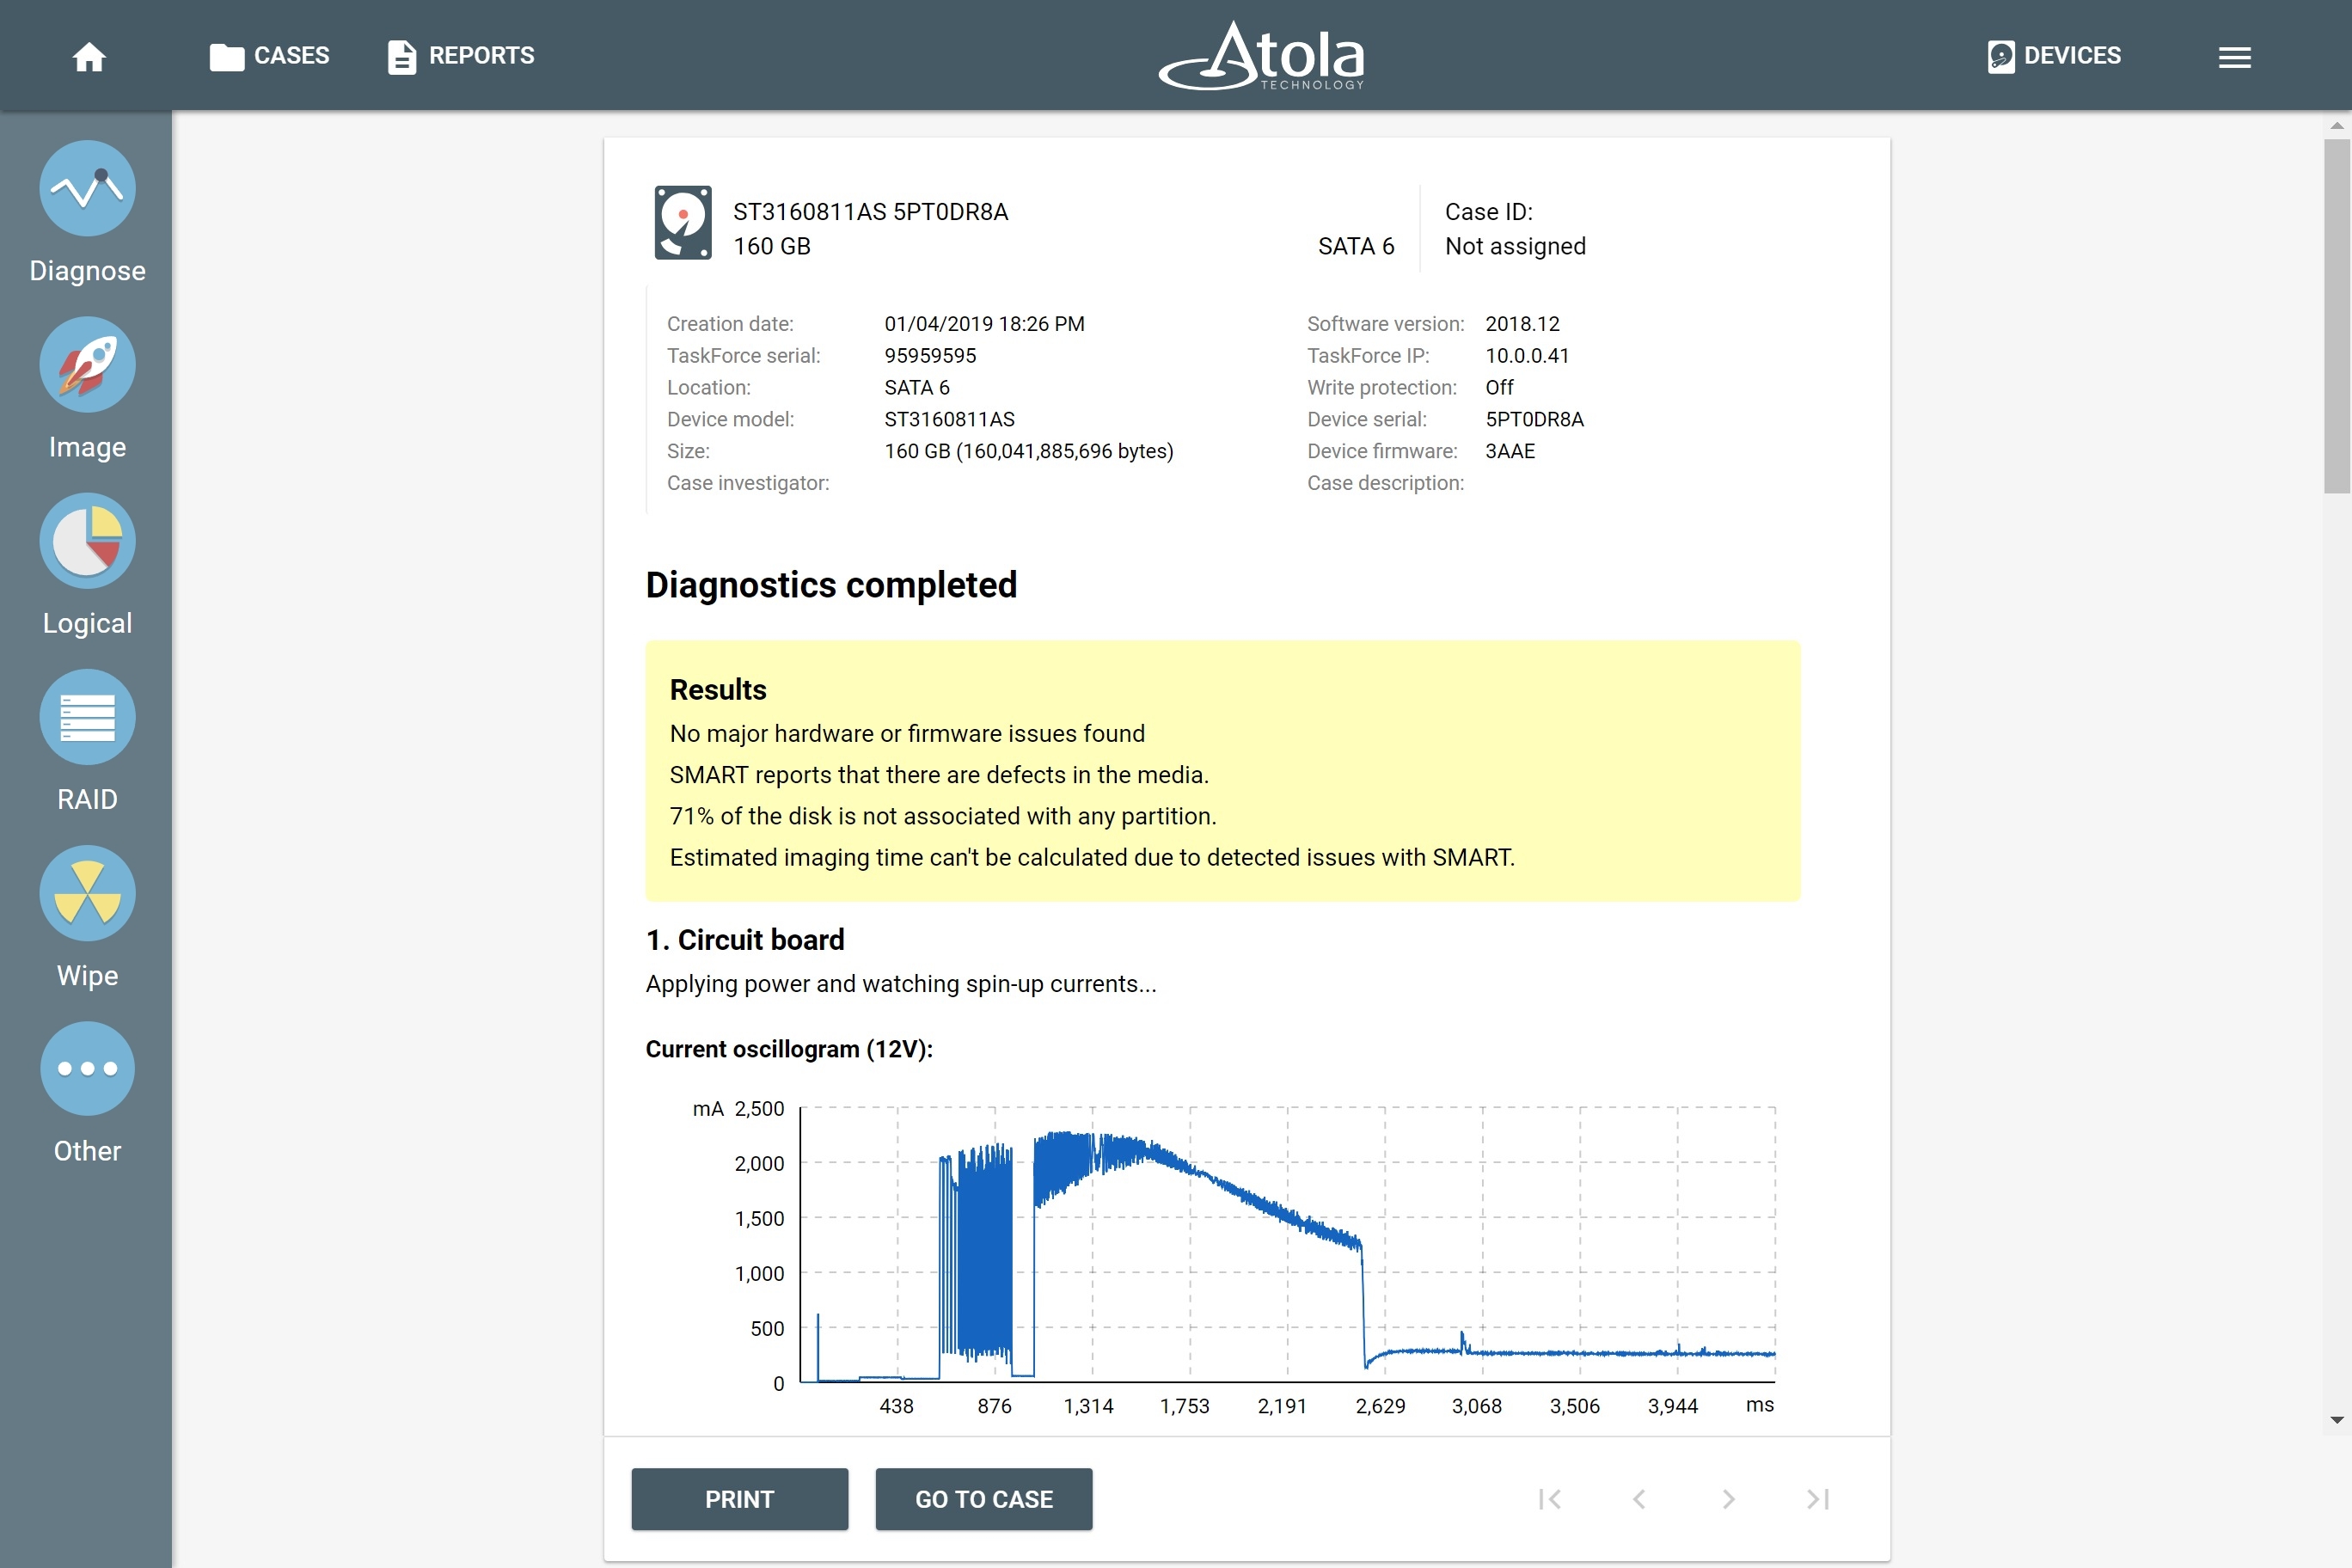
1. Circuit board
To detect possible issues with the printed circuit board and the motor, TaskForce applies power to the device and watches spin-up currents. Then the system compares the startup currents to its internal database to identify a specific failure.
To recognize an exact model of the device, TaskForce reads its identification sector. And even the drives that cannot be recognized by any system still can be diagnosed.
2. Heads
To avoid possible delays during imaging, TaskForce analyzes each head to detect head damage.
Attempts to read sectors with a damaged head add a lot of time to the imaging process and can cause further damage to the hard drive. Diagnostics help to identify the damage to the head stack and pinpoint which heads are damaged.
TaskForce smartly prompts to disable a particular damaged or degraded head. Once the operator clicks “yes”, the system automatically disables the head. If the user clicks “no” the degraded head can still be disabled manually in the imaging settings.
Avoid the need to swap heads
Physical head swap is always a challenge. Certain hard drive designs make the process extremely complicated, and in some cases, donor parts can be very difficult or even impossible to acquire. Physical recovery cases can be time-consuming and expensive; head-by-head imaging can often save an operator the need to attempt a head swap.
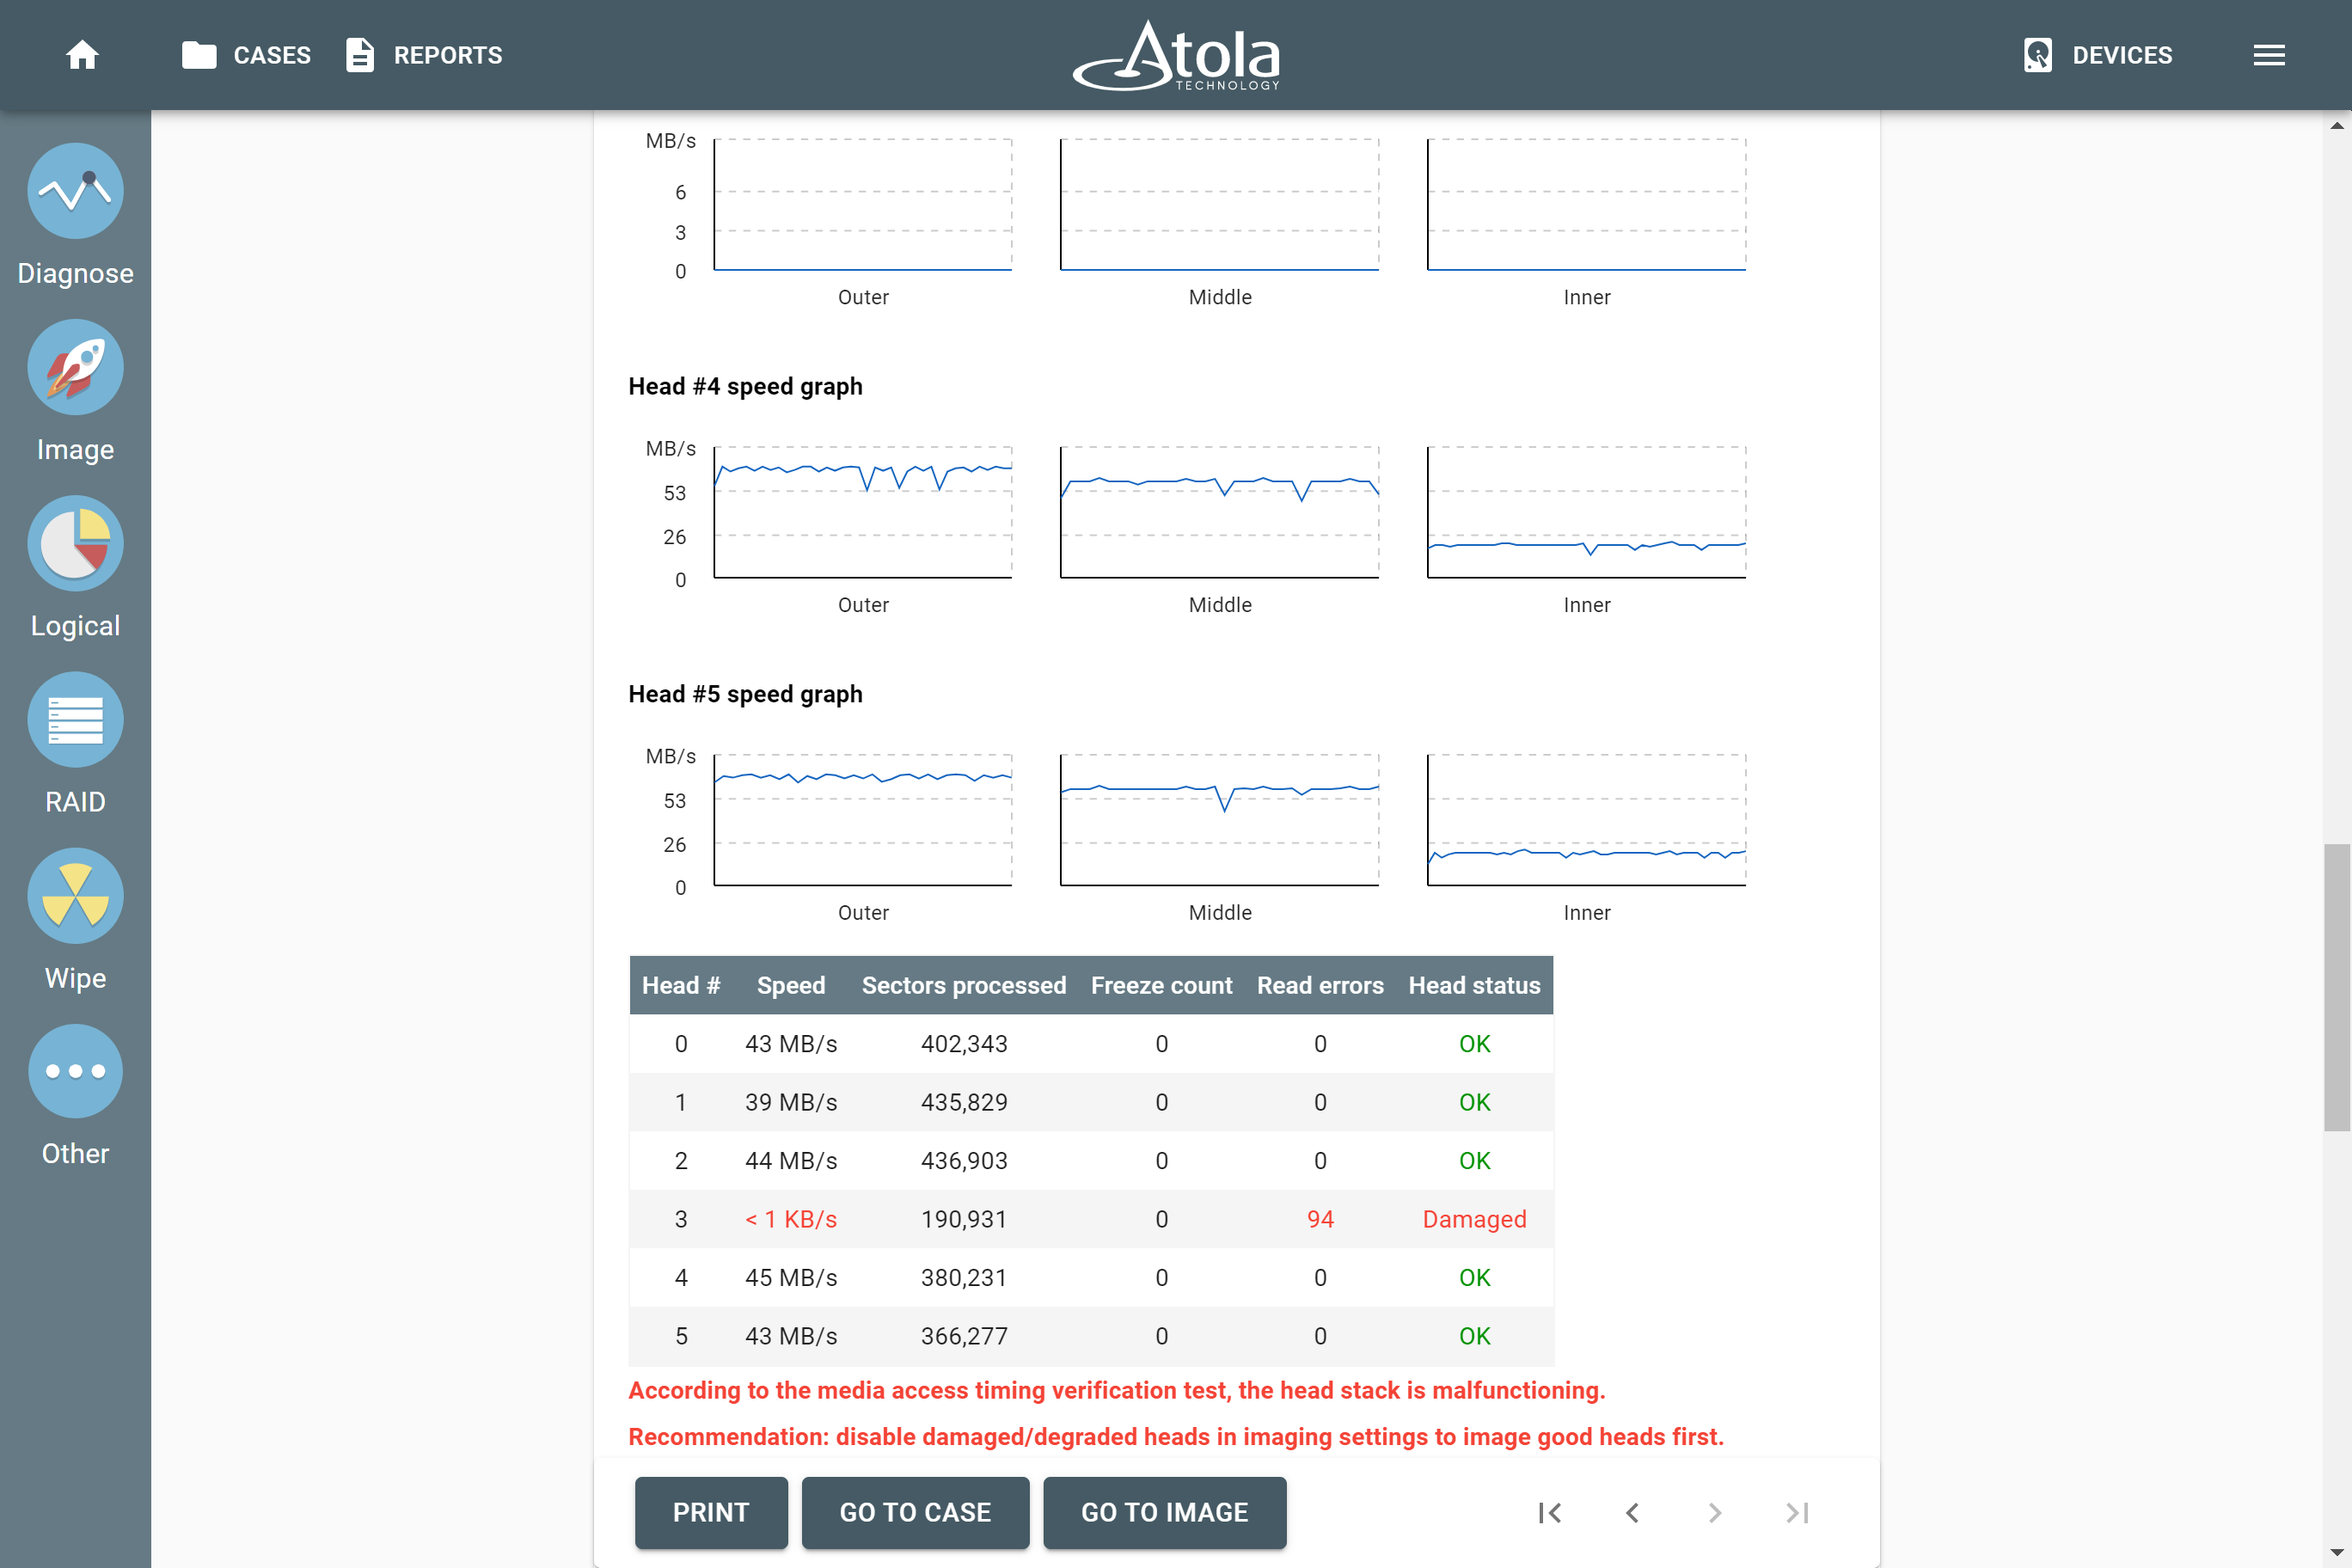
One degraded head detected during HDD diagnostics.
3. Media surface
To assess the drive’s readability, TaskForce checks if there are any bad sectors in the starting, middle and ending sectors of the drive.
To get an imaging time estimate, the system also evaluates the reading speed in different parts of the drive surface.
4. Firmware
During the firmware analysis, TaskForce checks if the device is locked with a password and whether its identification data is valid.
The diagnostics module also detects any hidden areas, created by HPA, DCO, or AMA limitations.
To evaluate if there are any defects in the media, the system reads the SMART table.
The diagram in the diagnostics report shows the device temperature history during the recent work time intervals between power cycles. This information can provide an investigator with additional clues about the device’s condition and patterns in its recent use.
5. File system
TaskForce detects and verifies the file systems on the drive.
The diagnostics report contains information about the type and size of partitions and their starting sectors.
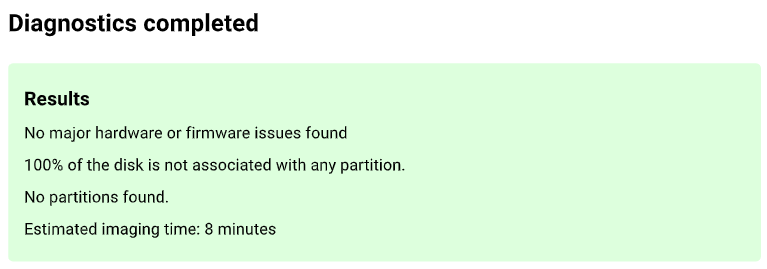
The system also notifies an investigator if any disk space is not associated with any partition.

Supported device types
TaskForce can diagnose all popular device types:
- SATA HDD and SSD
- SAS HDD and SSD
- M.2 PCIe (NVMe) and SATA SSD
- PCIe SSDs from Apple MacBooks (2013-2015)
- USB HDD and SSD
- USB Flash media
- IDE
- SD, CompactFlash, and Memory Stick cards
Drives with multiple failures
TaskForce can detect multiple issues at once. Sometimes, during the first diagnostics, only one of them will show up, and the other will be detected later, in the recovery stage.
For example, if a drive fails in both the PCB and firmware area, only the PCB damage will be identified at first. This is because the PCB is responsible for relaying electrical signals from the drive to detect firmware damage.
Once the PCB is repaired, the drive should be diagnosed for the second time to identify the damage to the firmware area.
Damaged drive diagnostics.
Diagnose drives that cannot be identified
TaskForce can accurately diagnose evidence drives that cannot be identified or recognized by any system. When TaskForce can’t identify a drive, it can sense the PHY status, display the state of its registers, analyze currents and detect a short circuit.
TaskForce applies power to the drive, while immediately starting to sample its startup currents. The next step: comparing the startup currents to the internal database, thus detecting a specific failure.
This very approach allows you to successfully identify a range of defects: head stack failure, motor damage, electronic board damage, and more.