Unclip or change HPA, DCO, or AMA restrictions
HPA (host protected area), DCO (device configuration overlay), and AMA (accessible max address) features were created by hard drive manufacturers as hidden areas reserved for storing vendor utilities or simply to make a drive appear to have a certain number of sectors (smaller than the actual drive capacity). Sometimes they use it for refurbished drives.
But it was many years ago that end users learned to modify and write to these areas of hard drives with the help of open-source and freely available tools.
For digital forensics specialists, it means that without the ability to identify such hidden areas of a drive and image the full physical image including data in these areas, the evidence they get may be incomplete and lead to inaccurate investigative conclusions.
Atola Insight Forensic can detect, unclip, or change HPA, DCO, and AMA limitations.
The DCO and HPA can co-exist on the same drive: max address limited via HPA should be less than DCO.
AMA is supported by new drives and can't exist if DCO or HPA is supported, and vice versa.
Detect HPA, DCO, or AMA restrictions
When you connect a hard drive to the DiskSense unit, in addition to the standard Identify device command, Atola Insight Forensic automatically sends commands to look up the drive size as set in the drive’s firmware.
If drive size is limited by HPA, DCO, or AMA, Insight draws attention to these changes by adding corresponding red indicators to the DiskSense Source Port.


To get more details about the modifications that have been made to the drive’s firmware, run Automatic Checkup.

AMA limitation is indicated in the Diagnostics results.
In the Firmware section of the Diagnostics report, there are two (for AMA) or three (for HPA and DCO) of the following lines, indicating the drive’s Max Address according to different records in the drive’s firmware:
- The Max Address according to device ID line shows the max address from the ID sector, affected by DCO and HPA/AMA restrictions if those are applied.
- Accessible Max Address indicates max address ignoring AMA limitation that may have been enabled.
- Native Max Address indicates max address ignoring HPA limitation that may have been enabled, yet affected by DCO restriction.
- Max Address from DCO is the line that gives you the actual drive size.
A Diagnostics report of a drive that does not have HPA, DCO, or AMA activated will have the same value in all these lines.
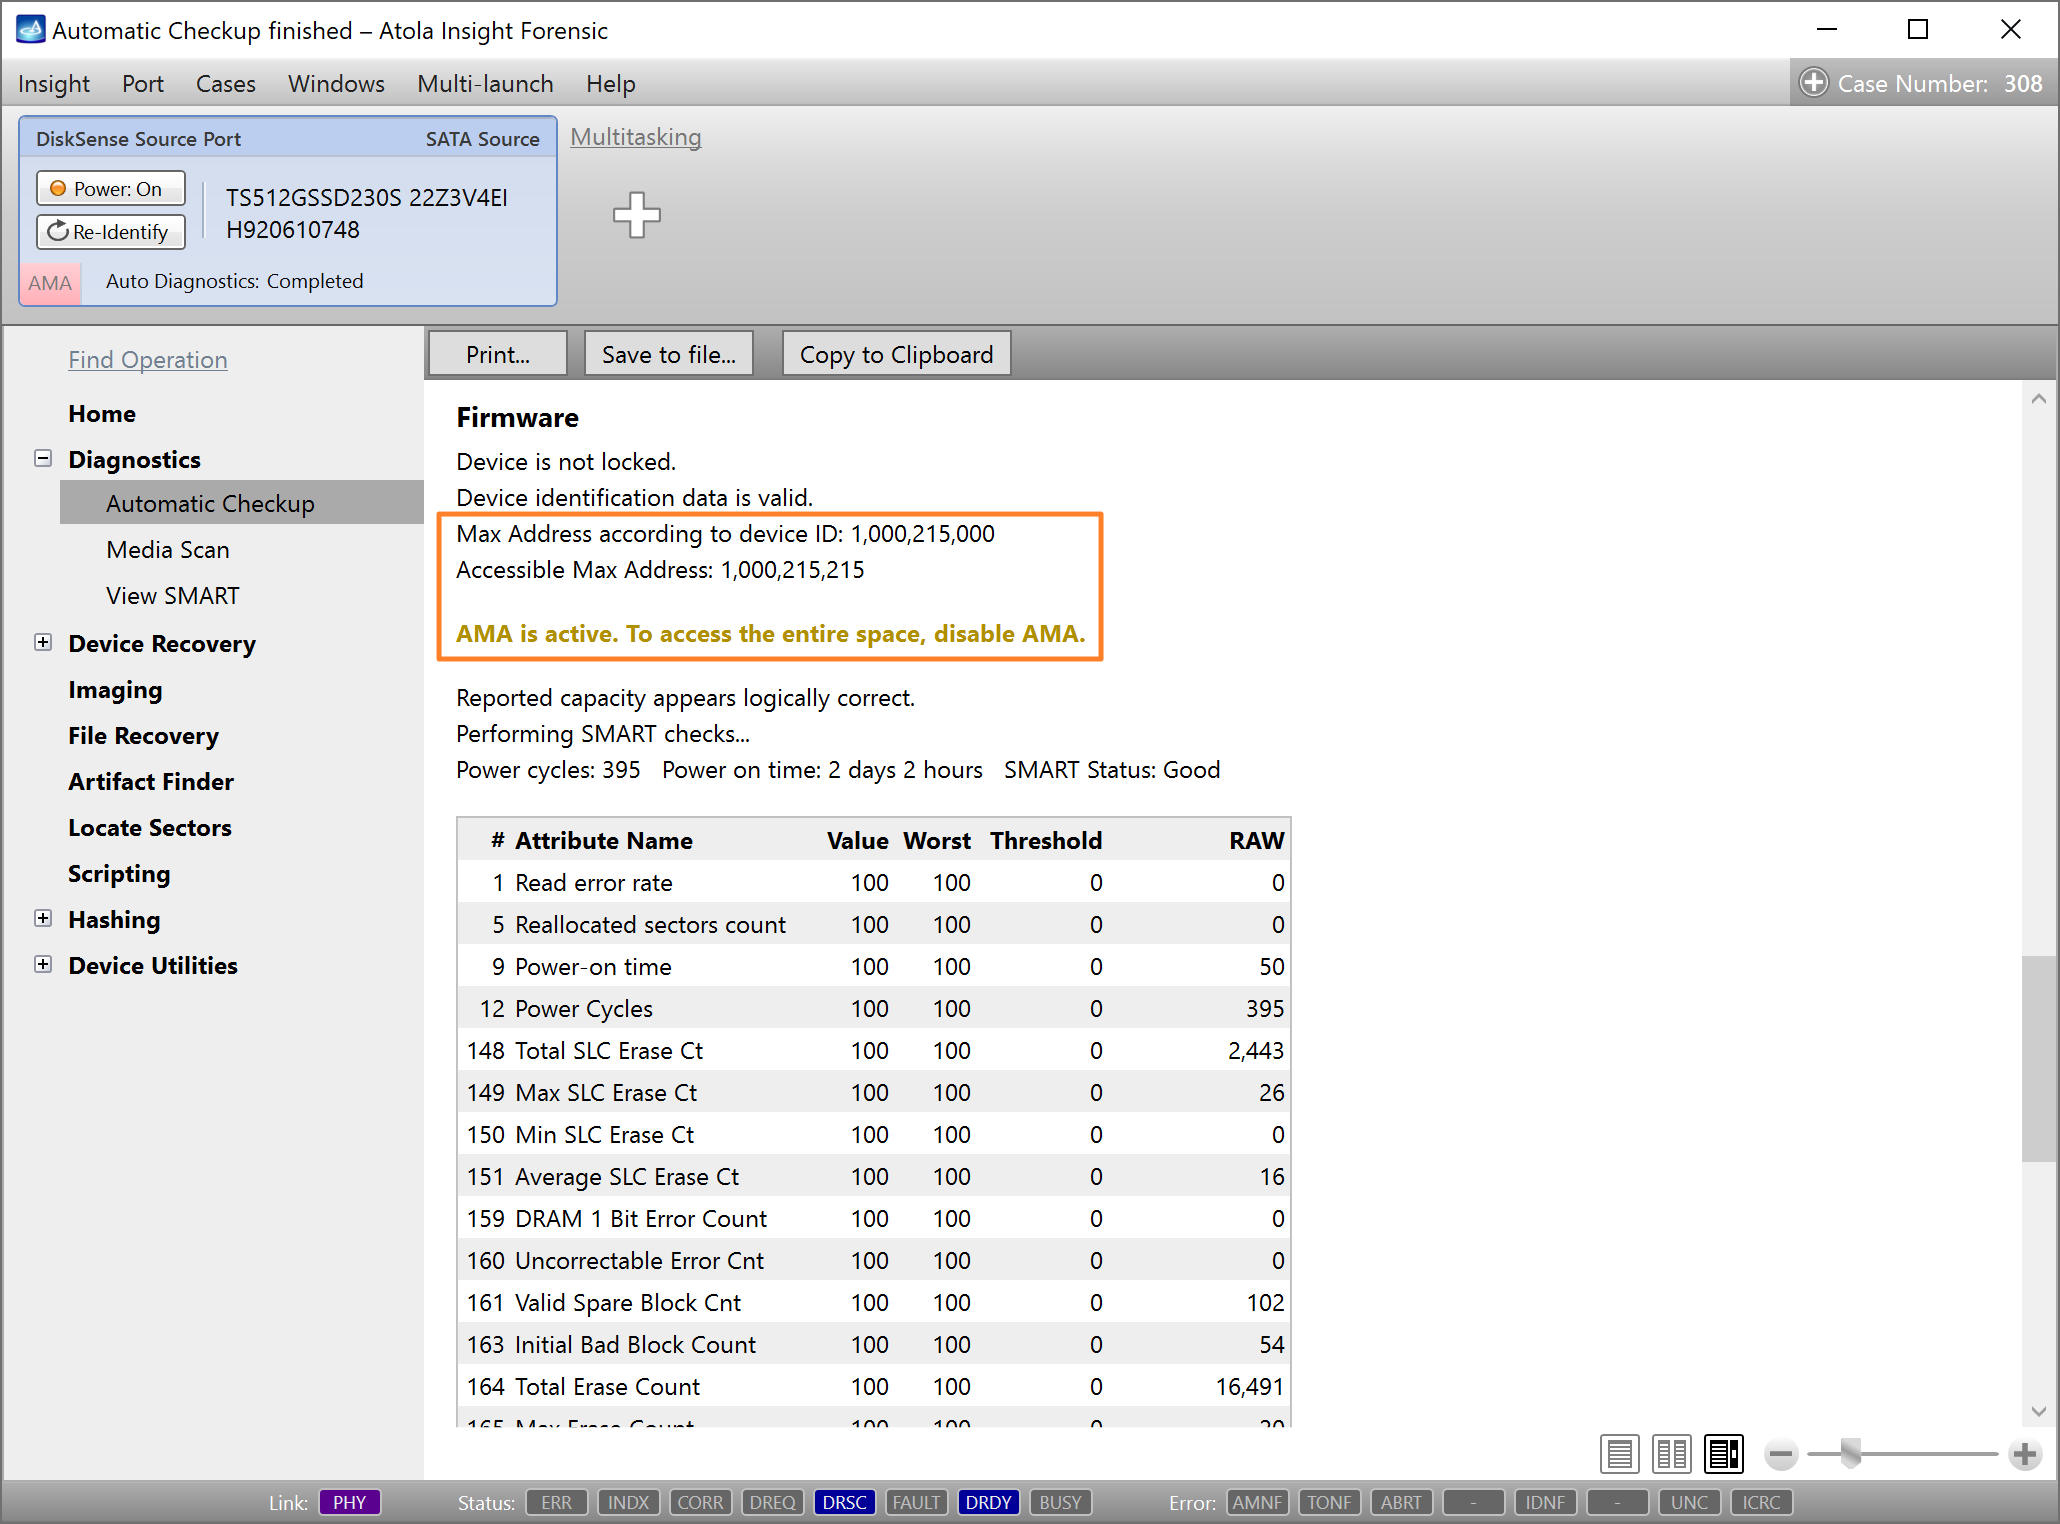
AMA restriction details in the Firmware section of the Diagnostics report.

HPA and DCO restriction details in the Firmware section of the Diagnostics report.
Unclip HPA/DCO/AMA restrictions
To lift any restrictions that have been applied to the drive’s firmware:
- Disable Write protection using the physical switch situated on the front panel of the DiskSense unit. The respective LED indicator turns off. Unclipping HPA/DCO/AMA implies making changes to the drive's firmware, and Write protection won't let perform such changes.
- Go to Device Utilities > Unclip HPA/DCO/AMA.
- Click the Unclip button.

Unclipping HPA/DCO/AMA.
Insight Forensic lifts HPA, DCO, or AMA restrictions in a matter of seconds and enables access to all data on the drive.
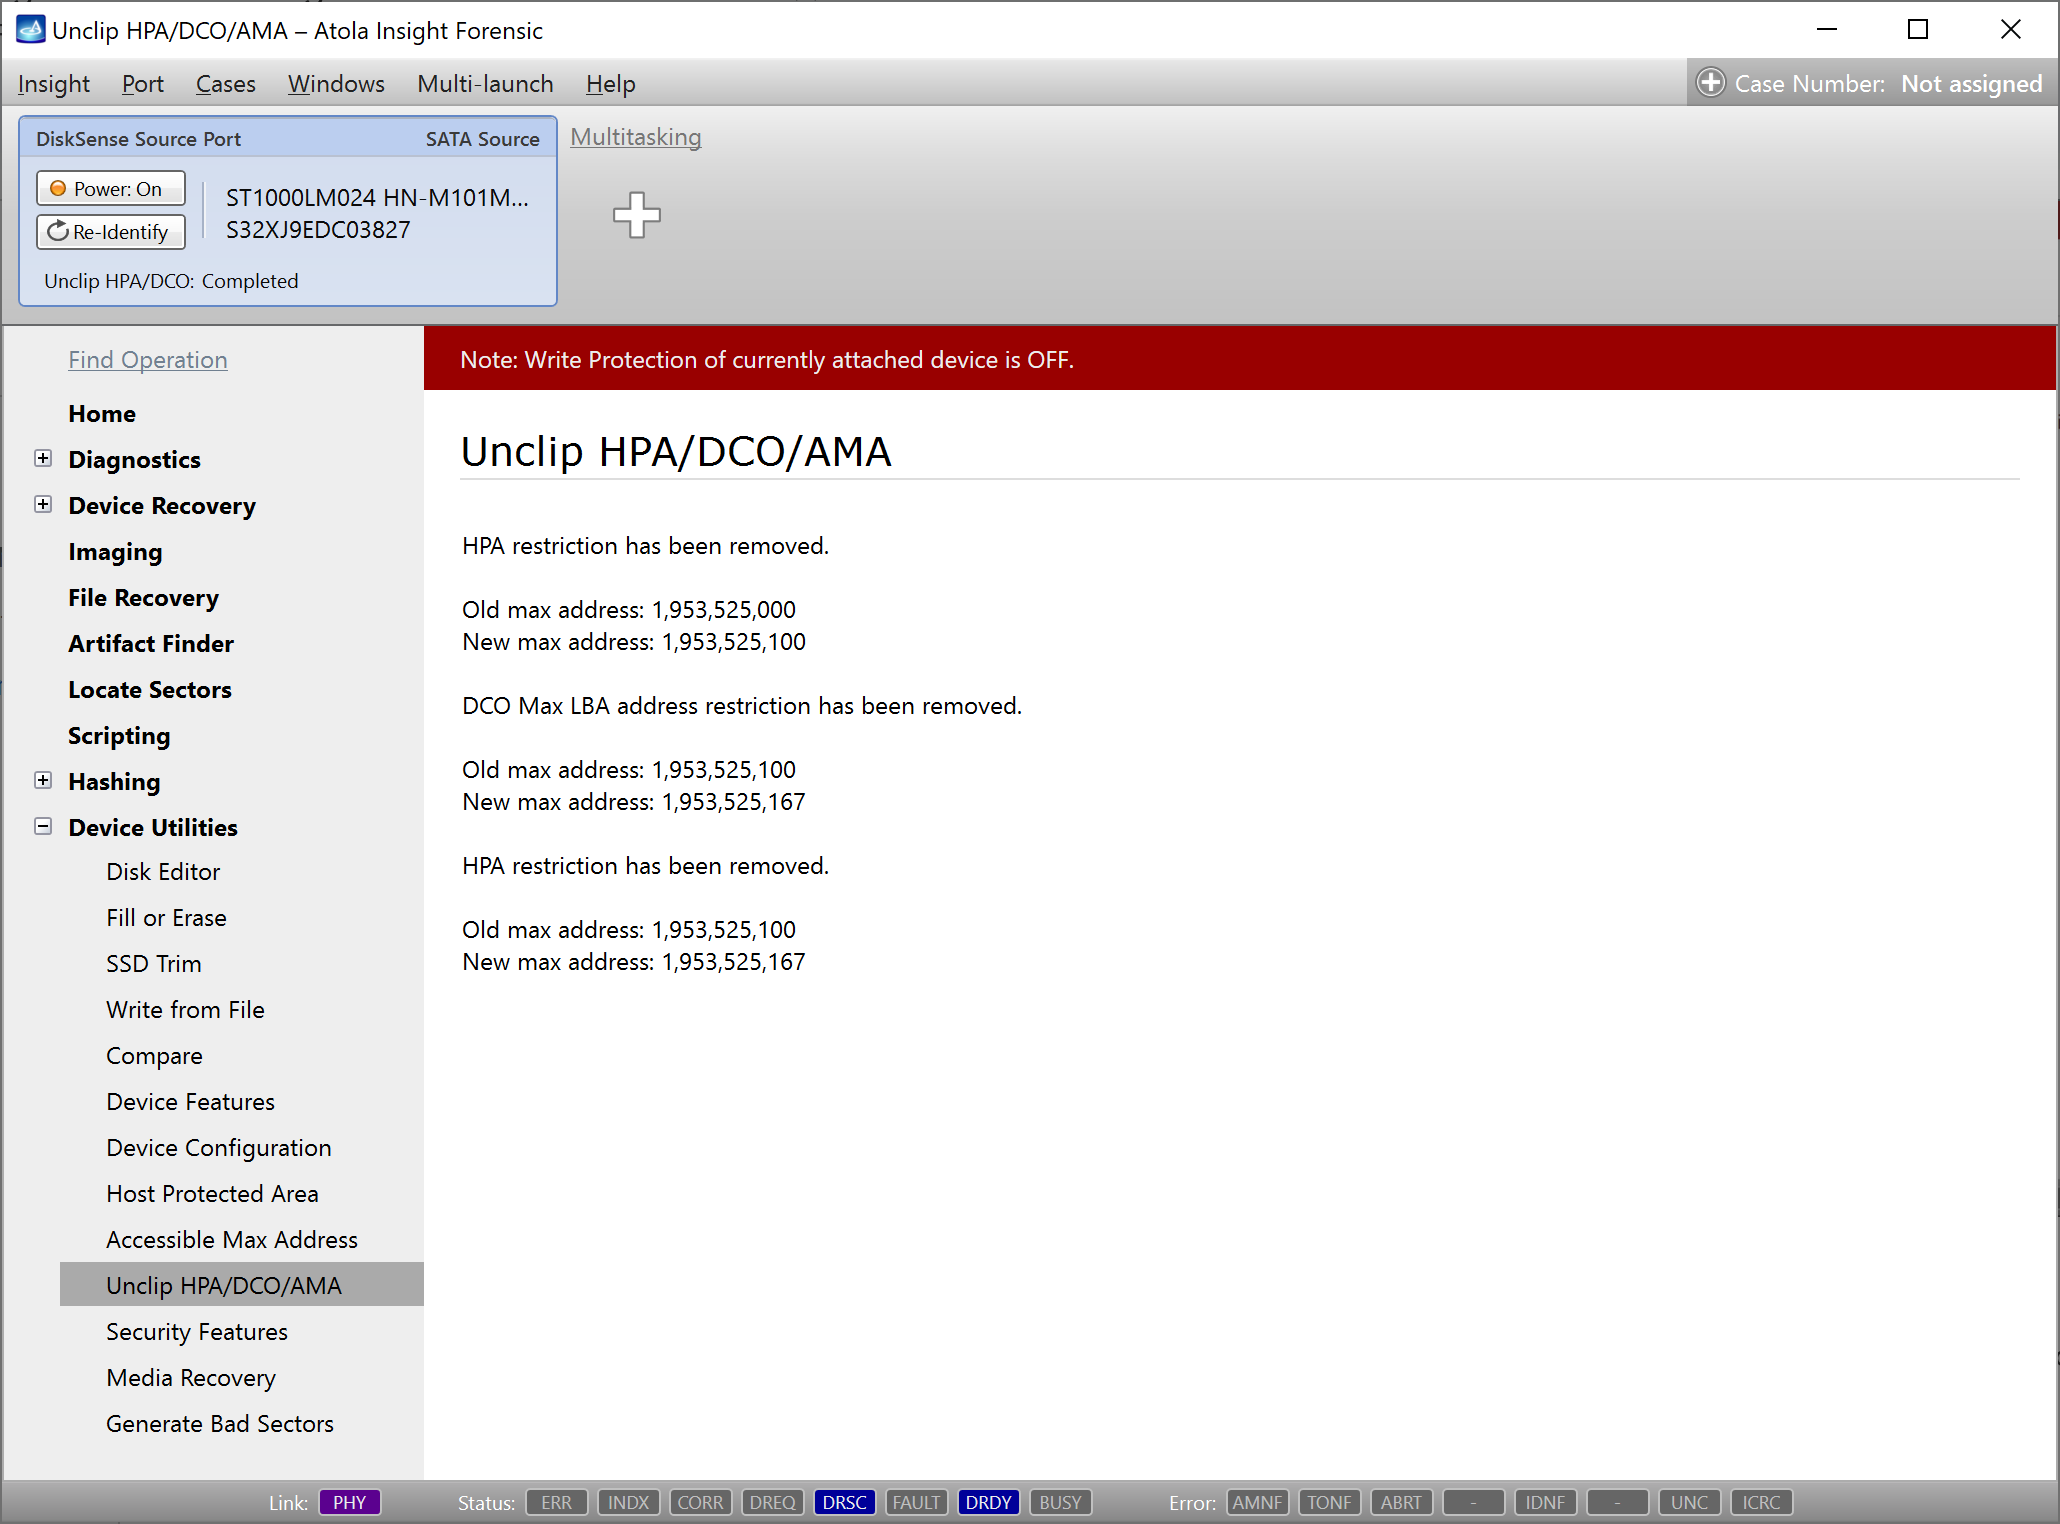
HPA and DCO restrictions have been removed.
Change HPA max address temporarily (until power cycle)
To ensure a forensically sound process, it can be necessary to avoid making any changes to the drive. Therefore it is prohibited to disable HPA and DCO restrictions and access data in the hidden areas.
With Insight Forensic it is possible to lift HPA restriction until the next power cycle. This helps avoid permanent changes to the drive.
To unclip HPA on the source drive until the next power cycle before imaging:
- In the sidebar, go to Device Utilities > Host Protected Area.
- Click the Read HPA parameters link.
- Click Set as current to automatically change the Current Max Address value to that of the Native Max Address.
- Select the Change Max Address temporarily (until power cycle) option.
- Click the Change Max Address button.

Changing HPA max address until power cycle.
This will allow access to the data in the area previously protected by HPA, yet as soon as you power off or detach the drive, the HPA will be in place again.
For more information about imaging of freezing drives, see Imaging freezing damaged drives.
Set or change HPA, DCO, and AMA restrictions
Not all drives support hidden areas. The DCO and HPA can co-exist on the same drive: max address limited via HPA should be less than DCO. AMA is supported by new drives and can't exist if DCO or HPA is supported, and vice versa.
If your target device is larger than your source device, but you need hash values for the source and for the target devices to be identical, see Clip target drive to source evidence size.
To set or change DCO restriction:
- Disable Write protection using the physical switch situated on the front panel of the DiskSense unit. The respective LED indicator turns off.
- Go to Device Utilities > Device Configuration.
- Click the Read device configuration link.
- Enter a new Max LBA address.
- Click Save configuration.

Setting a new Max LBA address using DCO.
To set or change HPA restriction:
- Disable Write protection using the physical switch situated on the front panel of the DiskSense unit. The respective LED indicator turns off.
- Go to Device Utilities > Host Protected Area.
- Click the Read HPA parameters link.
- Enter a new Current Max Address. The max address limited via HPA should be less than the Max LBA address set using DCO.
- Optional: Check the Change Max Address temporarily (until power cycle) option if needed.
- Click the Change Max Address button.

Setting a new HPA restriction.
To set or change AMA restriction:
- Disable Write protection using the physical switch situated on the front panel of the DiskSense unit. The respective LED indicator turns off.
- Go to Device Utilities > Accessible Max Address.
- Click the Read AMA parameters link.
- Enter a new Current Max Address.
- Click the Change Max Address button.

Setting a new AMA restriction.