Forensic Imaging and Data Recovery Tool
Extracting files directly from a potentially failing storage device is dangerous because the media can stop working at any moment. The best practice from both forensic and data recovery standpoints is to image the data quickly and safely from the original drive. Afterwards proceed with further evidence analysis using the backup copy.
DiskSense 2 is an updated version of Atola Insight's hardware unit that is capable of running 3 forensic imaging sessions in parallel. No matter the health status of the drive, Insight will image 3 drives in a fast and reliable fashion thanks to its state-of-the-art server-grade hardware.
Table of contents
- Imaging 3 drives simultaneously
- Imaging damaged drives
- Imaging to multiple targets
- HEX viewer
- Artifact search
- File signatures
- Entropy
- Customize every step of the process
- Major imaging parameters
- Visual representation of imaging status
- Data-only copy option
- Forensic image file creation
- Fully integrated File Recovery module
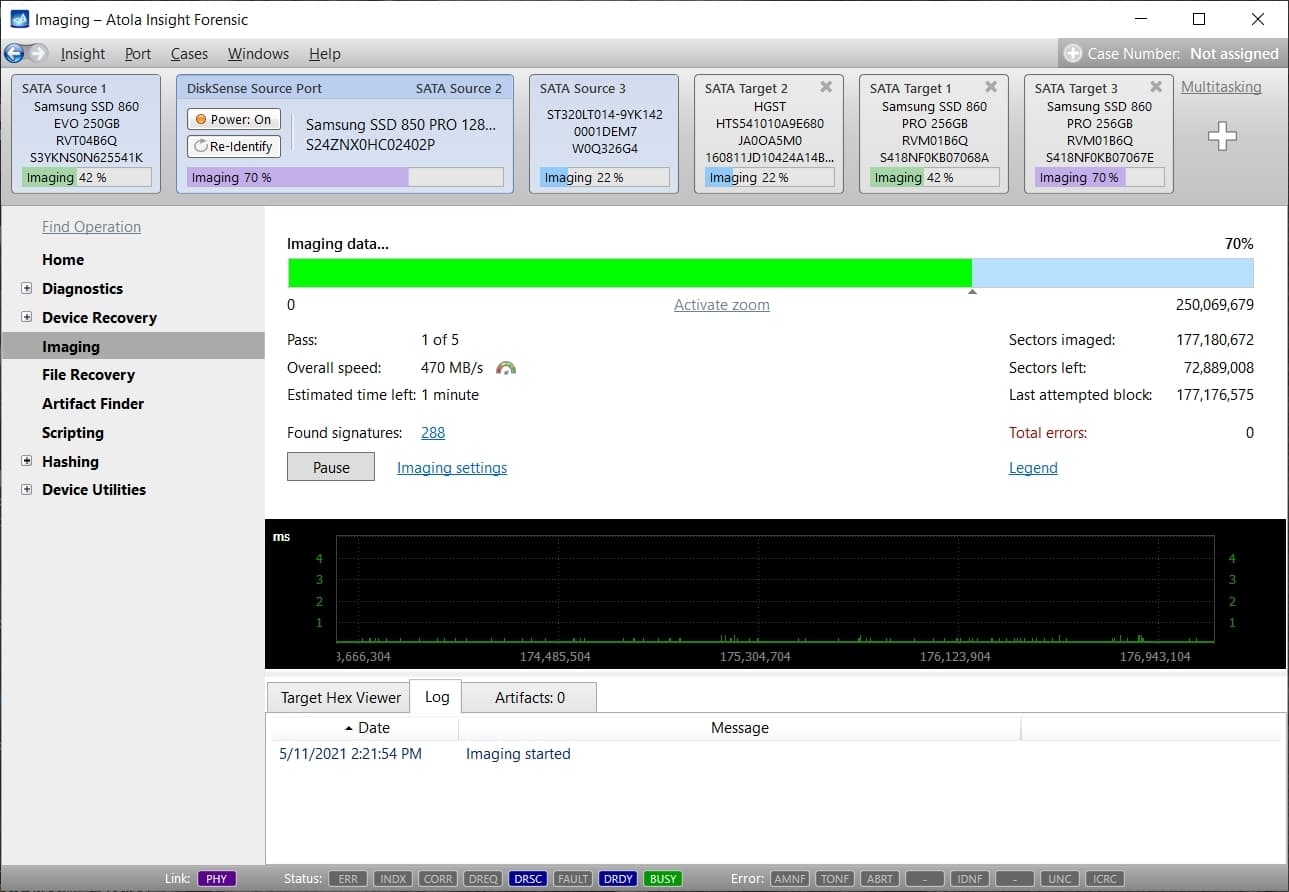
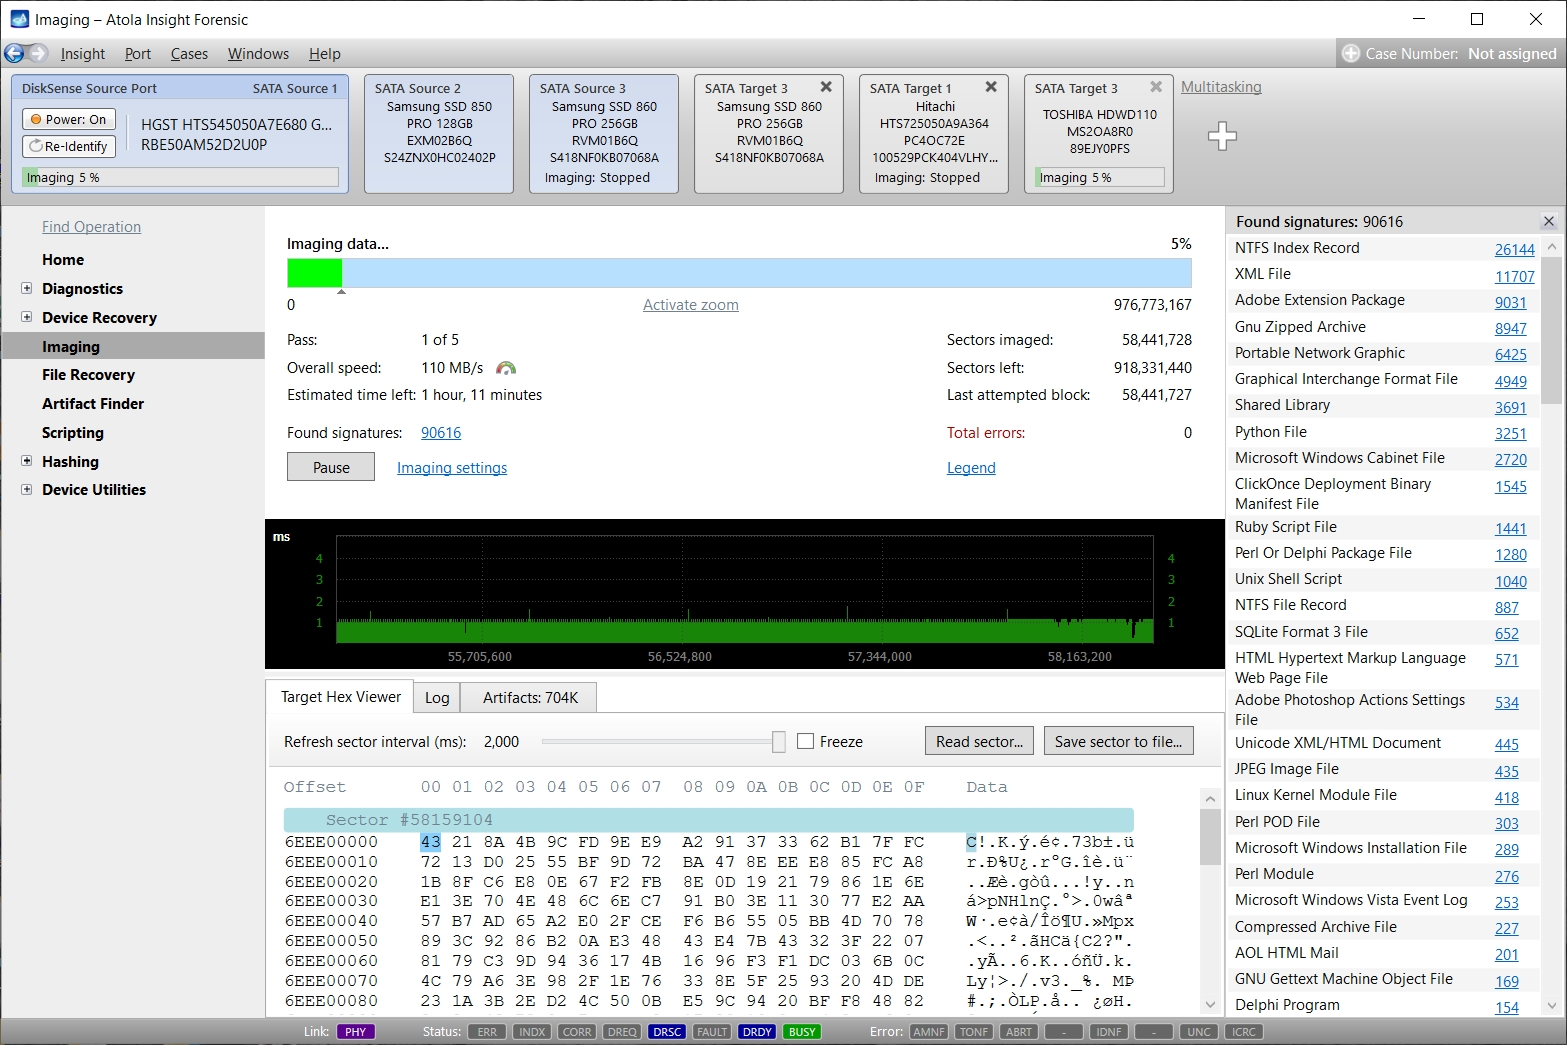
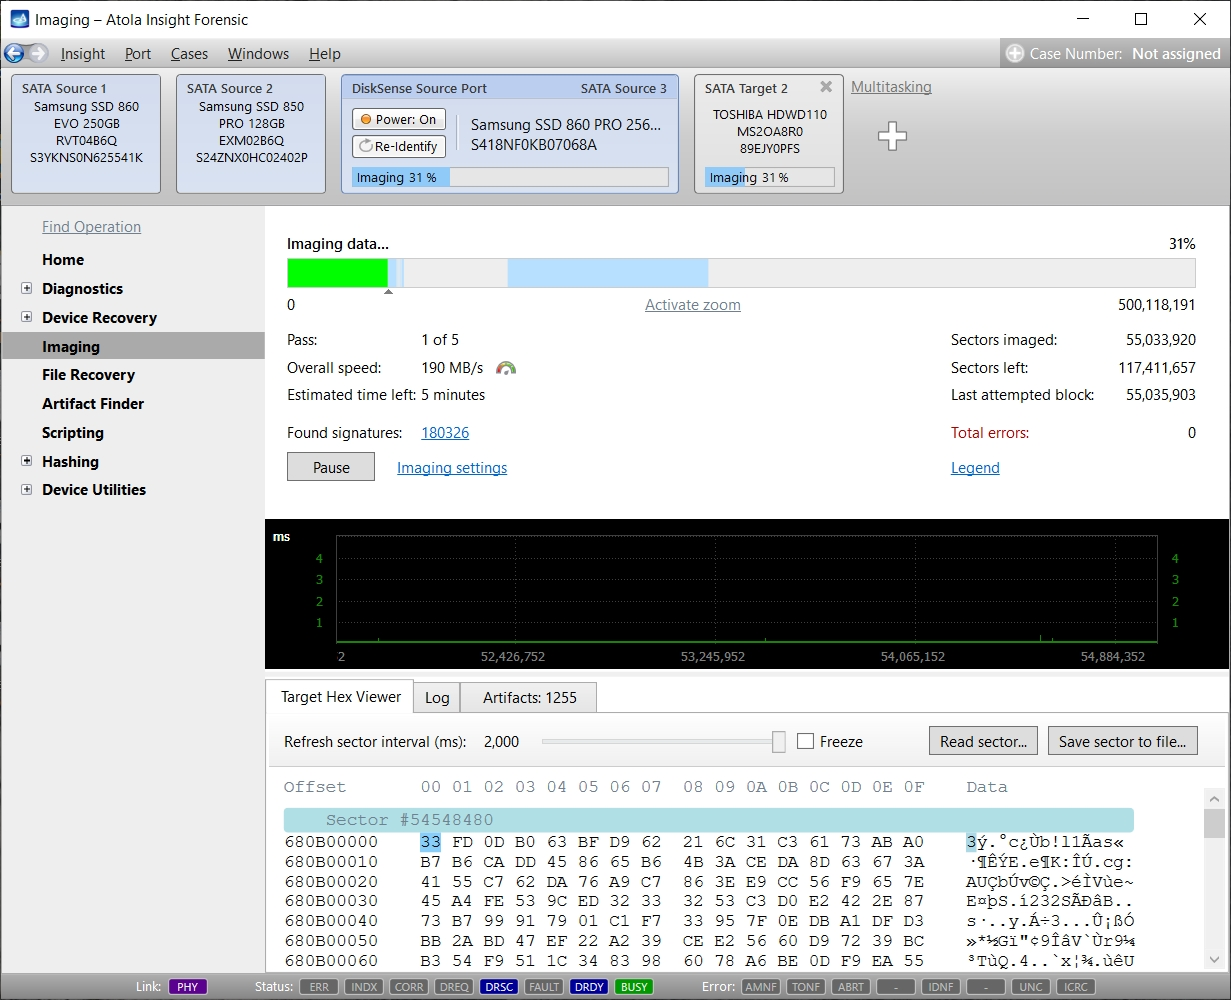
3 simultaneous imaging sessions
Atola Insight Forensic can run 3 parallel imaging sessions. The unit's server-grade motherboard, CPU and ECC RAM sustain fast and reliable evidence acquisition of multiple drives, either damaged or healthy.
DiskSense 2 unit is equipped with 6 Source ports:
- 3 SATA 3.0
- USB 3.2
- IDE (via Atola adapter included in the package)
- Extensions (optional):
- SAS extension
- Thunderbolt
- Apple PCIe SSD
- M.2 PCIe/SATA SSD
Remote image acquisition is available via iSCSI protocol.
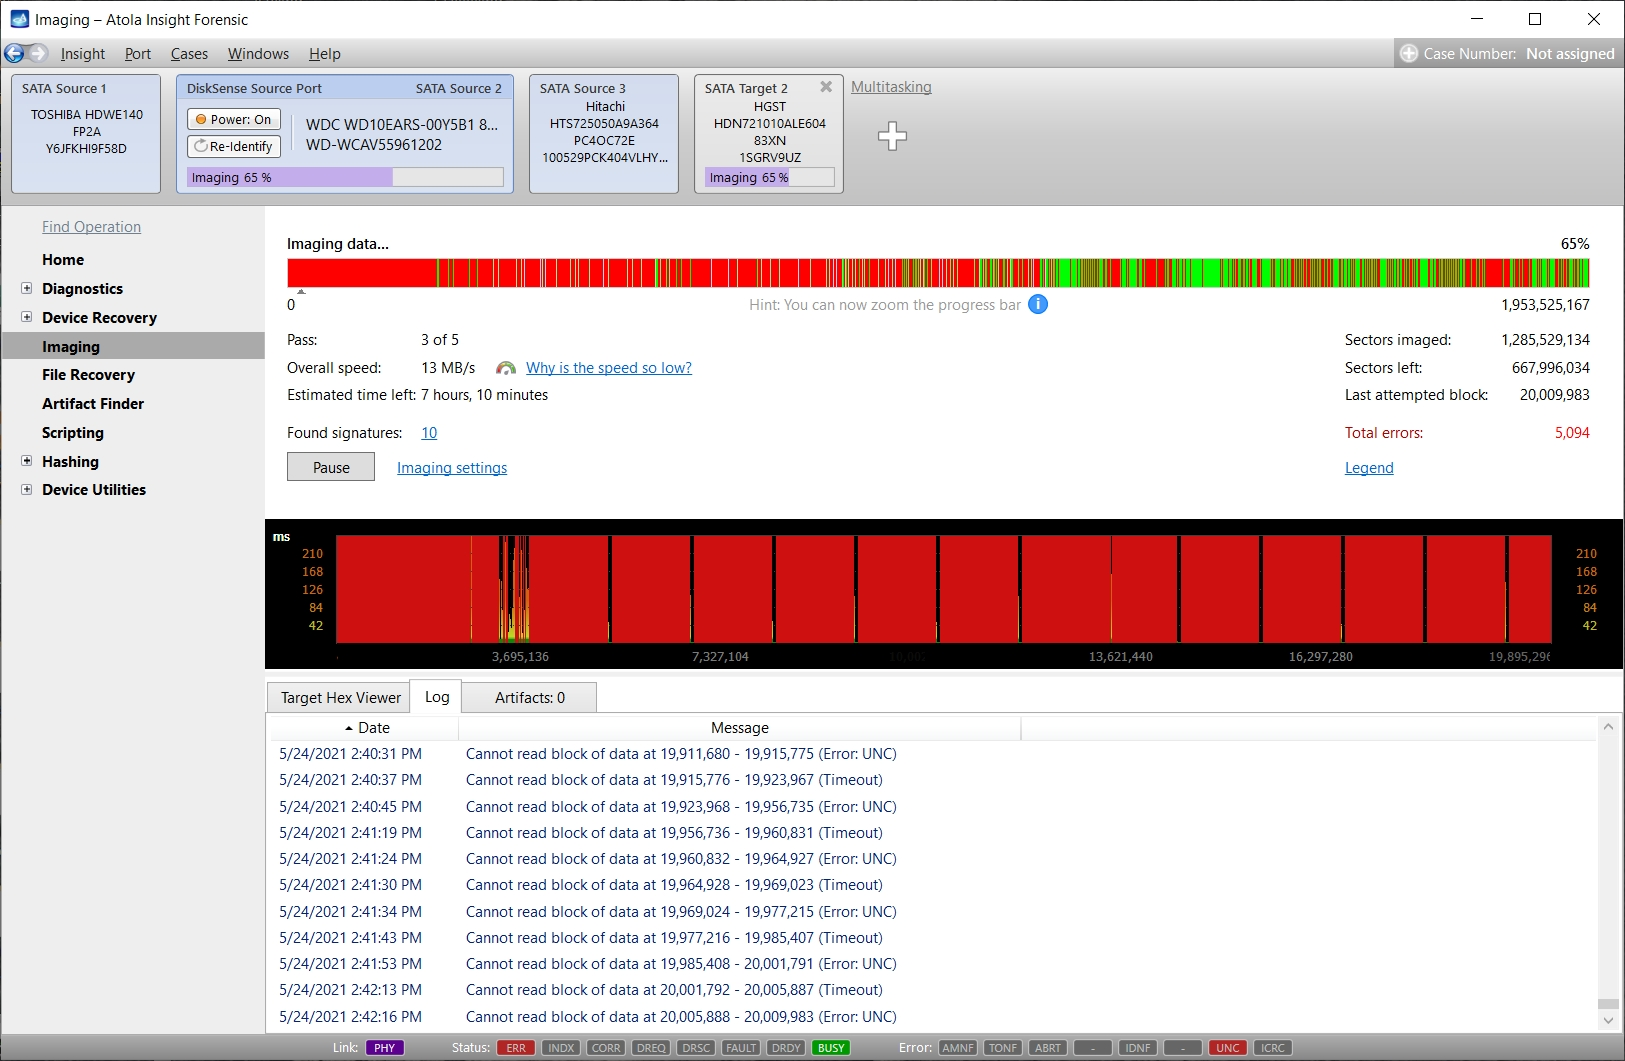
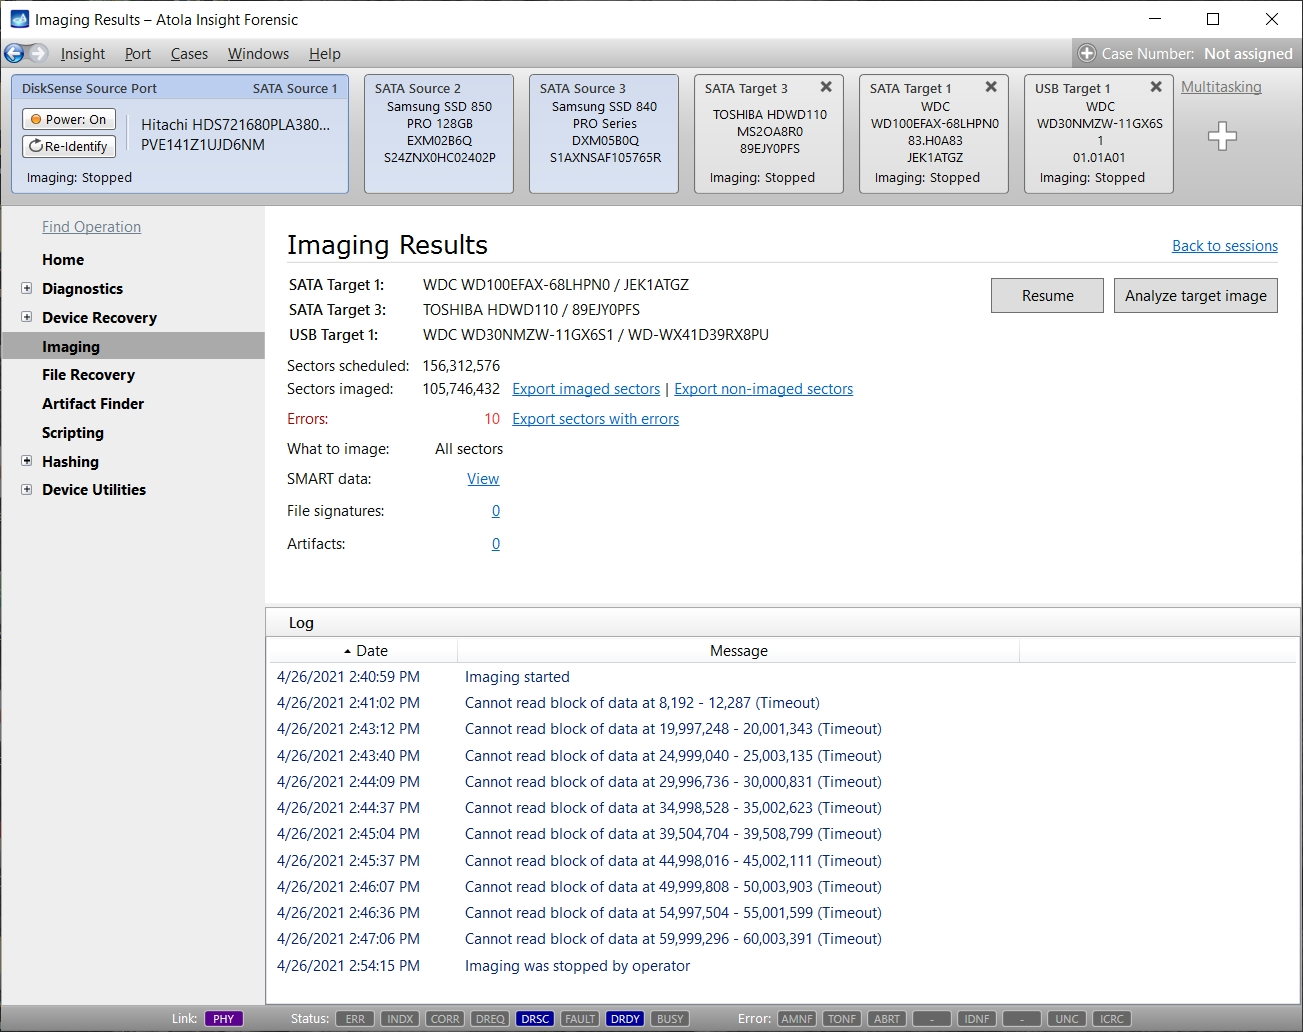
Imaging damaged drives
Physically damaged hard drives require a complex imaging approach. The imaging engine uses these techniques to achieve the best results:
- Multipass imaging with different timeouts for each pass
- Imaging data from good heads only
- Reducing read block size to a very small value
- Timeout recovery algorithm utilizing PHY reset and drive power control
- Bad sector recovery (How it works)
A few words on block size control. While using small block sizes helps in retrieving as much data as possible, it also significantly slows down the imaging process. Atola Insight's multipass imaging engine allows using large blocks with short timeouts on the first few passes. On the last passes, when only few sectors are left to be imaged, Insight uses the smallest block sizes.
This technique allows achieving real imaging speeds of up to 500 MB/sec on good areas of the drive, while approaching the bad areas in the most gentle way possible, thus achieving an unbeatable overall imaging speed.
Atola Insight Forensic handles block sizes automatically to provide the best possible results in the shortest amount of time.
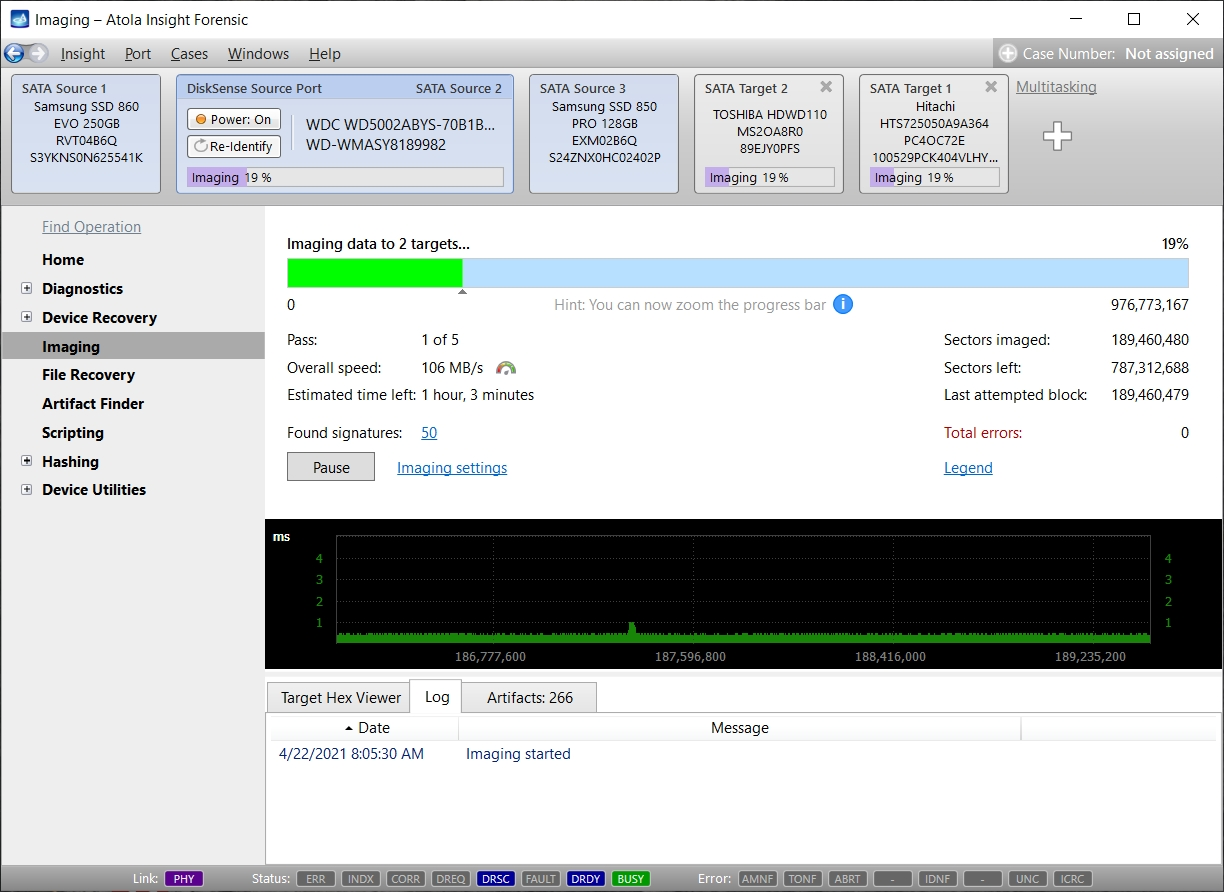
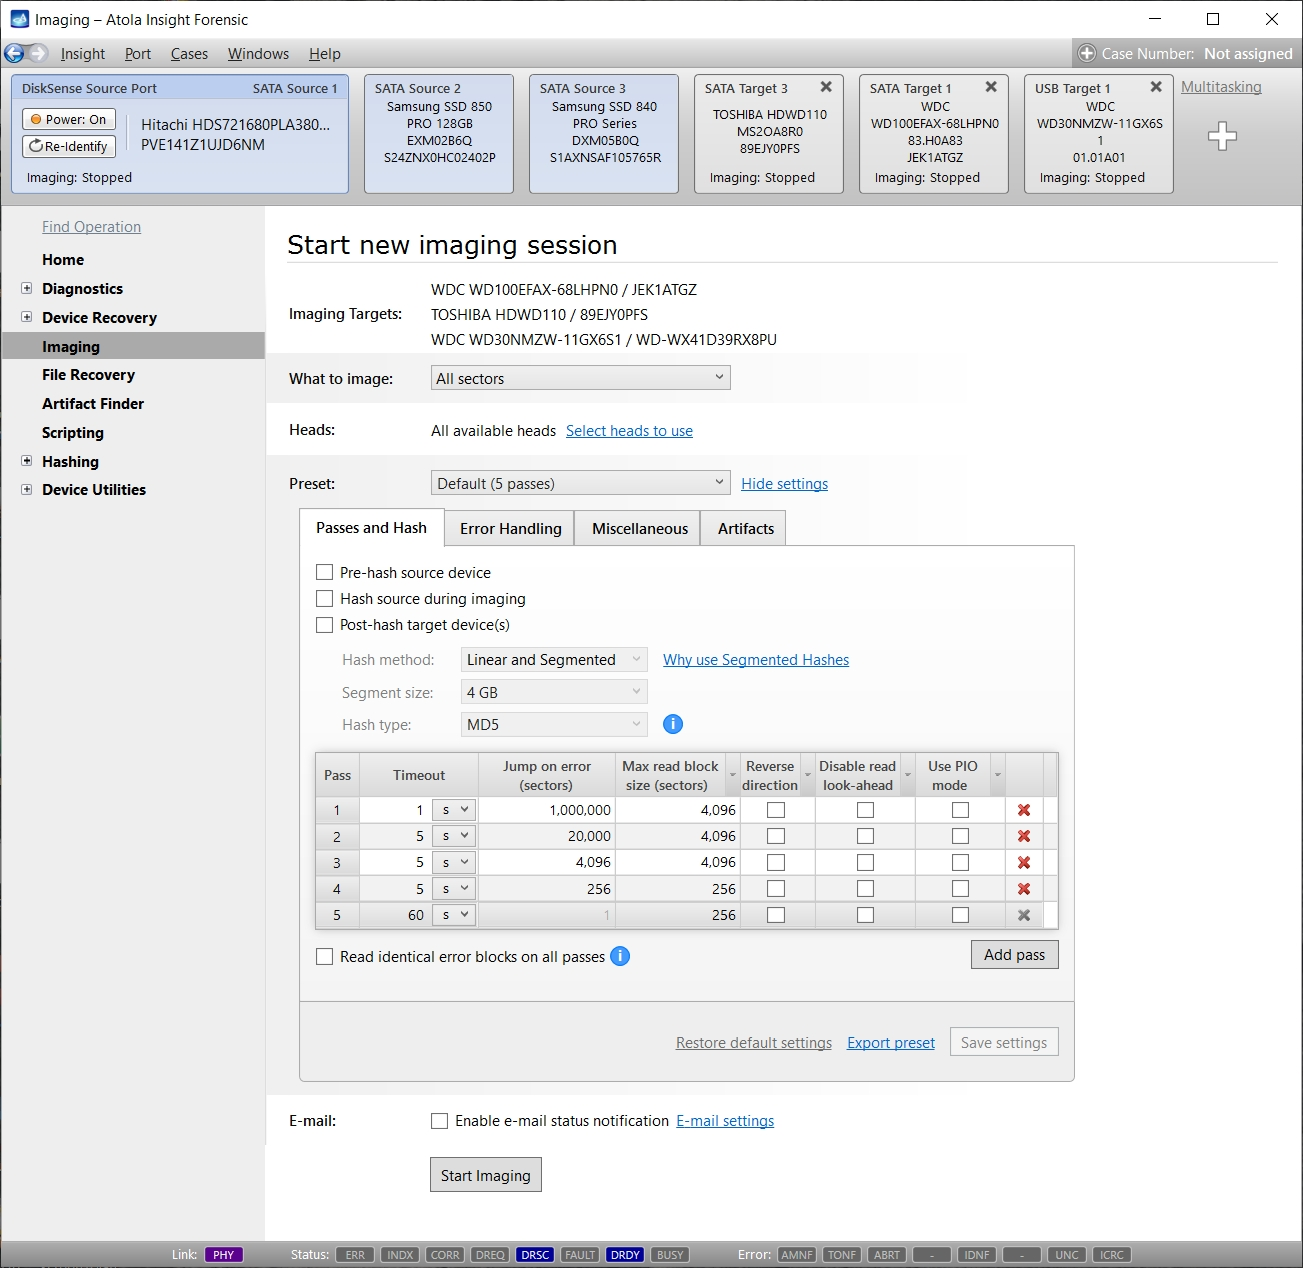
Imaging to multiple targets
Insight images source media to up to 3 targets simultaneously. The following target types are supported:
- SATA-I/II/III hard drive or SSD attached to the DiskSense 2 unit
- USB-1.0/2.0/3.2 hard drive or flash media attached to the DiskSense 2 unit
- Any device attached to the PC where the software is running
- Image file located on a local PC
- Image file anywhere on the network
- Image file on a target drive. Target drive encryption with VeraCrypt is supported.
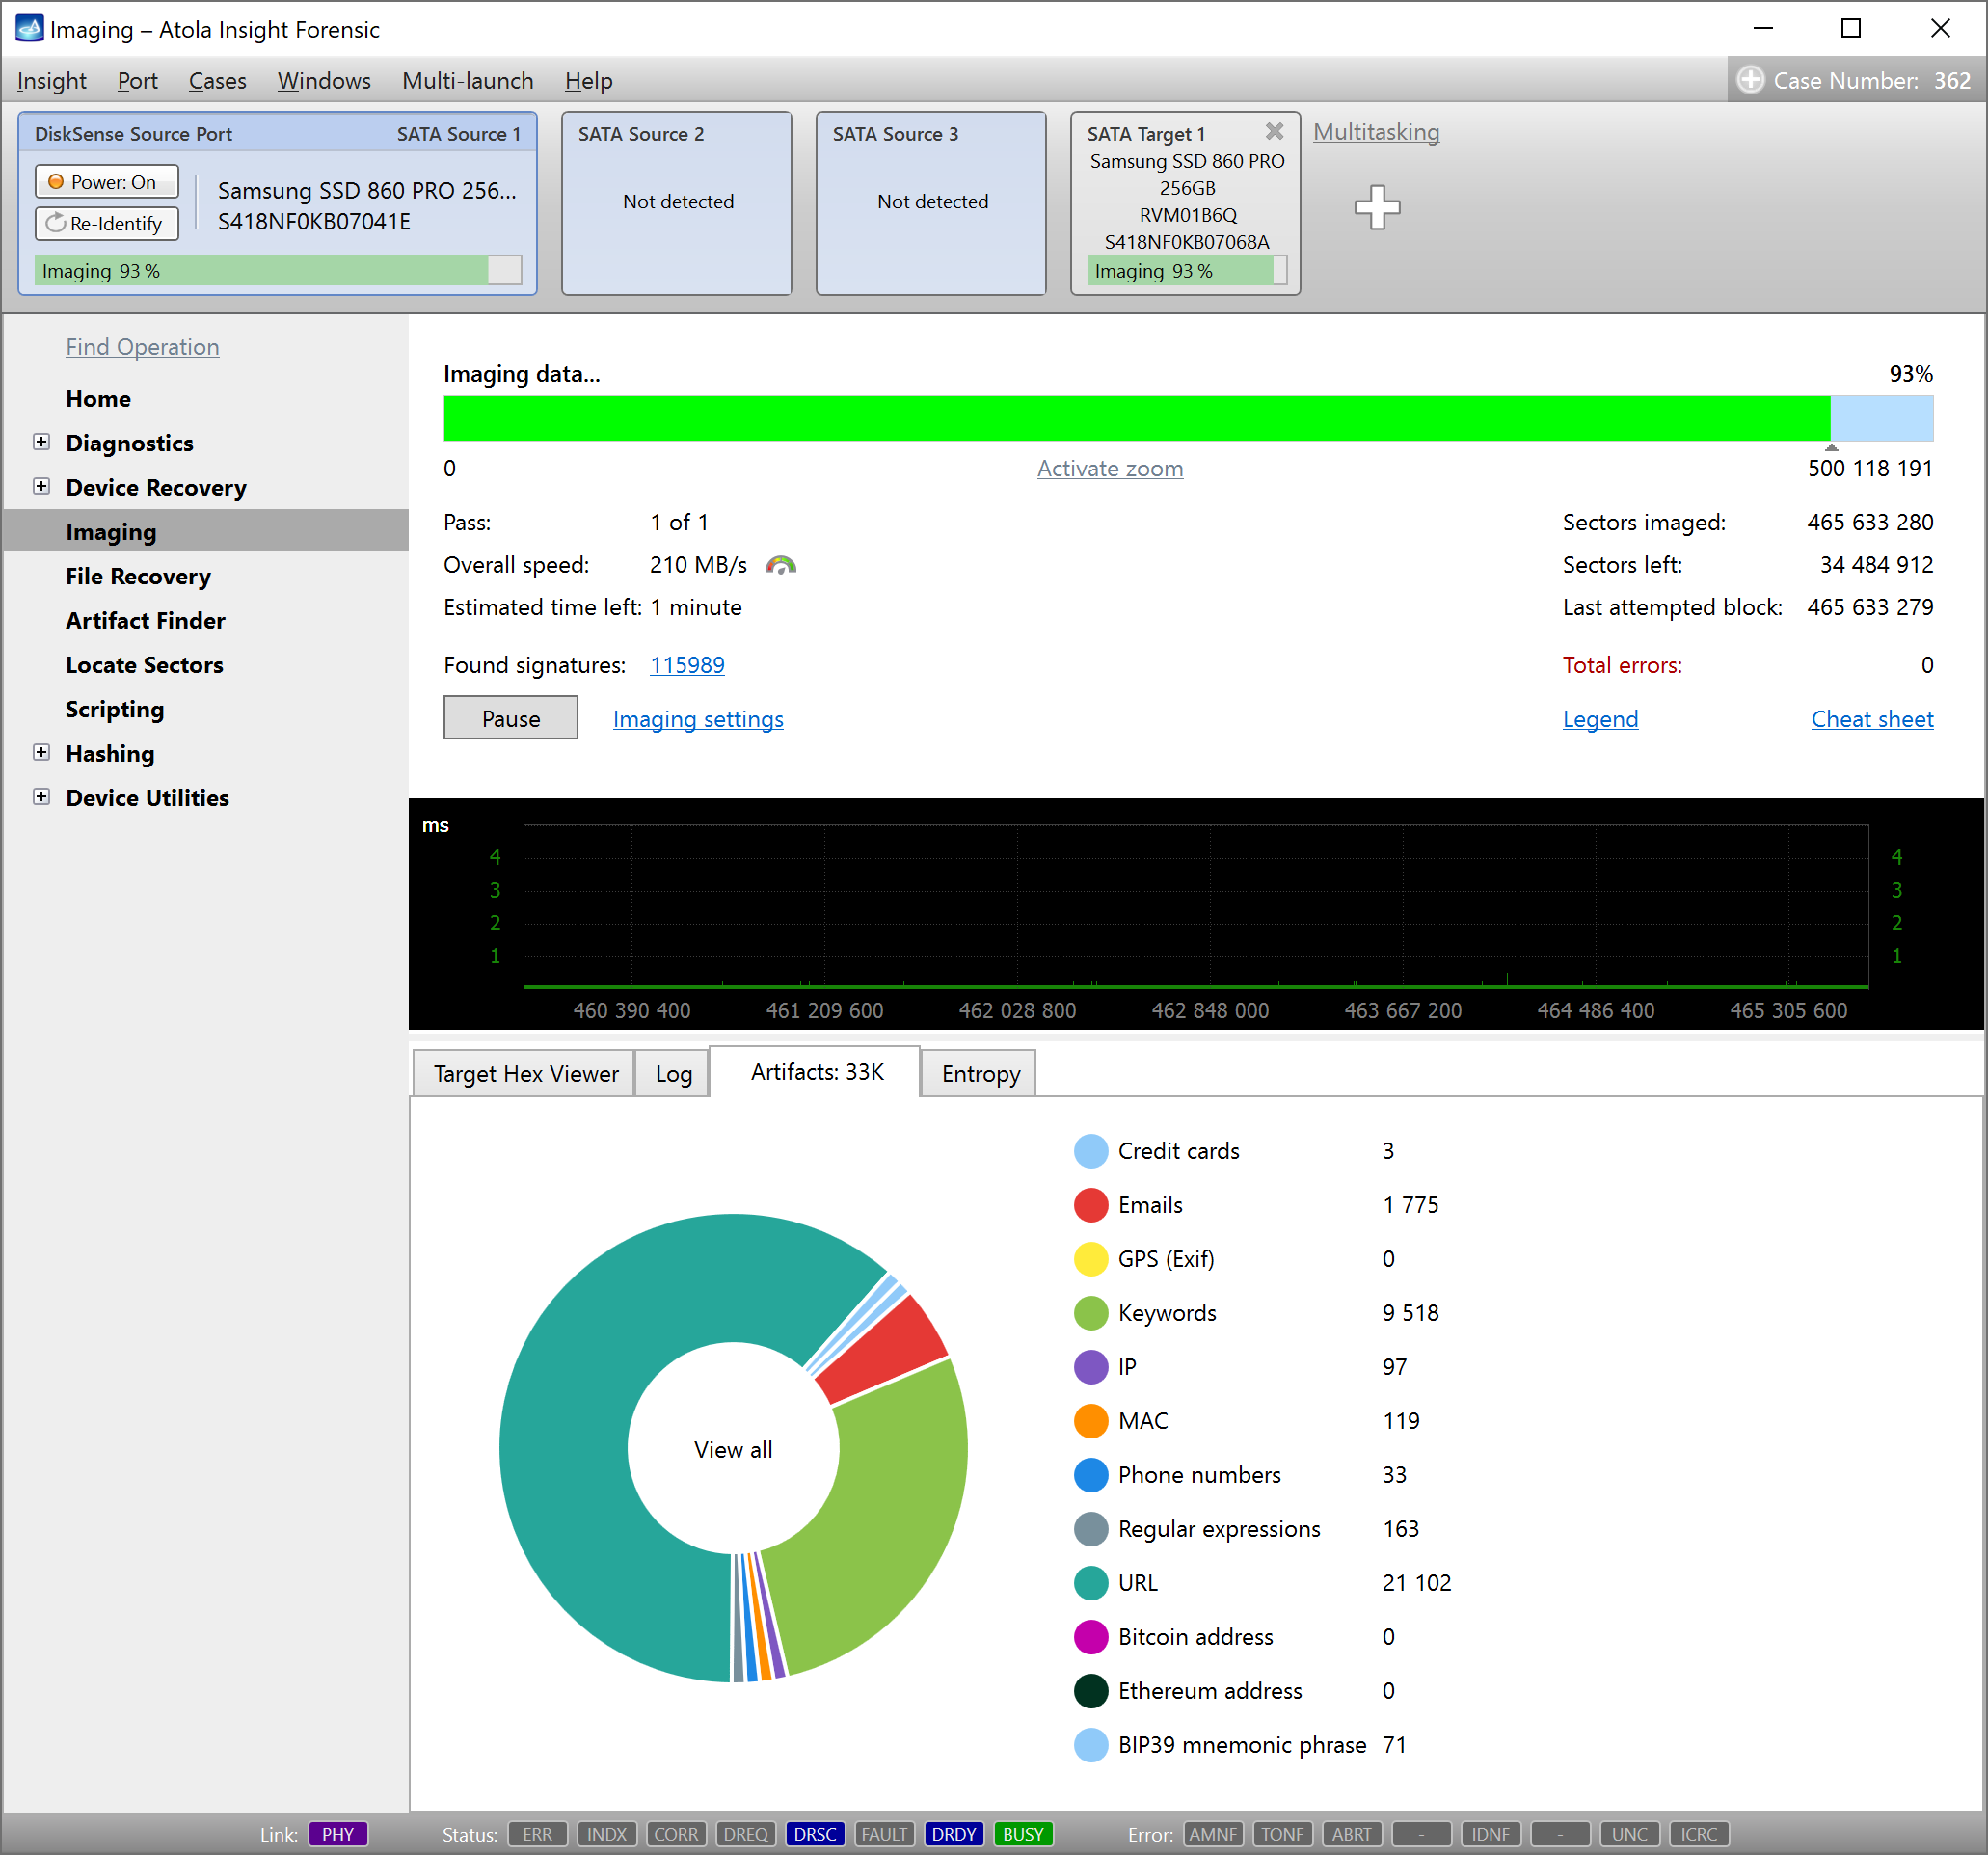
Artifact search
Artifact Finder module seeks for artifacts during imaging on the sector level. This allows on-the-fly overview, sorting and search of the found data in all source evidence drive areas, including unallocated space.
Supported artifacts include:
- keywords
- regular expressions
- Bitcoin and Ethereum wallet addresses
- BIP39 mnemonic phrases
- credit card numbers
- emails
- GPS coordinates
- IP addresses
- MAC addresses
- phone numbers
- URLs
In the Artifacts tab, at the bottom of the interface, the numbers of artifacts and the corresponding diagram update in the course of imaging.
The Artifacts table displays each artifact with an assigned Id number. The values are shown in the context (20 bytes before and 20 bytes after the artifact in grey color) along with their LBAs and offsets to help locate each artifact.
HEX viewer
The real-time data viewer shows the raw data extracted from the source drive during imaging. There are two modes available:
- Automatic with refresh interval slider
- Manual by means of Read sector button
Automated sector analysis checks each sector for file system structures (NTFS File Record, boot sectors, etc.)
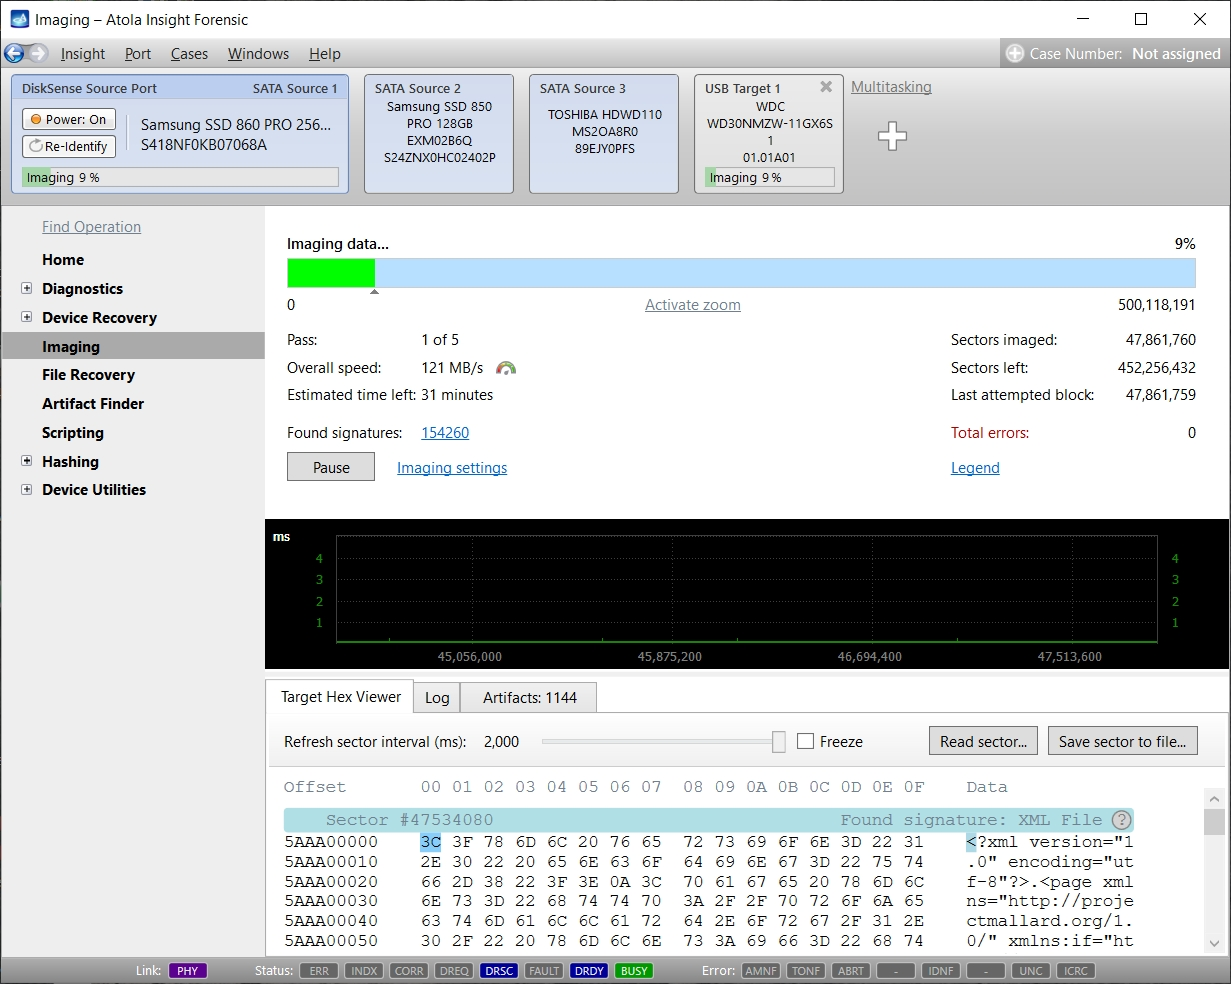
File signatures
The imager performs file signature analysis during imaging. It shows live stats of all found signatures while the data is being transferred, with no negative effect on imaging performance. Moreover, you can easily check raw sector data for any found file using the HEX Viewer without even pausing the imaging process.
The imaging module searches for 390+ default file signatures in the course of image acquisition. In addition to that, you can also add custom file signatures via CSV file.
Format of custom signature file:
Each line describes one signature.
The line consists of 4 parts divided by a comma: Name, Bytes in Hex codes, Extension, Tag
The last field "Tag" is optional.

Example:
    DjVu document, 41 54 26 54 46 4F 52 4D, djvu

    Tape Archive, 75 73 74 61 72, tar

    Works for Windows spreadsheet, FF 00 02 00 04 04 05 54, wks

    7-Zip File Format, 37 7A BC AF 27 1C, 7z, Archive
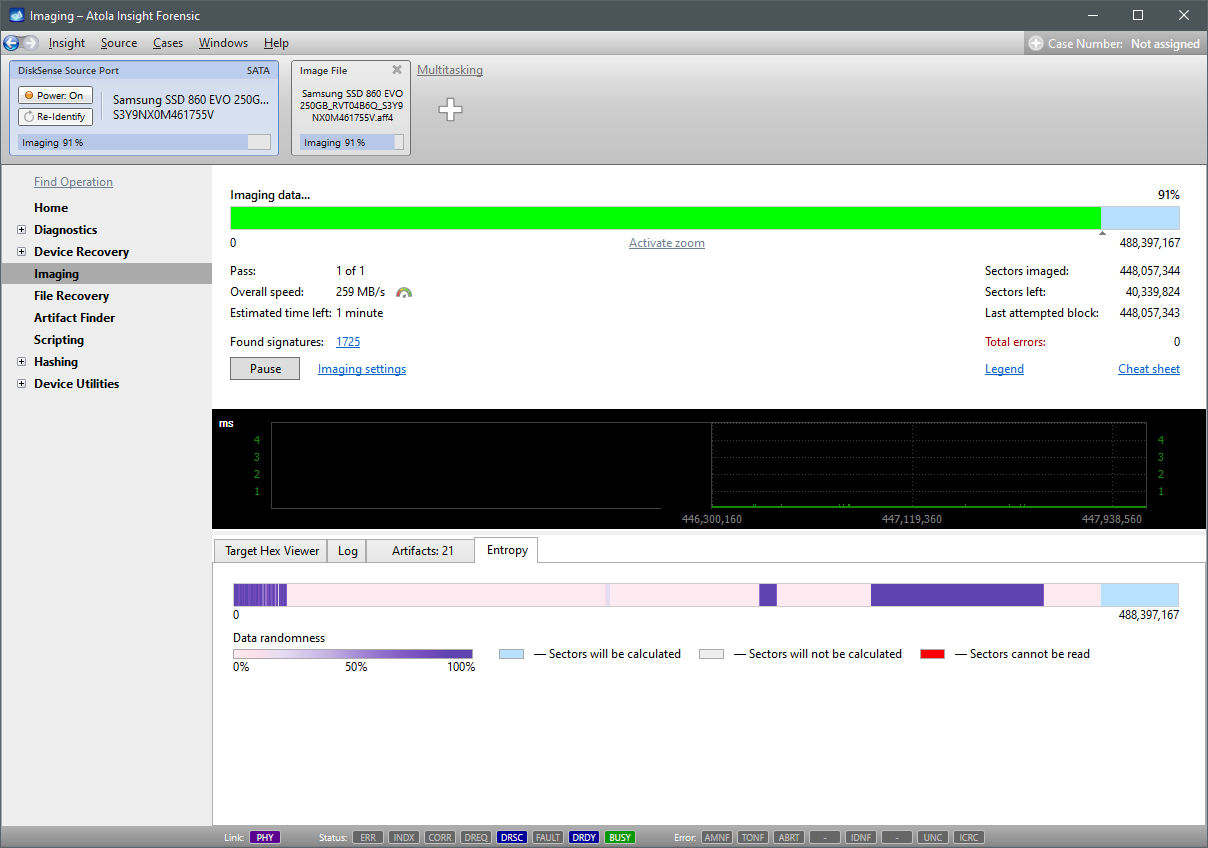
Entropy calculation
The entropy is an indicator of randomness, which measures the amount of variation and unpredictability in the data. Insight calculates it on-the-fly while imaging. The light pink color means a low entropy level close to 0%. Most likely, you have sectors filled with binary zeroes or a pattern there. As opposed to that, the dark purple color indicates the maximum data randomness. Typically, it is a sign of:
- encrypted files or partitions, for instance BitLocker or Veracrypt
- archive files
- compressed videos, photos, audio files
Customize every step of the process
The parameters of each task in Insight can be easily adjusted to fine-tune every step and meet the requirements of a specific case or organization, for example:
- Insight can image the entire hard drive, select partitions or specific sector ranges.
- The newly created image can be stored either on a destination hard drive or the host computer.
- Wiping allows quickly and effortlessly writing any pattern to the destination hard drive to prepare the target for a new image.
- Insight can image damaged or unstable drives in the field, even if they can't be identified by regular forensic imaging hardware or software. It allows forensic examiners image more devices in the field, without needing to take them to the lab.
Multiple hashing methods are available and hashes are calculated on the fly.
Major imaging parameters
- Linear and segmented hash calculation (pre-hash, during imaging, post-hash): MD5, SHA1, SHA224, SHA256, SHA384, SHA512
- Compare media after imaging
- Specify read/write heads to transfer data from
- HEX pattern to fill skipped sectors with (00 by default)
- Read timeout setting
- Number of sectors to skip after a failed read attempt
- Number of passes
- Apply Read-Long command on the last pass (see Bad Sector Recovery)
- Reduce HDD operating speed to PIO mode
- Imaging direction (linear or reverse)
- Define image file size (chunk size)
- Abort after X amount of automatic HDD power cycles
Imaging status: Visual representation
The real-time imaging status screen shows all necessary information, thus providing full control over the process.
Visual feedback includes:
- Hard drive's drive space map, showing good and bad areas;
- Statistics (speed, good/bad sectors stats, ETA)
- By-head read speed graph (allows for early detection of a failing head)
- HEX Viewer with automated sector analysis
- Artifact tab for artifact search stats
- Entropy tab
- Log view
You are able to make on-the-fly changes to the parameters based on the information. For example, add a specific behavior on a certain condition (power cycle after X errors, etc), or modify timeout settings.
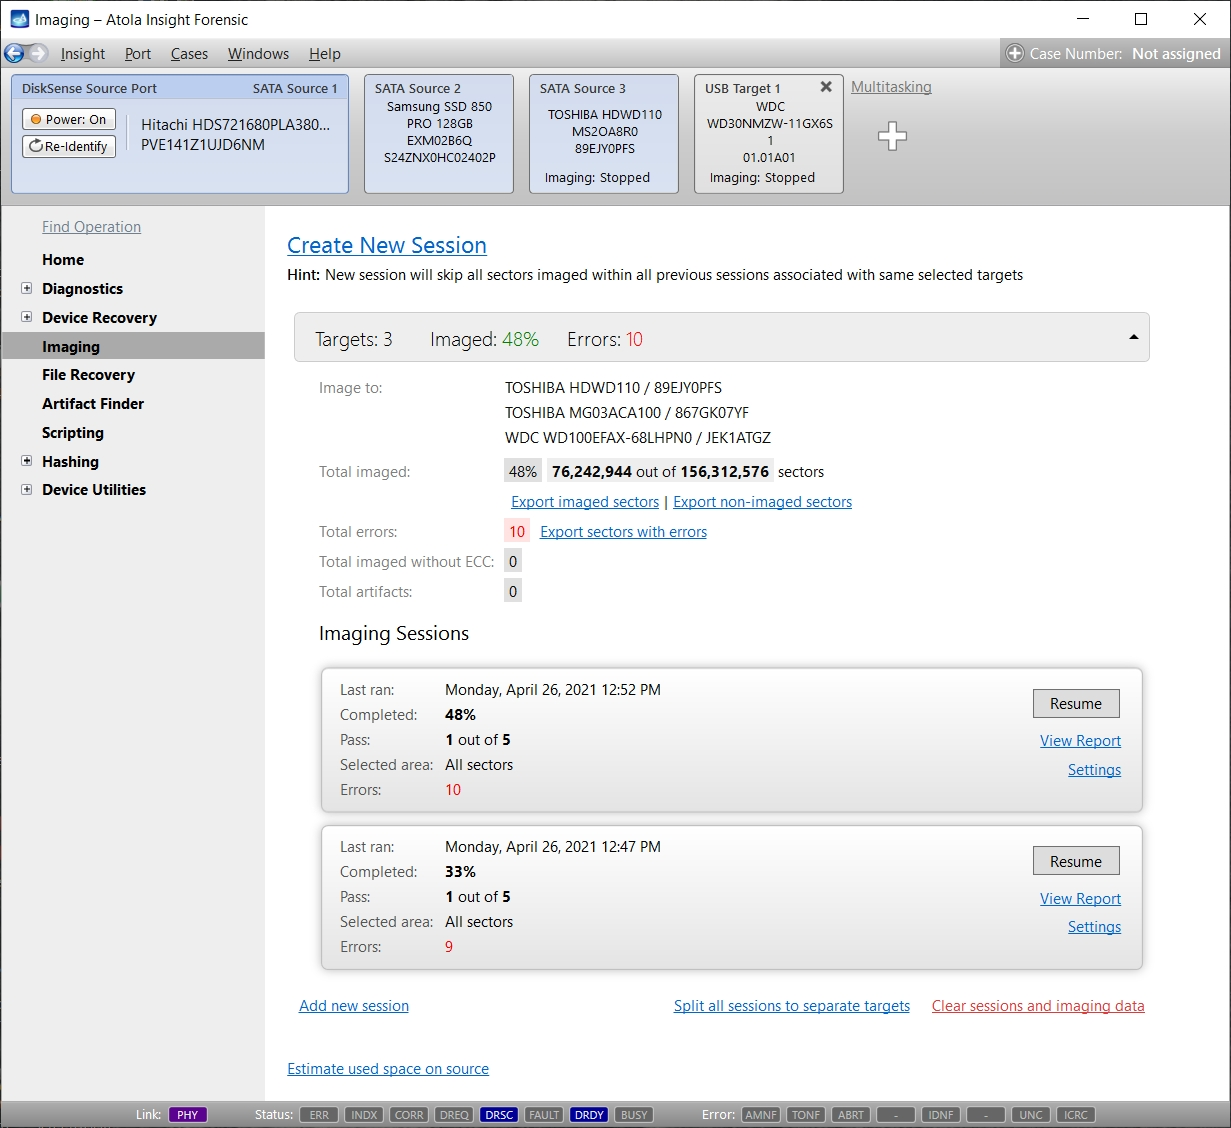
You can perform these actions during imaging:
- Pause the process (can be seamlessly resumed later at any time)
- Create new imaging session to the same targets with completely different settings. It will share the imaging map of the previous sessions, so that the previously imaged sectors don't have to be re-imaged.
- Restart imaging from any sector right away by pointing and clicking the overall map bar
- Change imaging settings and apply them immediately without even pausing the process
Once the imaging is over, all status information is automatically sent to the Case Management and File Recovery modules.
An imaging report contains all necessary information including SMART table of the source drive before and after imaging process.
Creating a forensic image file
Atola Insight can image a source drive into an image file. Just select a storage location on host PC and specify the image file size: put all data in a single image file or "chop" the data into a series of smaller chunks.
Supported image file types:
- E01
- AFF4
- Raw
Imaging only sectors with data
This option allows imaging only the sectors containing data from the source drive. The empty areas of the source drive will be skipped. This can substantially reduce the time spent on data transfer, relieve strain on the source drive and save space on the target.
Supported file systems: NTFS, APFS (with encrypted volumes), XFS, ext4/3/2, ExFAT, HFS/HFS+, FAT32, FAT16
Imaging only metadata
This imaging option allows copying the absolute minimum amount of data for file browsing to work. Once metadata has been imaged, choose specific files to be imaged in full.
Fully integrated File Recovery module
At the end of the imaging process, Atola Insight creates a Bad Sector Map and stores it in the Case history. The File Recovery module automatically refers to the Bad Sector Map, and marks all files hit by bad sectors.
It is a big time-saver: a list of recovered files has already been recorded during imaging, and the data is ready for browsing. Atola Insight is a 2-in-1 product that performs both imaging and file recovery.
For DiskSense units (manufactured in 2014 - 2020), check out this page about Drive Imaging.